iOS Audio Connect APP
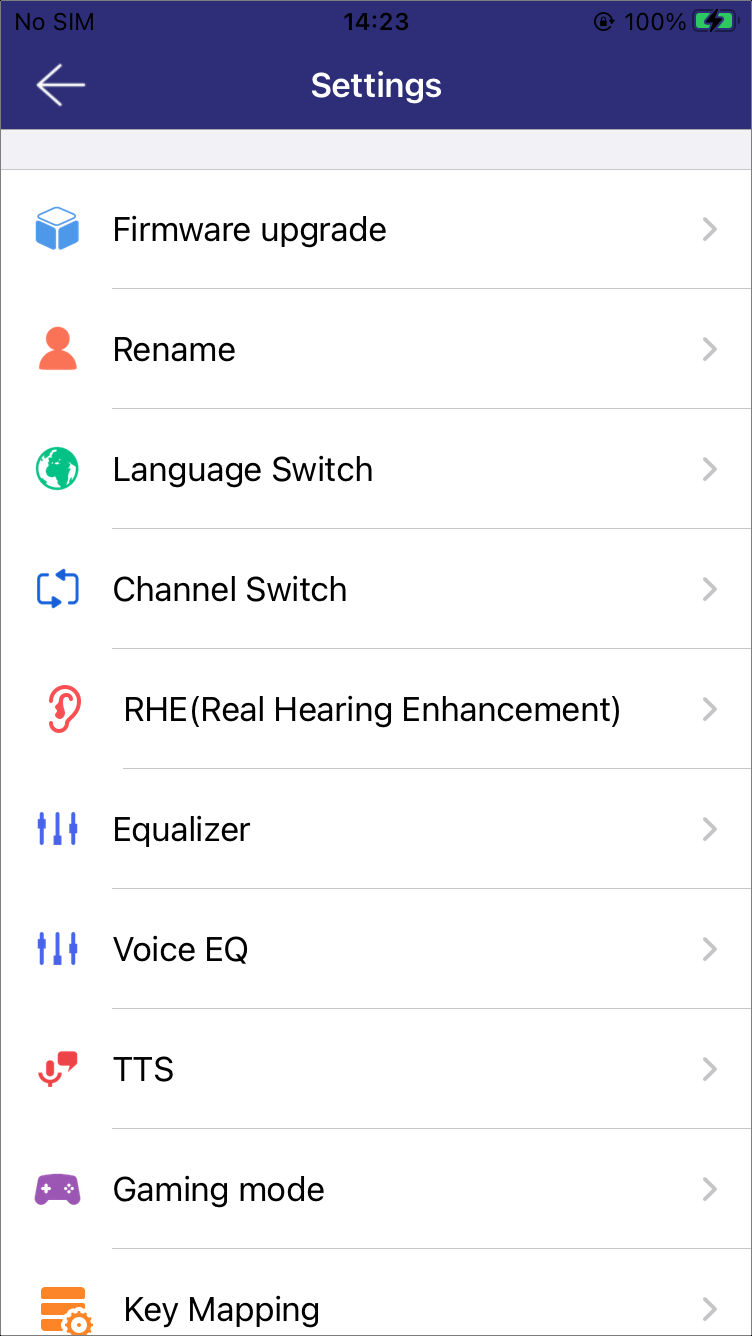
Audio Connect is an application designed to control Realtek Bluetooth earphones and headsets. It supports a wide range of features to enhance user experience, including:
Device Information Display: View the device name and battery level.
Firmware Upgrade: Upgrade the device firmware to ensure it runs the latest version.
Rename: Customize the device name.
Language Switch: Change the voice language of the device.
Channel Switch: Choose from three channel modes for different audio experiences.
-
Real Hearing Enhancement: Optimize hearing effects by switching listening modes and adjusting configurations in each mode.
Hearing Aid Adjustment: Fine-tune hearing aid settings for personalized audio.
Hearing Assessment Test: Conduct a simple hearing test to understand user's hearing condition.
Equalizer: Customize the built-in sound effects for music.
Voice EQ: Adjust EQ parameters during calls for clearer voice quality.
TTS: Get caller information before answering calls.
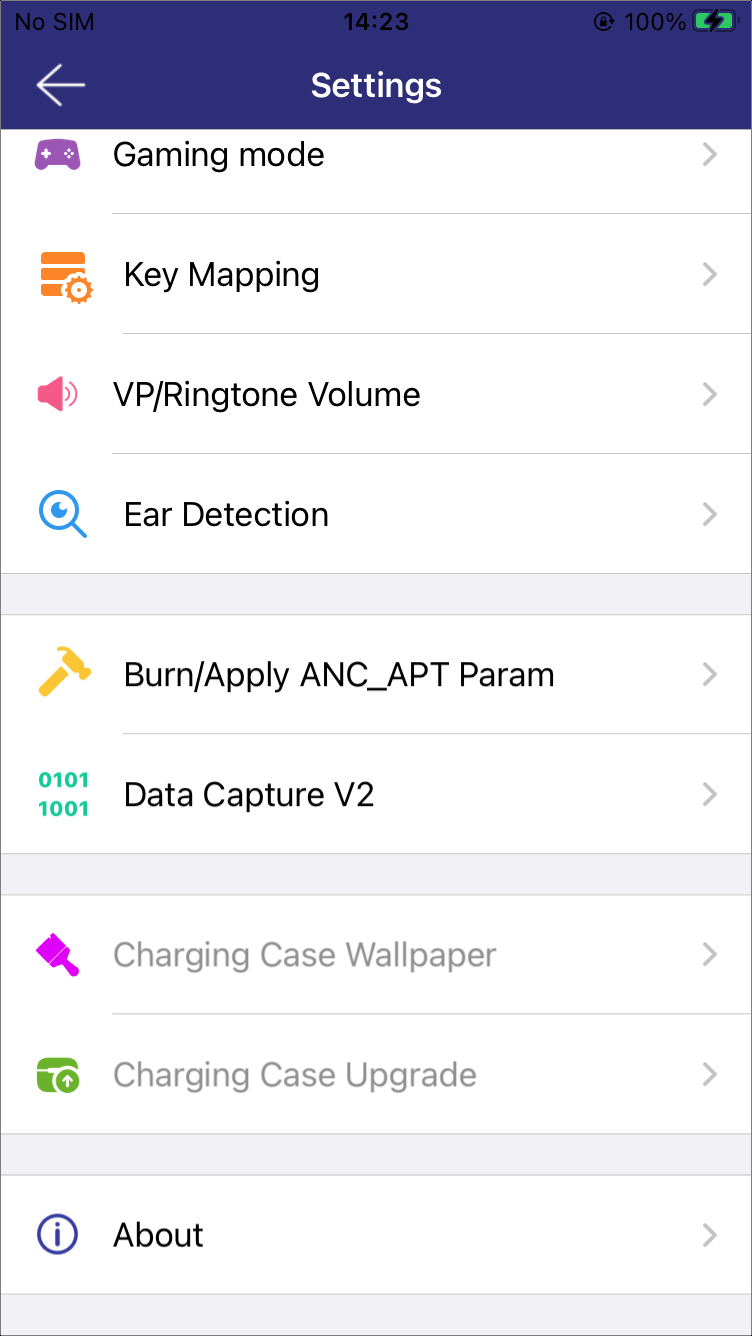
Gaming Mode: Enable or disable gaming mode with five delay levels for optimal gaming audio.
Key Mapping: View and customize the mapping between key actions and their corresponding functions.
VP/Ringtone Volume: Adjust the volume for VP and ringtones.
Burn/Apply ANC_LLAPT Parameters: Write ANC or LLAPT parameters to the device.
Data Capture V2: Capture DSP logs via Bluetooth Low Energy.
Supported operating system: iOS 11.0 & later.
Device Connection and Version Information
-
View Version Information
On the Home Page, click About to view the current APP version, as shown in Version Information.
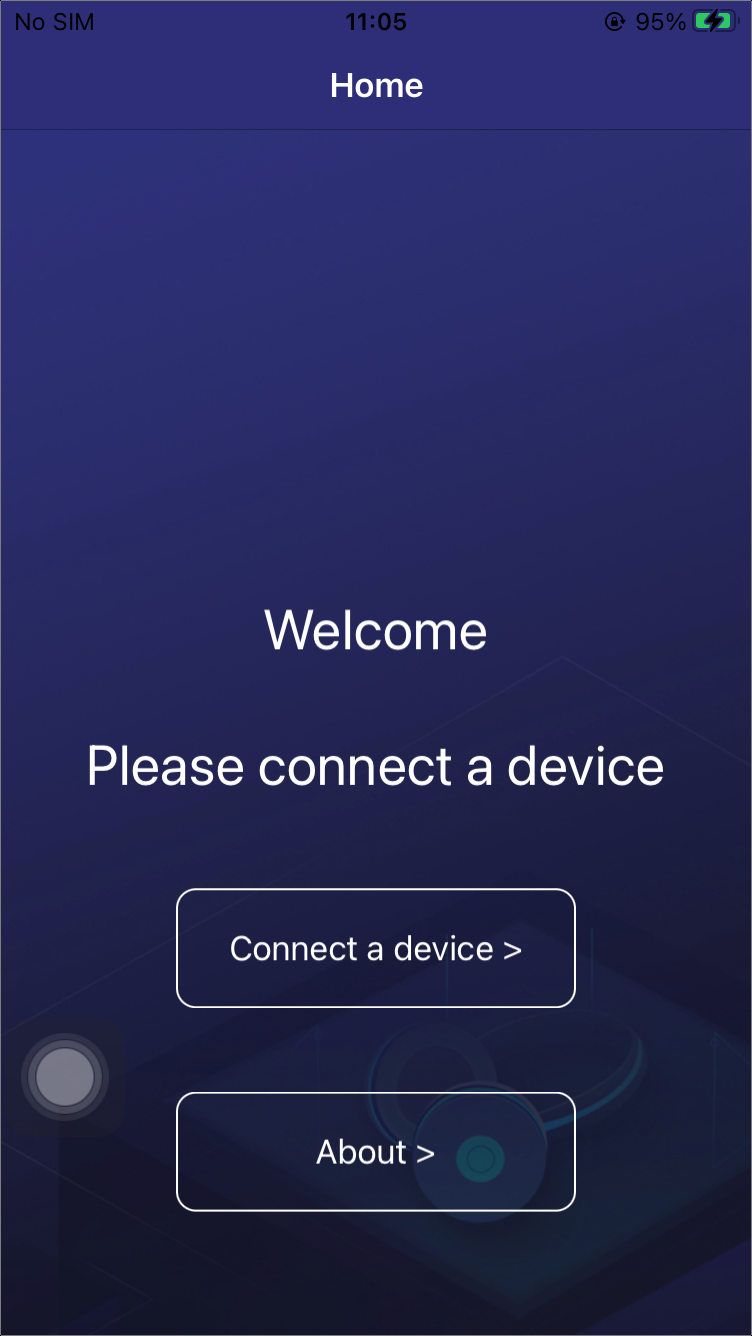
Home Page
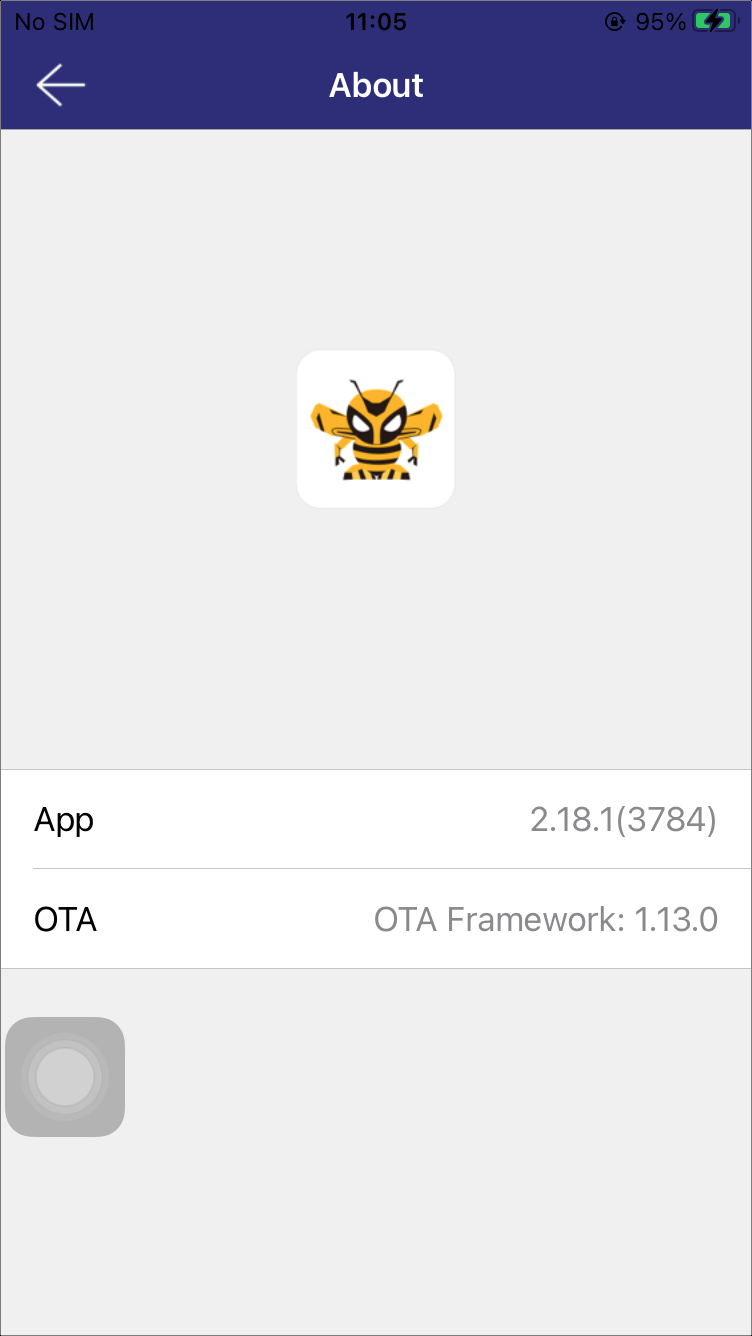
Version Information
-
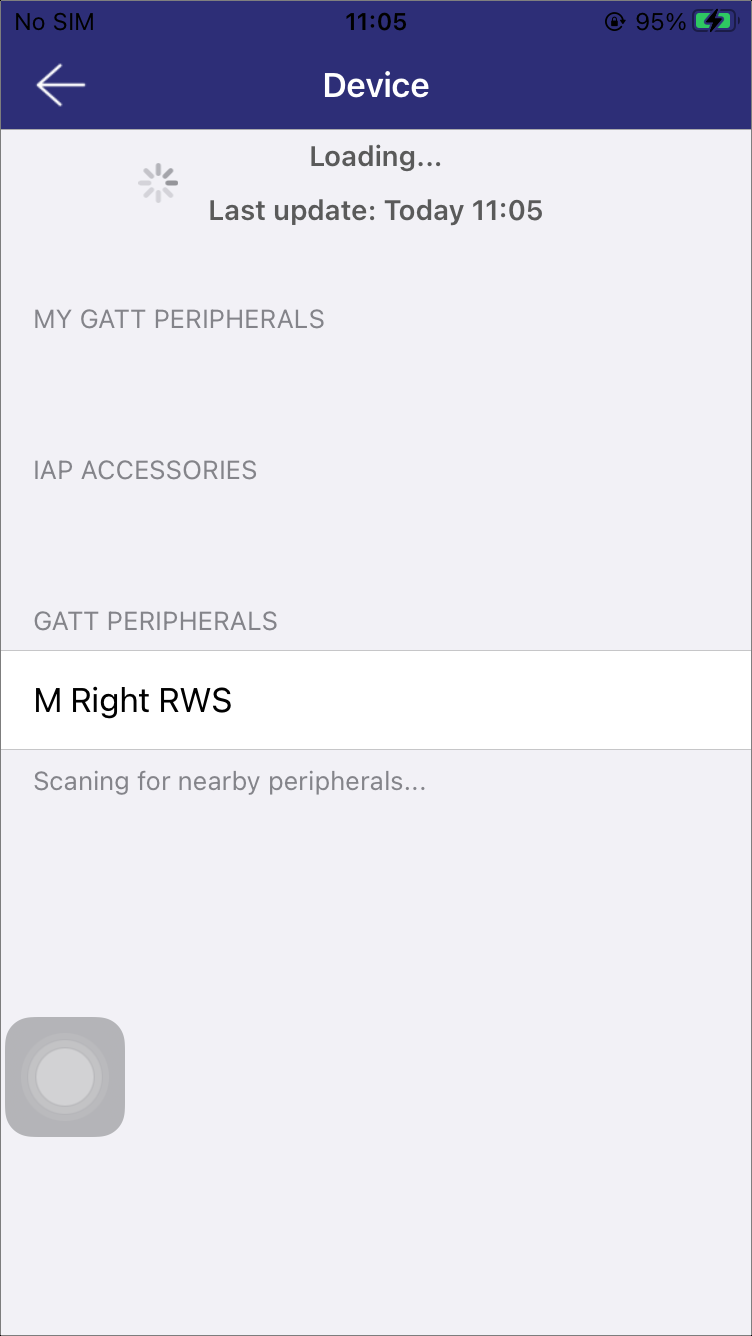
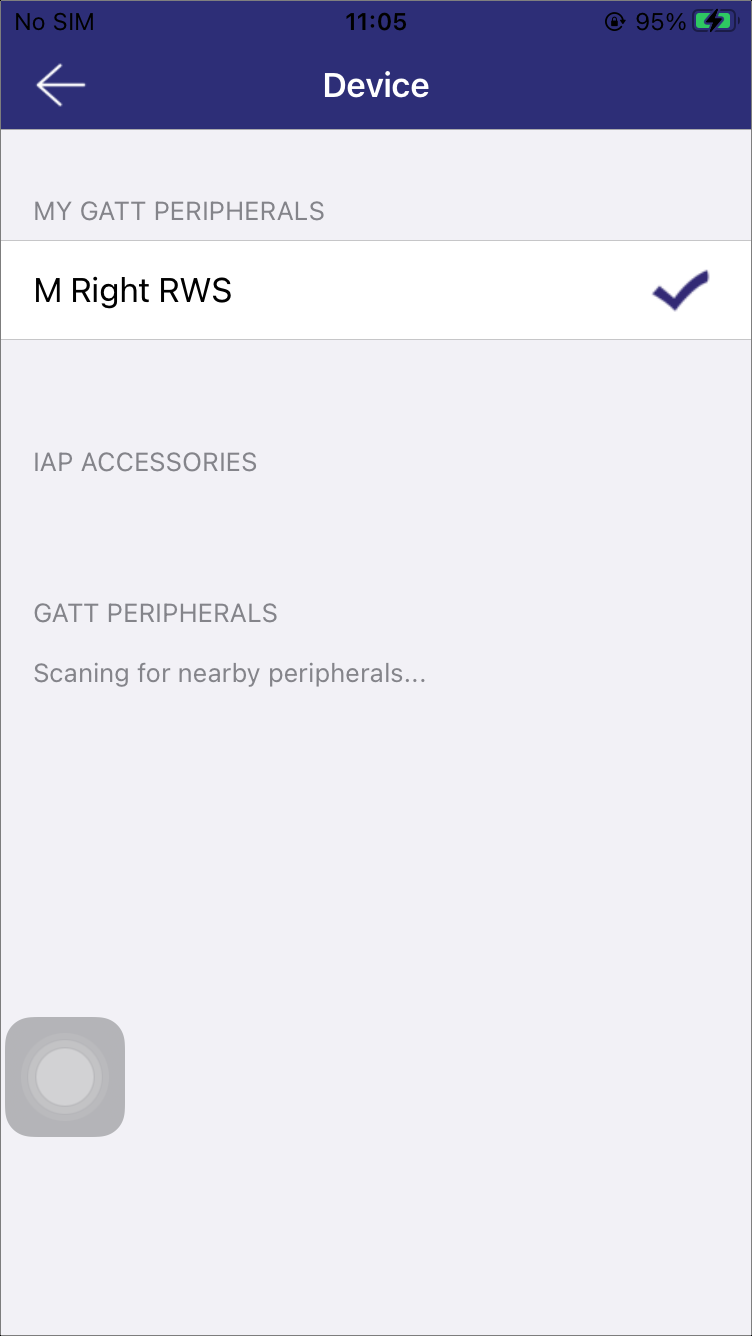
Connect to a Device
Click Connect a device, then select the target device from the IAP ACCESSORIES or GATT PERIPHERALS list on the Device page, as shown in Device List.
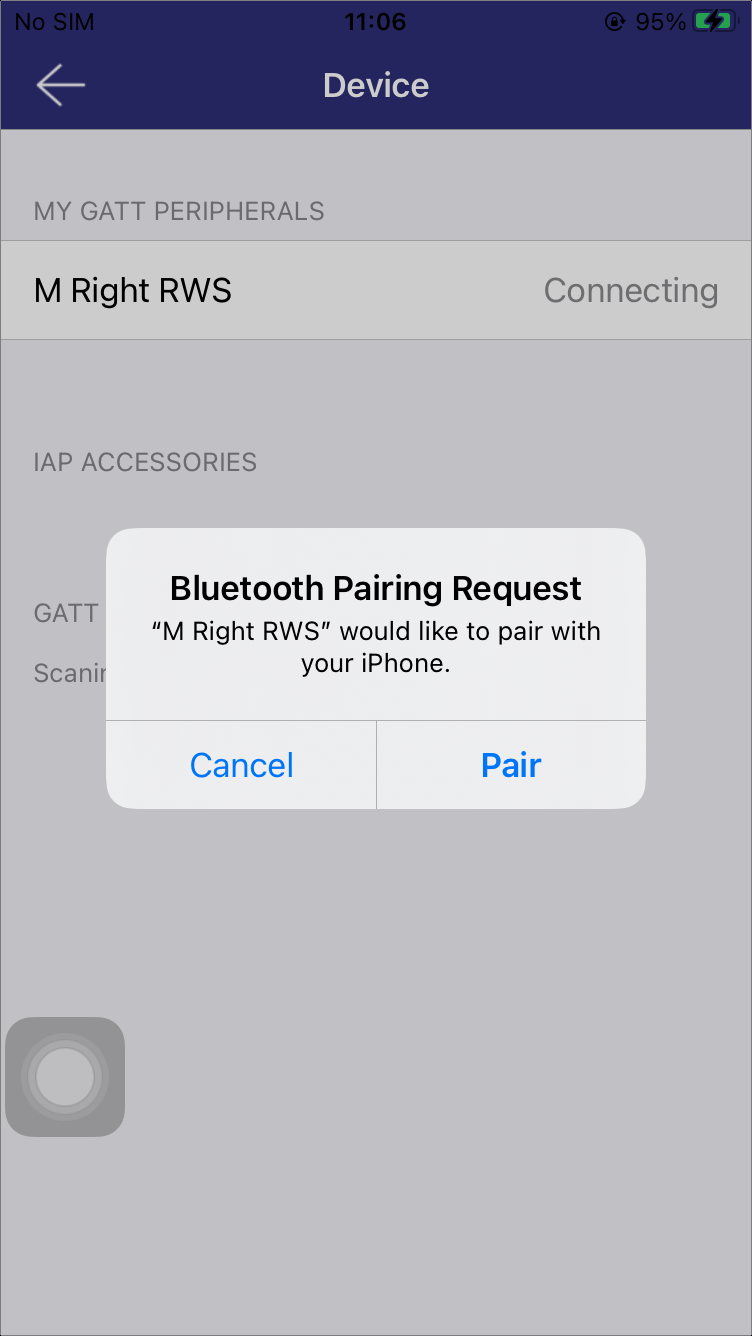
Taking a GATT device as an example, after selecting the device, it will appear under the MY GATT PERIPHERALS. If connecting for the first time, a pairing dialog will pop up. Click Pair and if the icon changes to a check mark, the connection is successful, as shown in Pairing Request and Device Connected.
Device List
Pairing Request
Device Connected
-
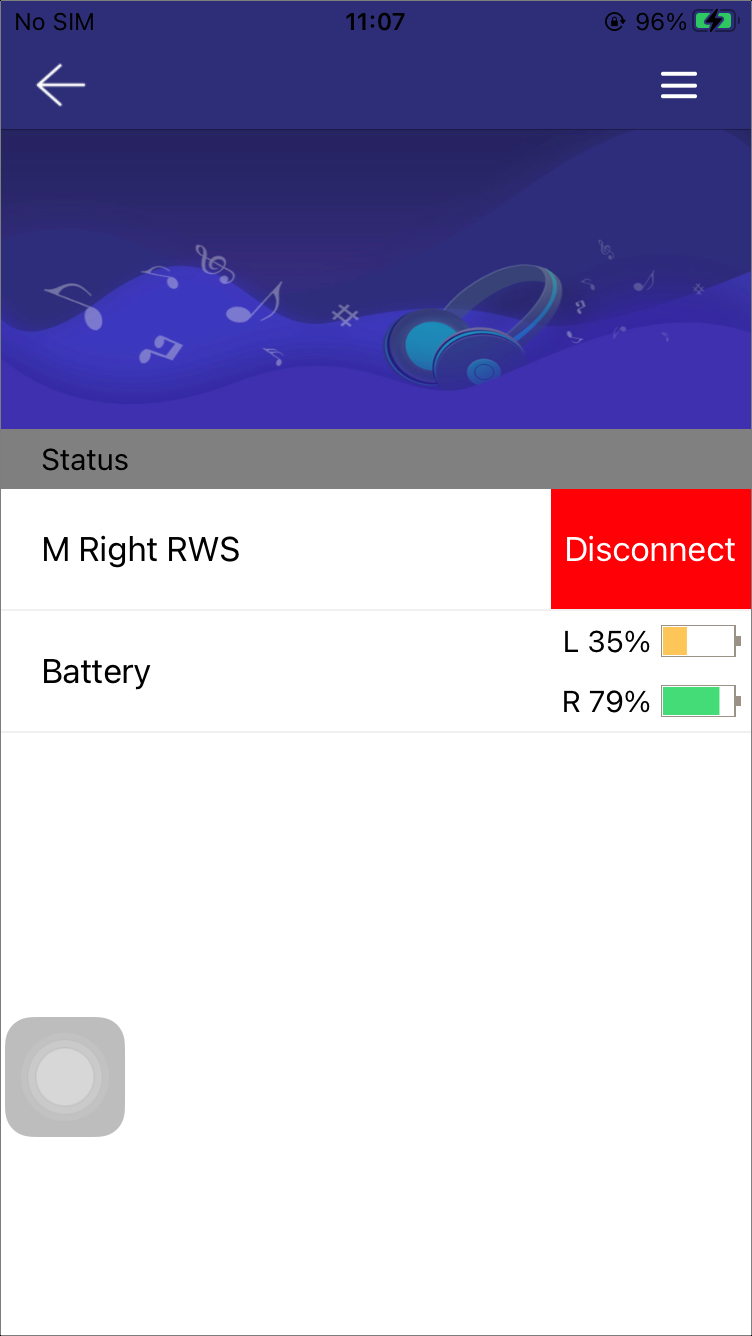
Connection Status and Battery Information
If the connection is successful, click the device row to view the connection status and battery levels: C-case battery, L-left battery, R-right battery, as shown in Status.
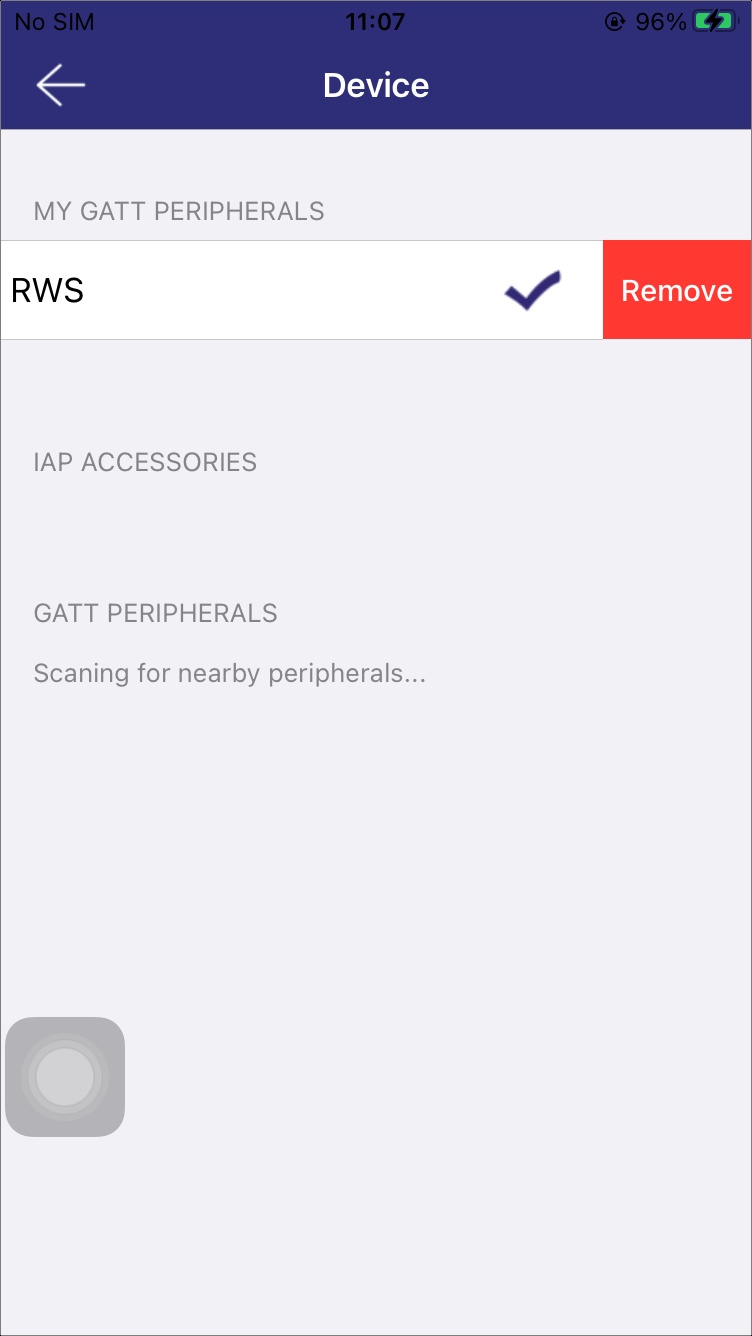
Disconnect a Device: Click the Disconnect button, or slide the device row to the left and click Remove as shown in Remove the Connected Device.
More Settings: Click the button in the top right corner for additional settings. If the font color is gray, it means the function is not supported, as shown in Setting 1 and Setting 2.
Status
Remove the Connected Device
Setting 1
Setting 2
Firmware Upgrade
This module allows users to upgrade the device firmware to ensure it runs the latest version.
-
Access the OTA Page
Select Firmware upgrade to enter the OTA page. The current firmware information will be displayed (see OTA). Before proceeding, check the RWS State to ensure compliance.
-
Select Upgrade File
Click Select File to choose firmware file for upgrade on Firmware page, as shown in File List. If the file list is empty, click the button in the top right corner for instructions.
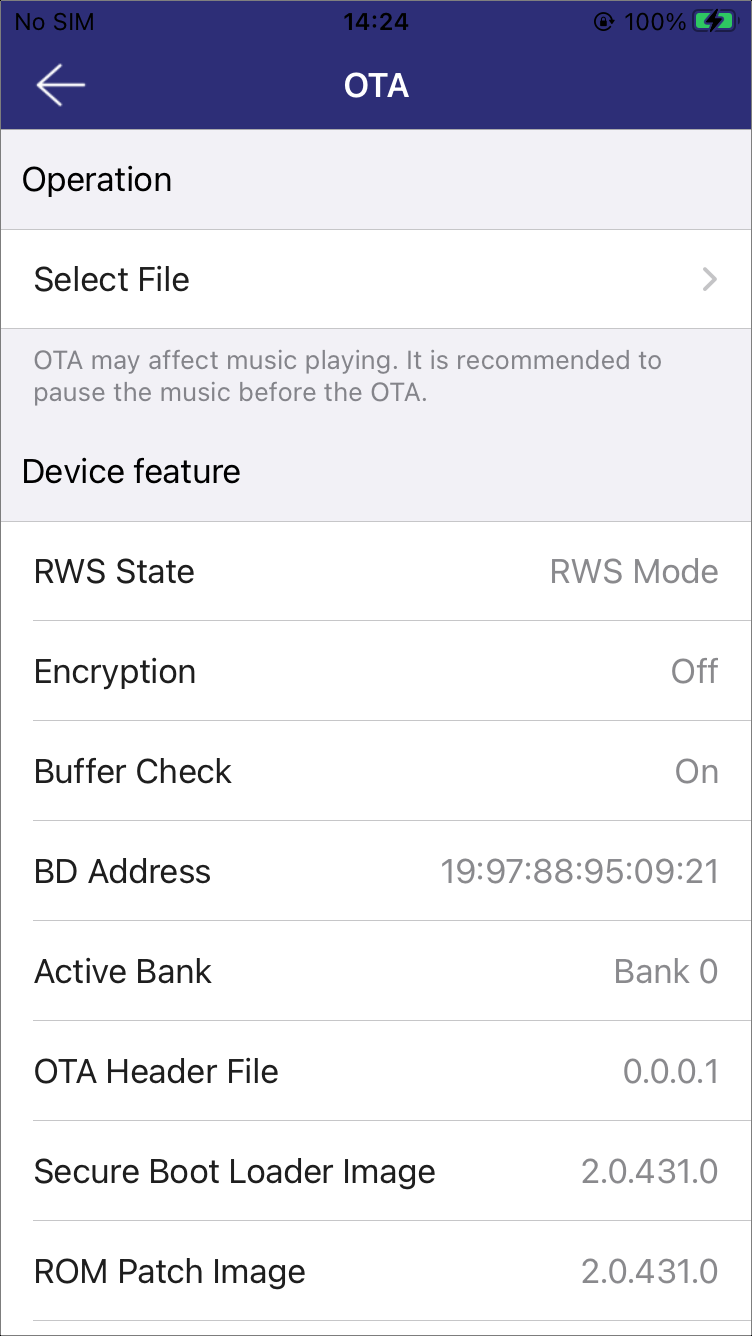
OTA
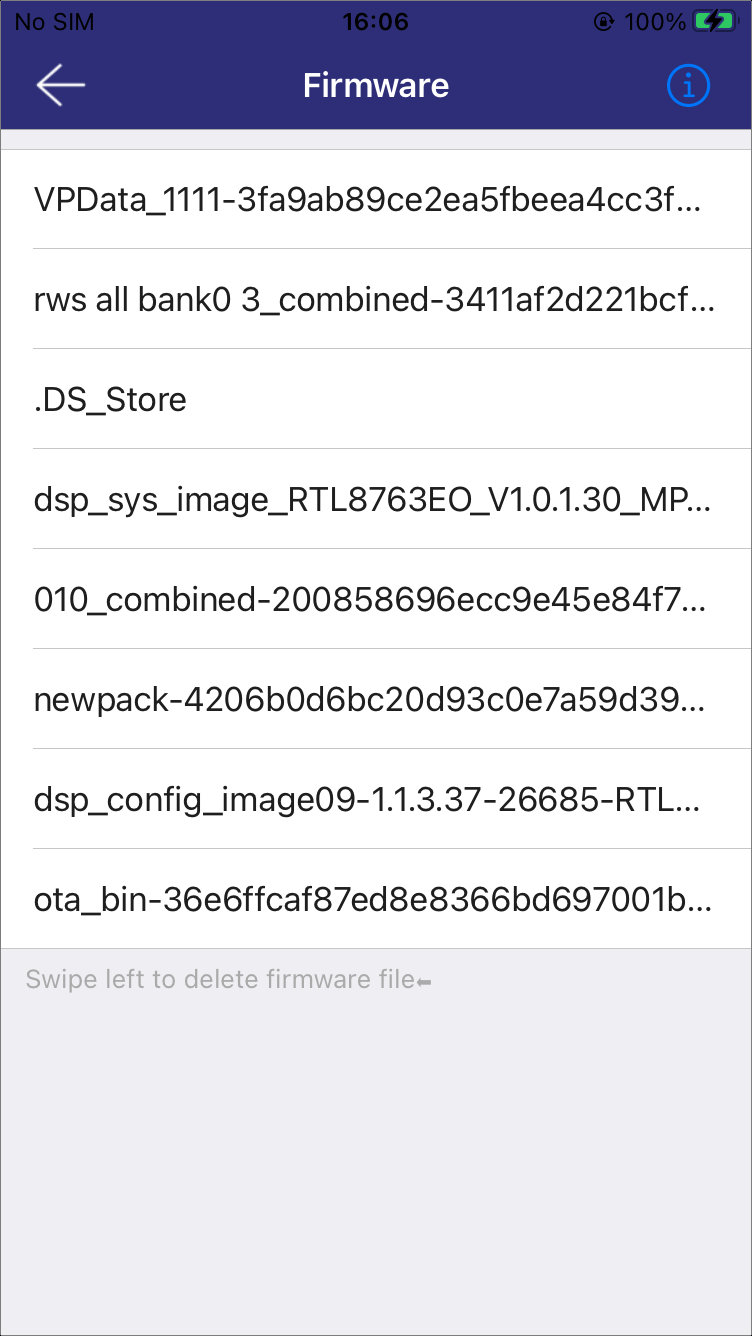
File List
-
Start the Upgrade
After selecting the firmware, the Upgrade option will appear, as shown in Start OTA.
Click Upgrade to begin the process. The upgrade progress will be displayed, as shown in OTA Progress.
Once the upgrade is complete, the device will restart, and the APP will automatically reconnect. Confirm the connection status on the Status page.
Note
OTA upgrade may affect music playing. It is recommended to pause the music before starting the OTA process to ensure a smooth upgrade.
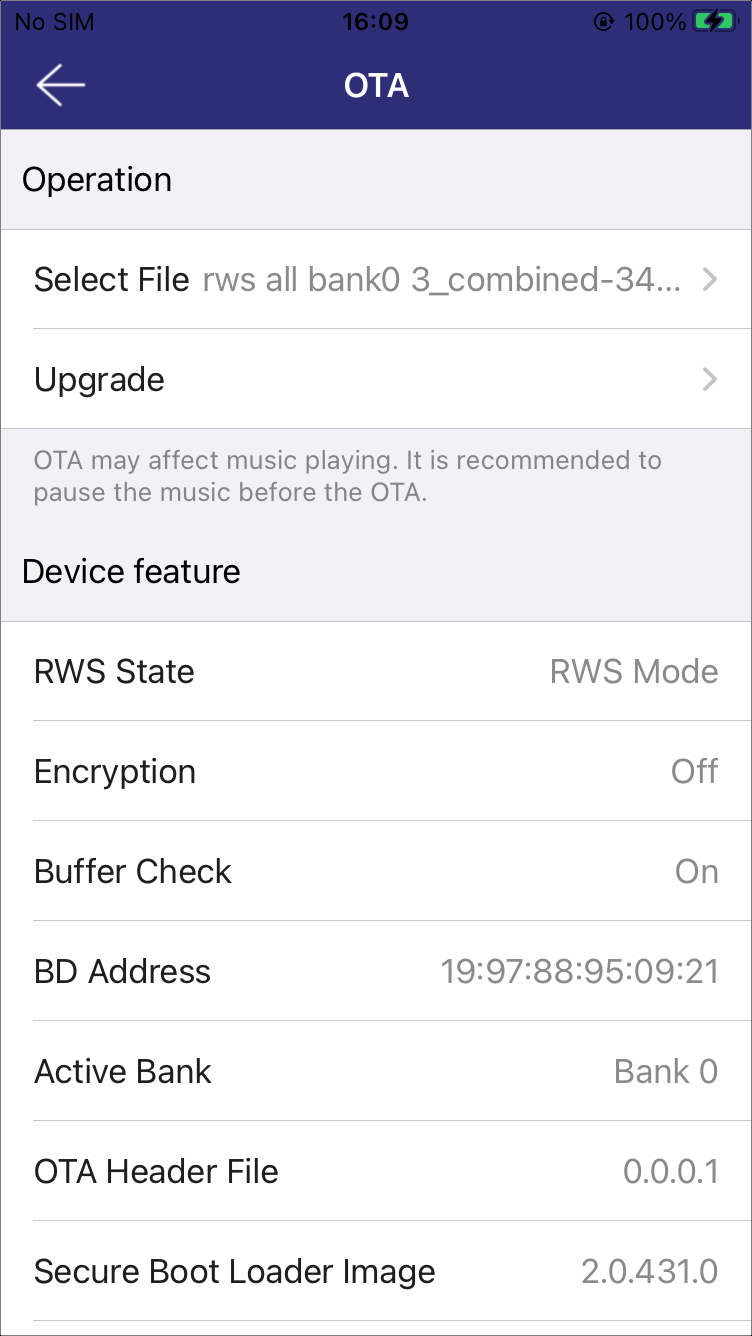
Start OTA
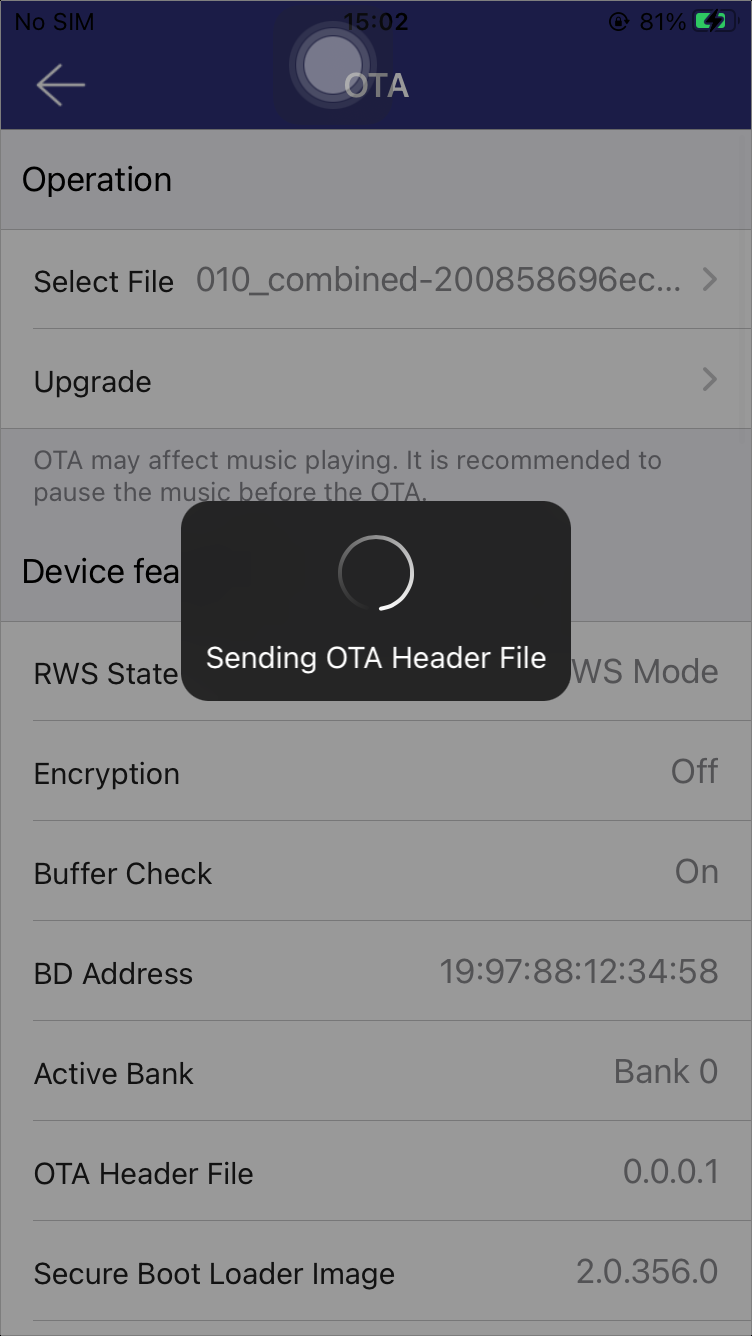
OTA Progress
Rename
This module allows users to customize the name of their device for easier identification. In the pop-up menu, enter a new device name into the name field, as shown in Rename.
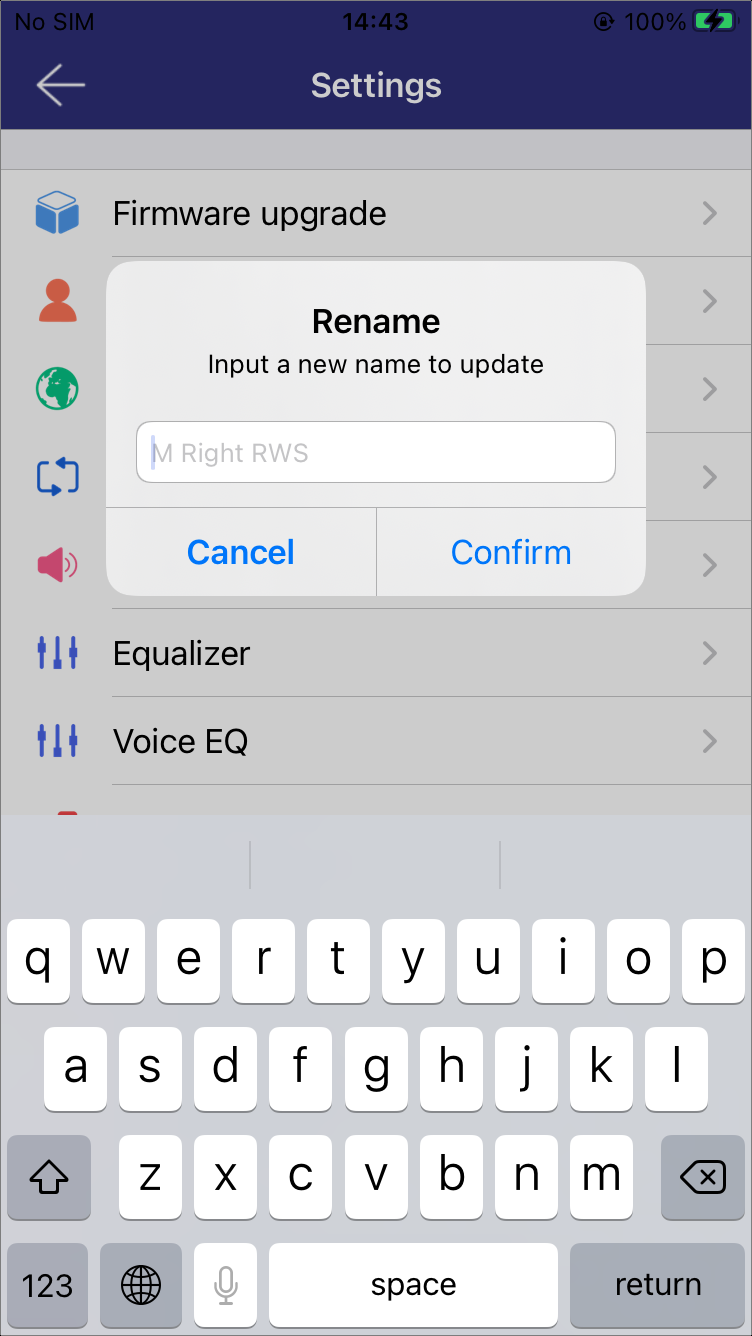
Rename
Language Switch
This module allows users to change the voice language of the device for a personalized experience. Currently, the supported languages include Chinese and English.
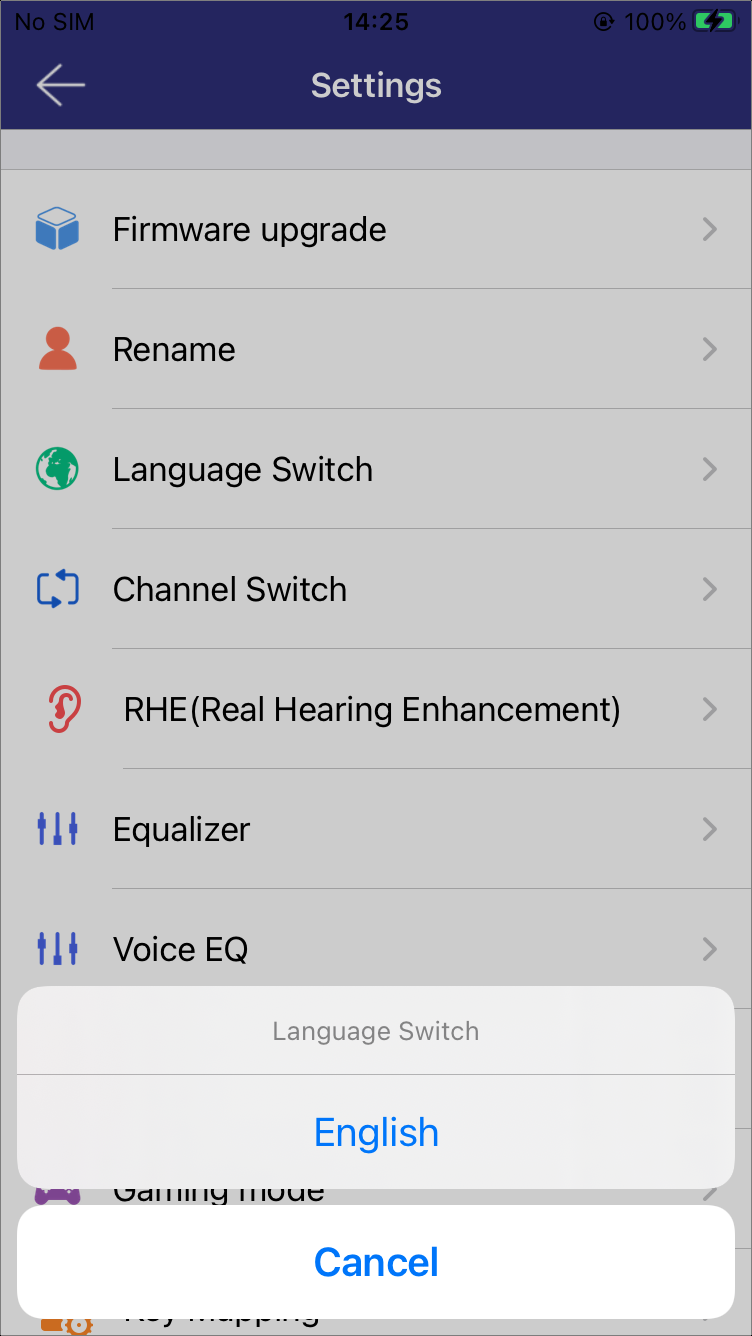
Language Switch
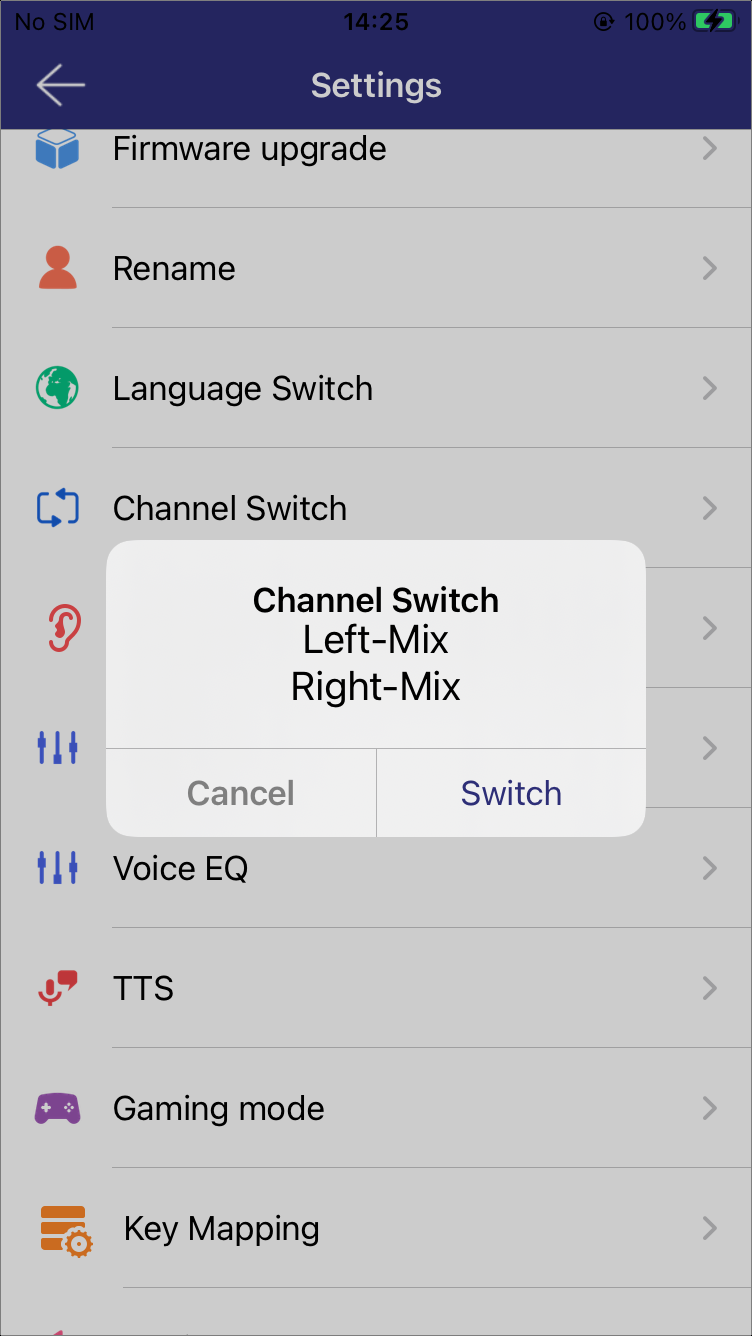
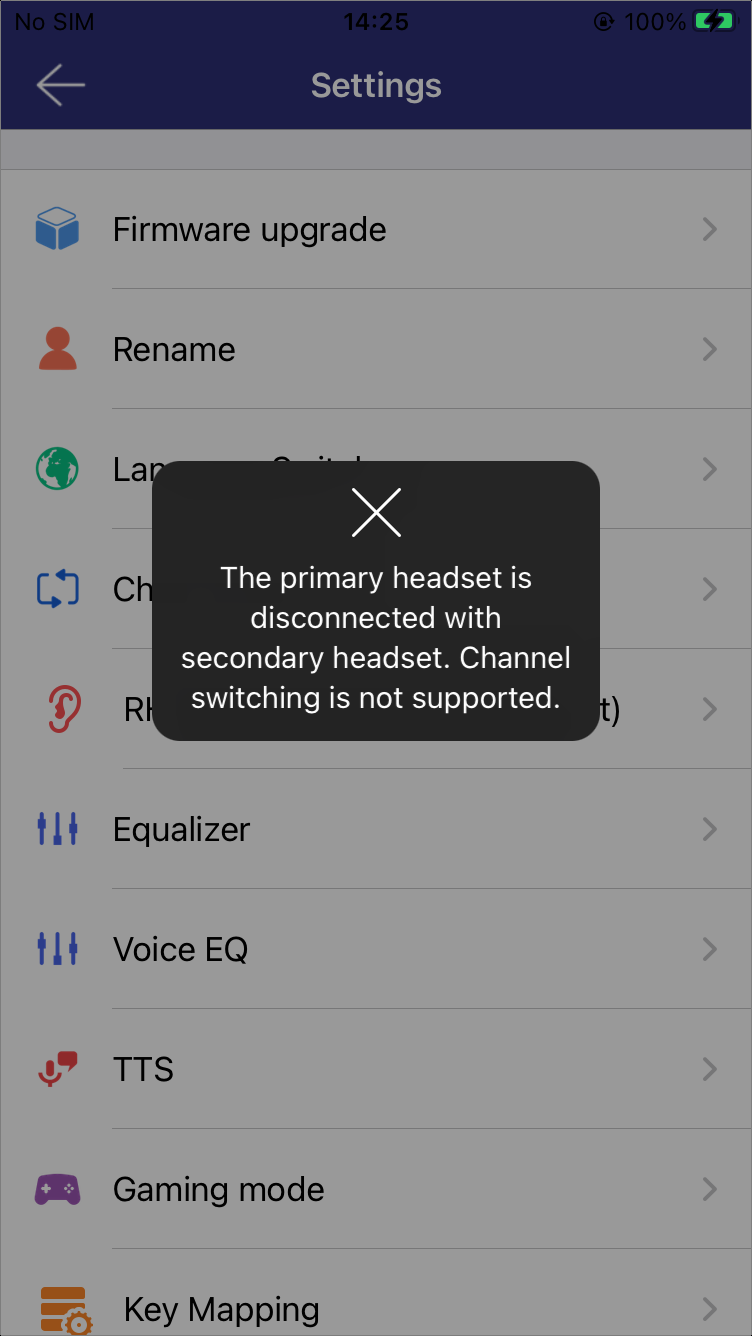
Channel Switch
This module allows users to switch between three audio channel modes, providing flexibility for different listening preferences and scenarios.
Left-Left Channel | Right-Right Channel: The left and right audio channels are played independently through their respective earbuds.
Left-Right Channel | Right-Left Channel: The left and right audio channels are swapped between the earbuds.
Left-Mix | Right-Mix: A mixed audio signal is played through both earbuds.
Note
Channel switching is not supported when the primary headset is disconnected from the secondary headset.
Channel Switch |
Channel Switch Failed |
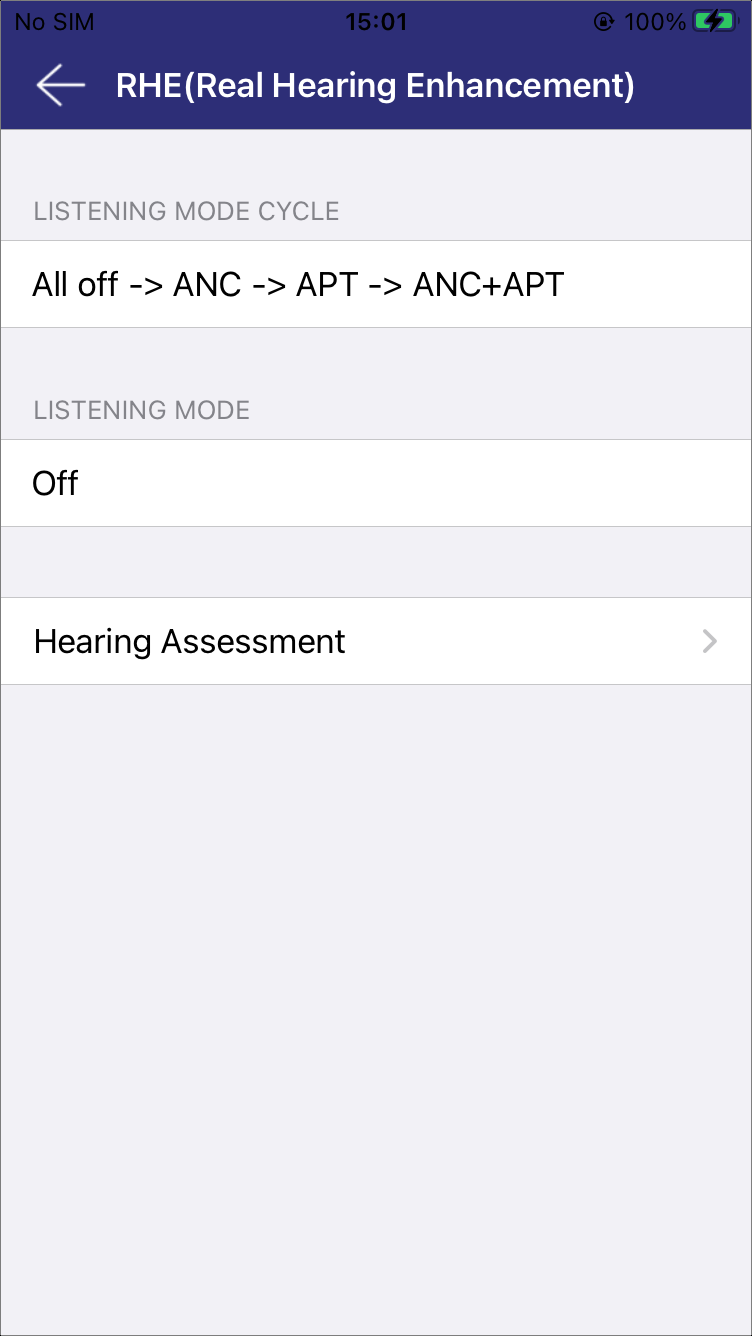
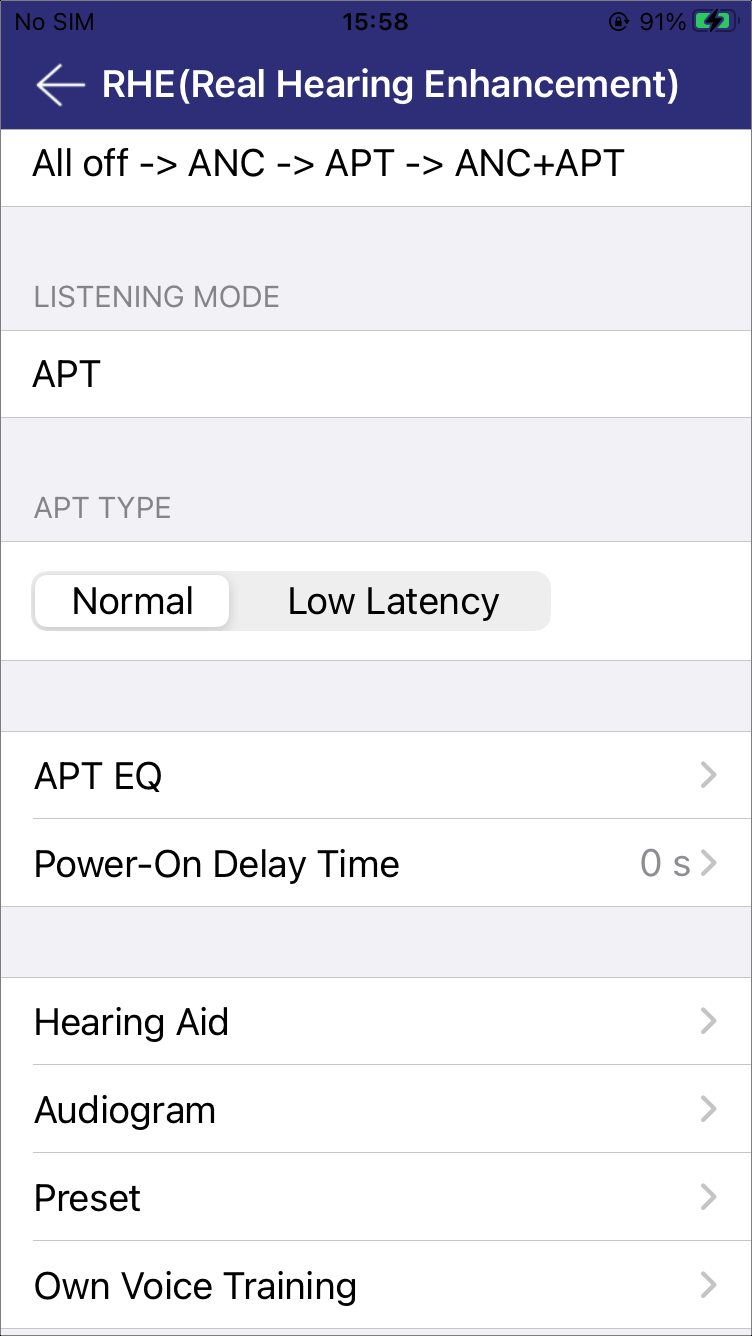
Real Hearing Enhancement
This module allows users to optimize their listening experience by switching between different listening modes and customizing the configuration within each mode.
Listening Mode Cycle
This feature allows users to configure a sequence of listening modes, which can be cycled through using device keys.
Tap the LISTENING MODE CYCLE cell to to bring up a selection box. Choose the preferred option from the six supported cycling modes. The Custom Mode enables personalized sequence loops.

Listening Mode Cycle
Listening Mode
Multiple listening modes are tailored for different environments, including: Off, ANC, Normal APT, Low Latency APT, and ANC+APT.
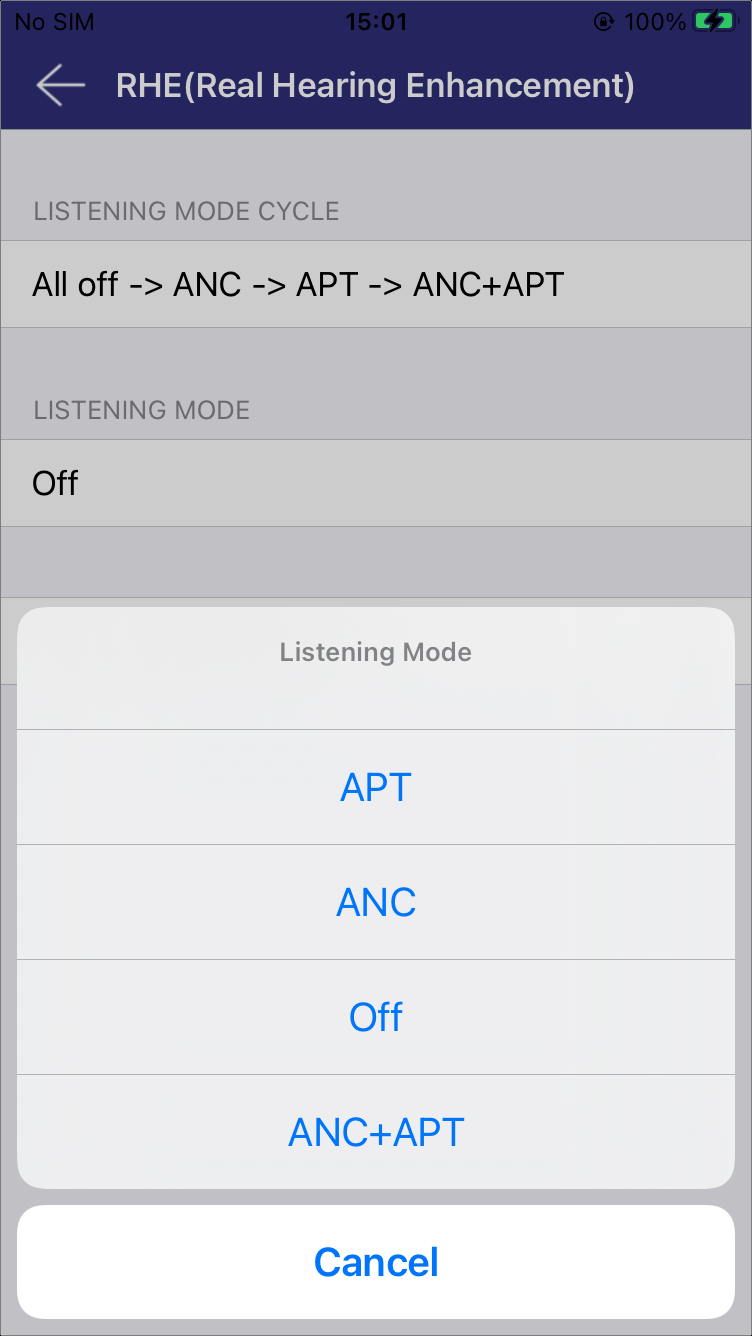
Listening Mode
OFF
In the Off mode, where all audio enhancements are disabled, a Hearing Assessment Test can be performed. Personalized hearing settings can then be configured based on the results of this assessment.
OFF
ANC
ANC mode reduces background noise for a quieter listening experience.
A variety of application scenarios are available for selection, such as High, Low, Family, Library, Airplane, Subway, Outdoor, Running, Line-in and Custom. Users can configure these scenarios as shown in ANC Scenario Group Setting.

ANC Scenario |
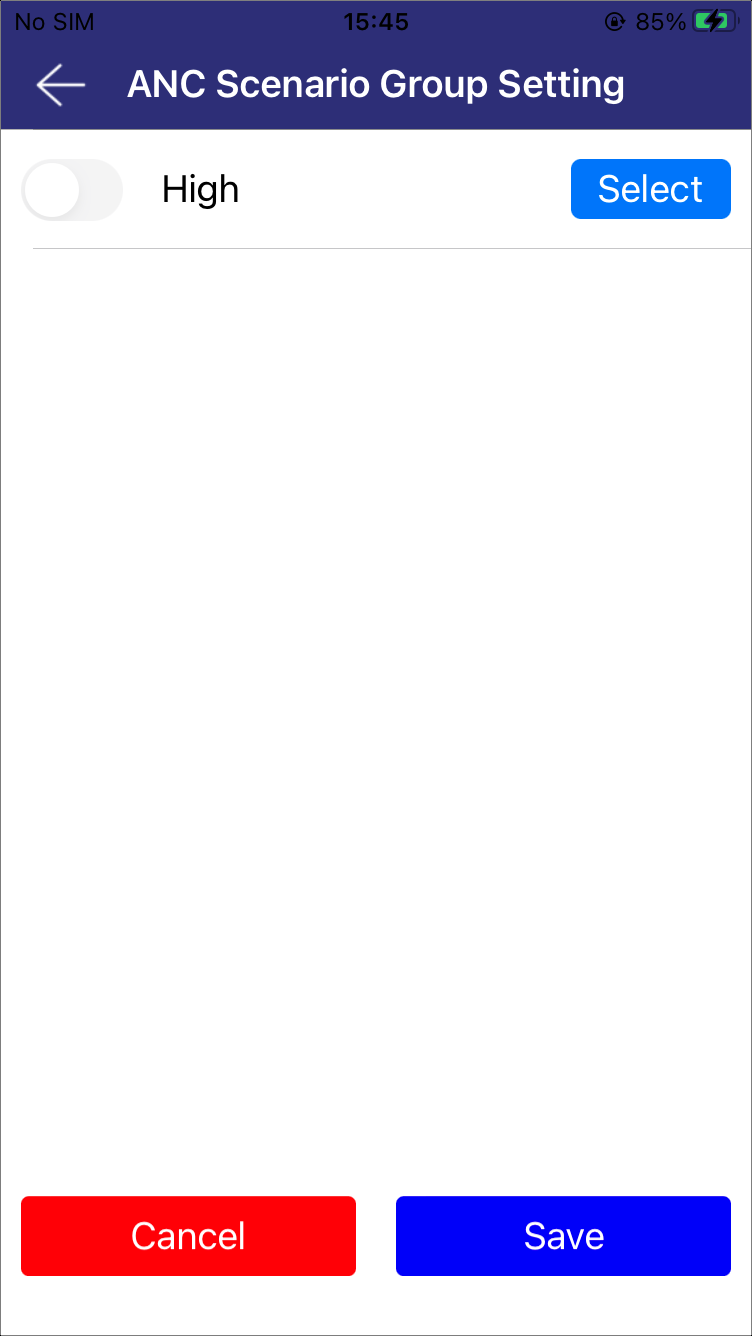
ANC Scenario Group Setting |
Normal APT
APT mode allows external sounds to pass through for better environmental awareness.
This mode offers several configurable options, including APT EQ, Power-On Delay Time, Hearing Aid, Audiogram, Preset, and Own Voice Training.
Normal APT
-
APT EQ
Users can choose from various preset EQ sound effects or customize their own sound effects using the sliders, as shown in APT EQ.
Click Save to store the custom effect.
Click Reset to restore the factory default effect.
LEFT|RIGHT allows selection of the earbud. If the segment component is absent, the device does not support separate adjustments.
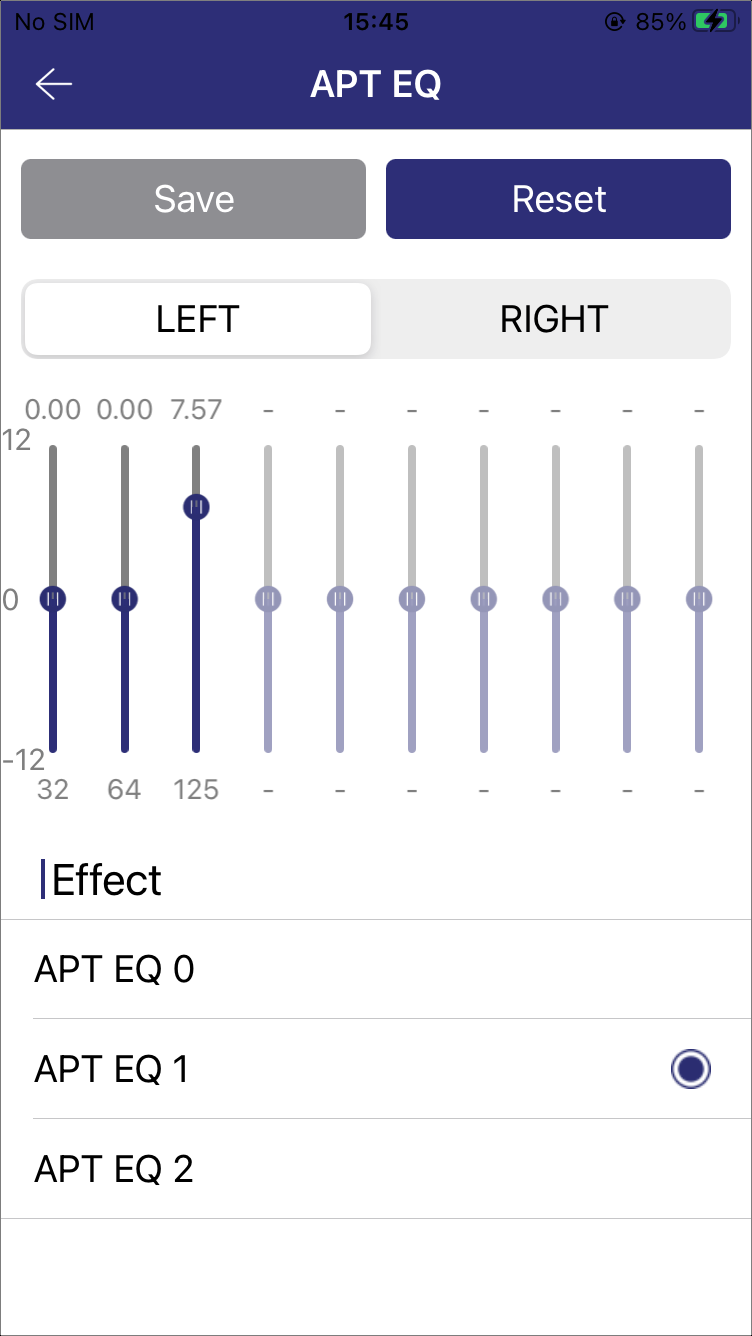
APT EQ
-
Power-On Delay Time
This feature allows users to configure a delay time for APT after the device is powered on. By setting a specific delay duration, users can ensure that all systems are fully initialized and stable before APT begins operation. The time range is 0-31 seconds.
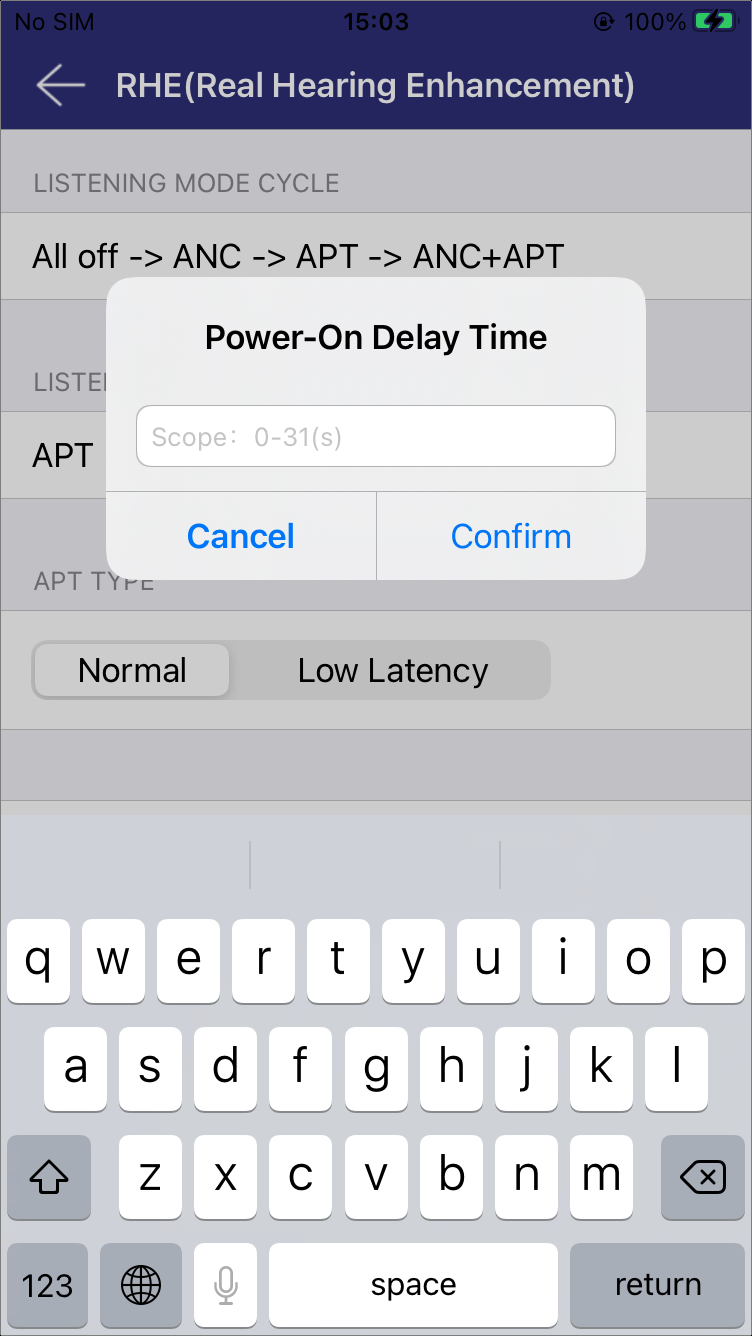
Power-On Delay Time
-
Hearing Aid
Provide more configurable options to improve hearing. Refer to Hearing Aid Adjustment for details.
-
Audiogram
The user's hearing level data is presented in two formats for comprehensive analysis:
Audiogram: Offers an intuitive overview of hearing levels.
Table: Provides exact values for in-depth analysis.
Base on this data, the APP will indicate the hearing loss level for reference.
If the results are satisfactory, click Apply compensation to hearing buds to apply the generated compensation data to address the hearing loss, as shown in Apply HA Compensation.
If the results are unsatisfactory, click + in the upper right corner to access the Pitch Thresholds interface for further adjustments, as shown in Edit Thresholds UI and Update Thresholds.
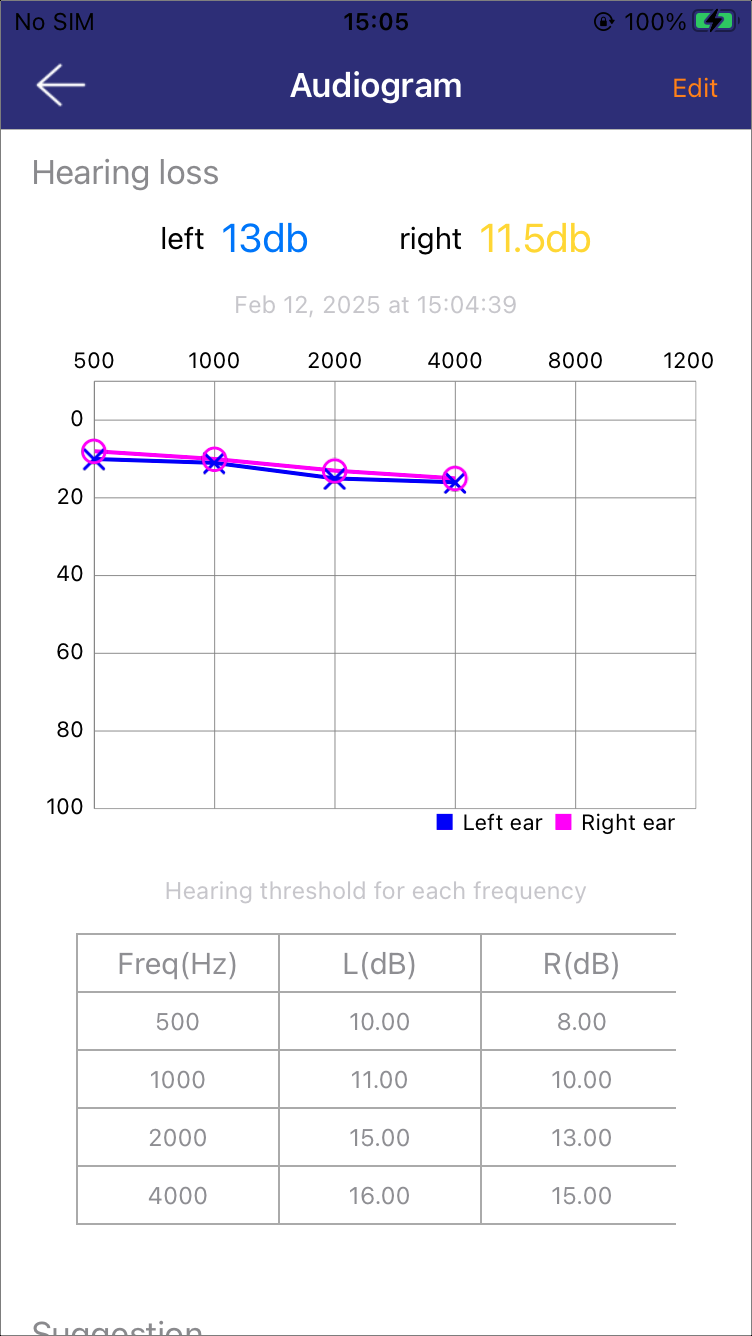
Audiogram
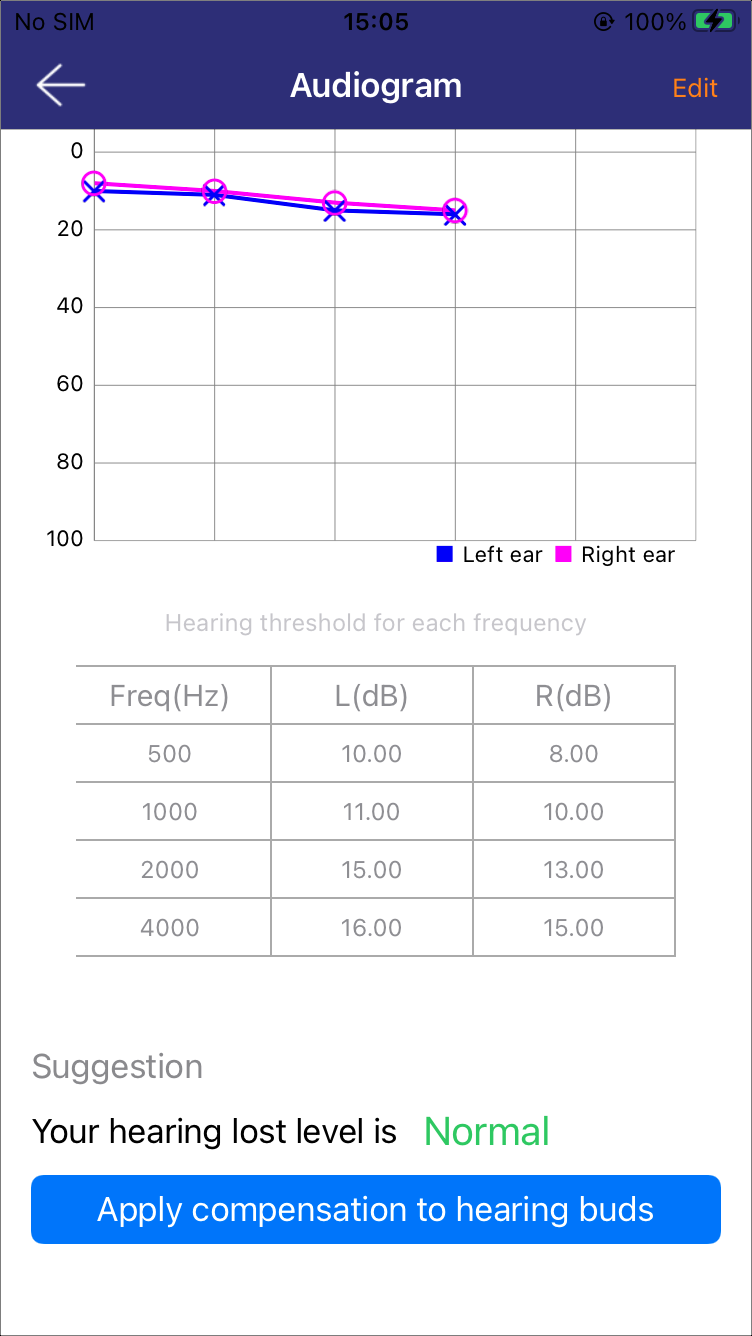
Apply HA Compensation
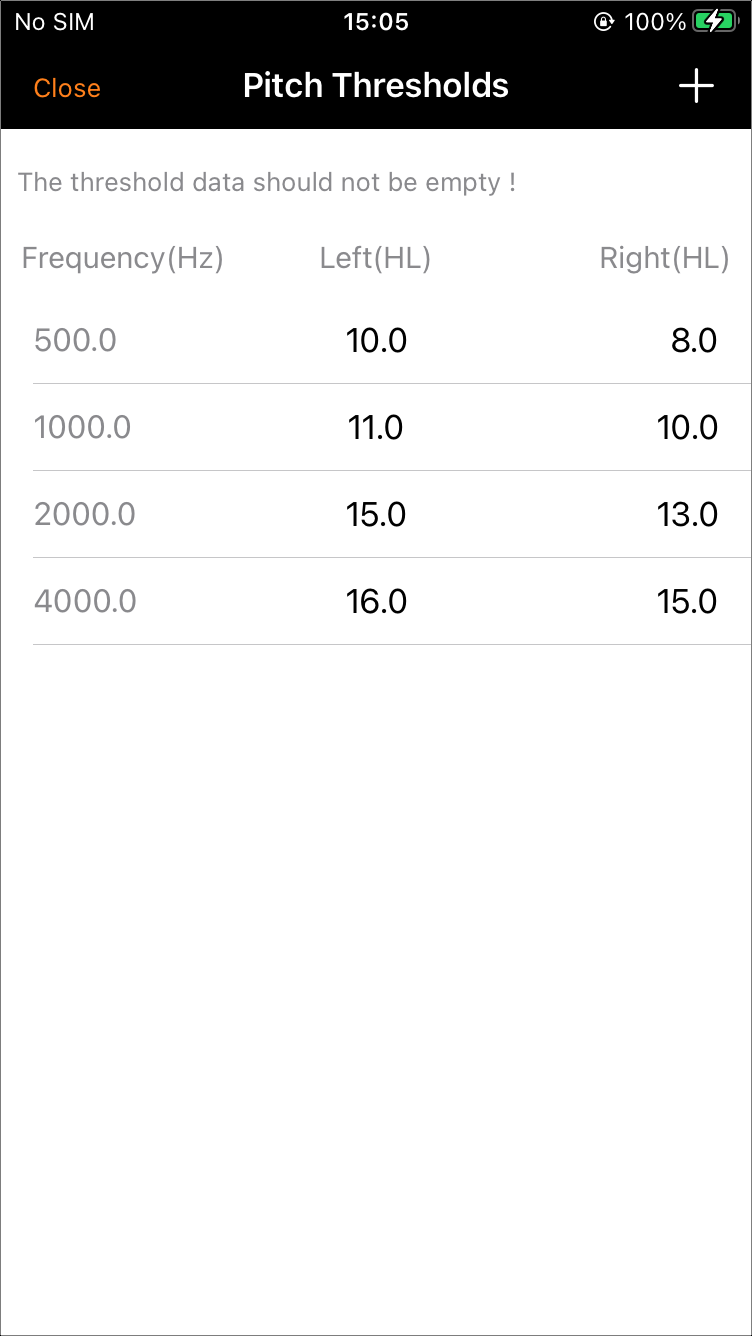
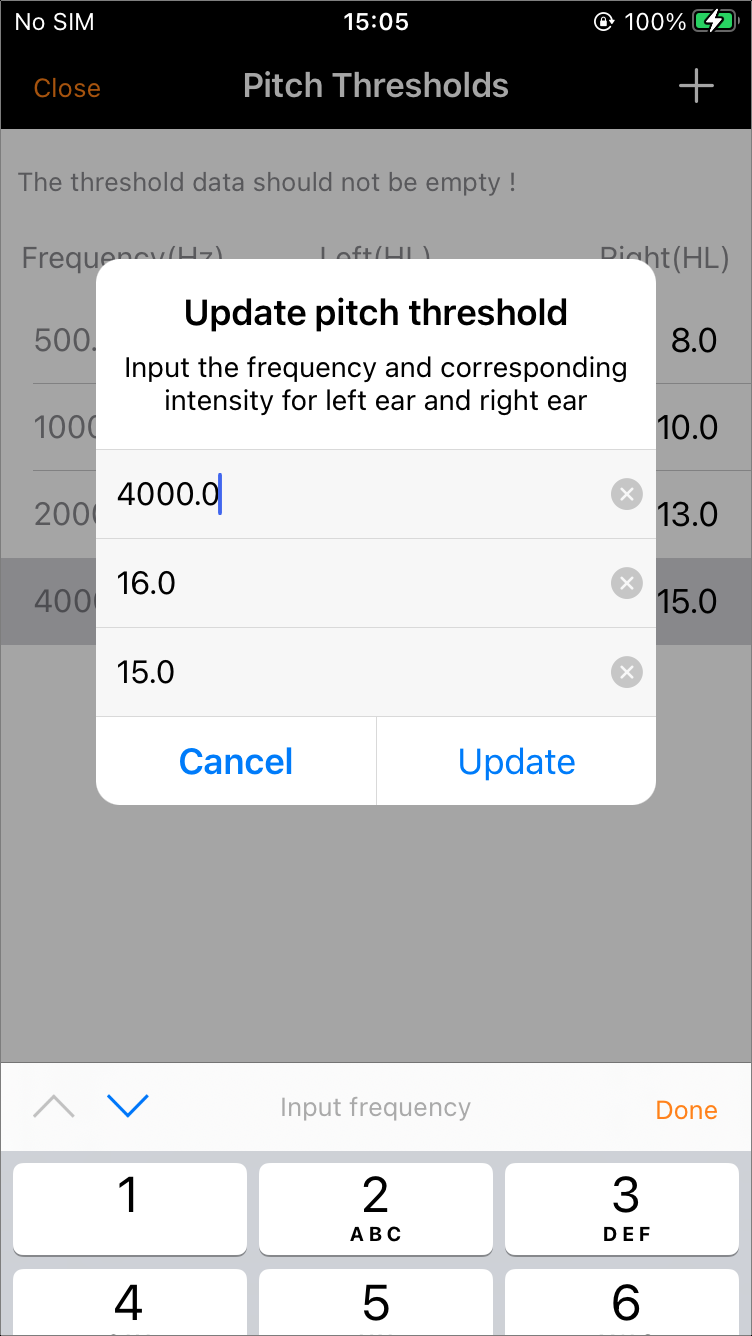
Update Thresholds
-
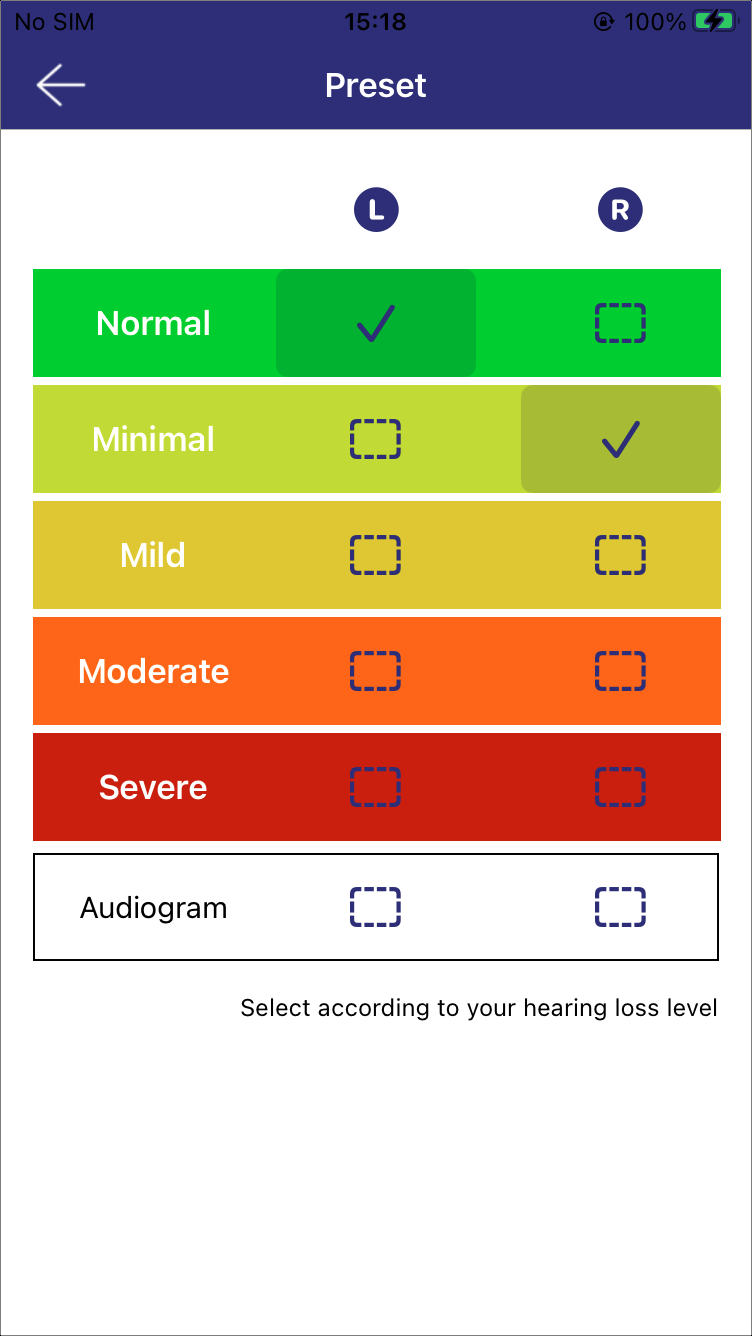
Preset
Allows users to select a preset hearing loss level that best matches their hearing condition. The available options are: Normal, Minimal, Mild, Moderate, Severe, and Audiogram. If unsure about hearing loss level, refer to the Audiogram for a detailed assessment.
Preset
-
Own Voice Training
Train the device to recognize and optimize the sound of the user's own voice. The training involves having the person hear their voice in a controlled setting, allowing the device to optimize its settings for more natural and comfortable sound perception. The training steps are as follows:
Ensure a quiet environment before starting the training. The process lasts about 7 seconds, and it's important to stand at least 1 meter away from any walls. Loudly and continuously count '1, 2, 3...'.
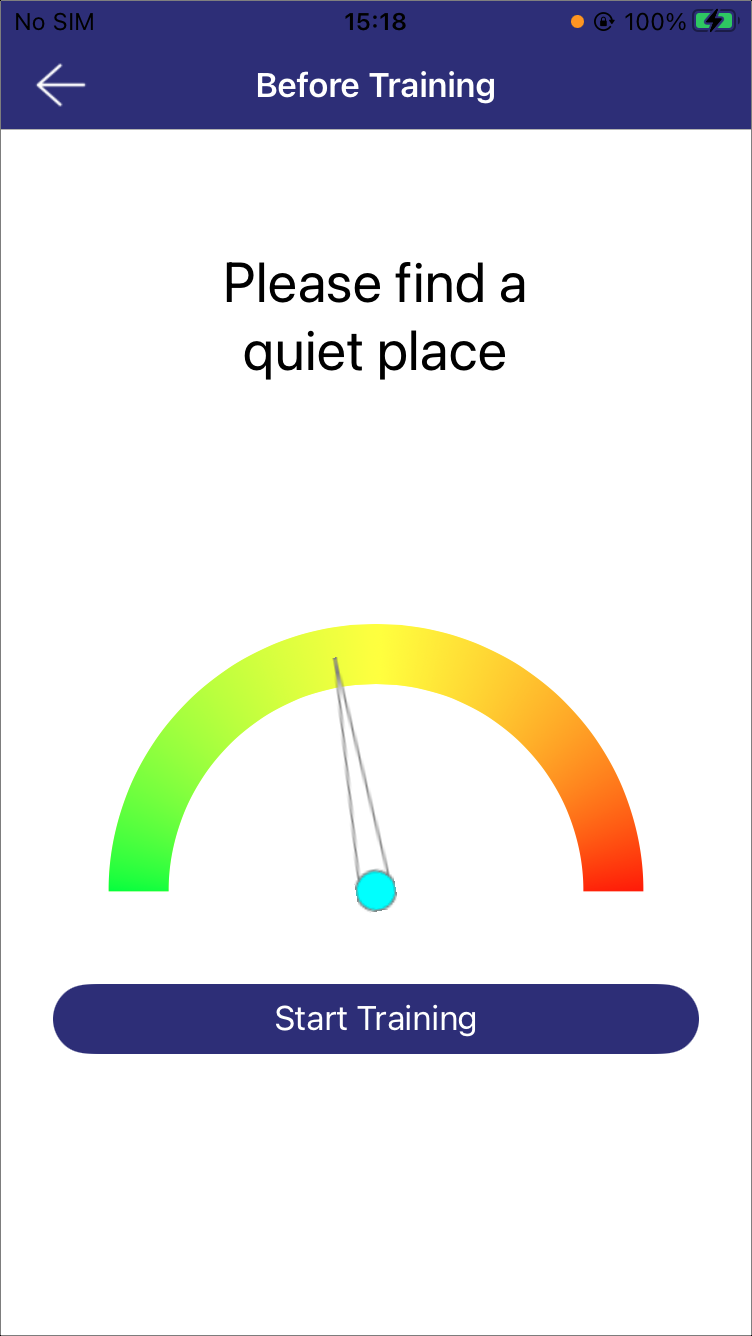
Before Training
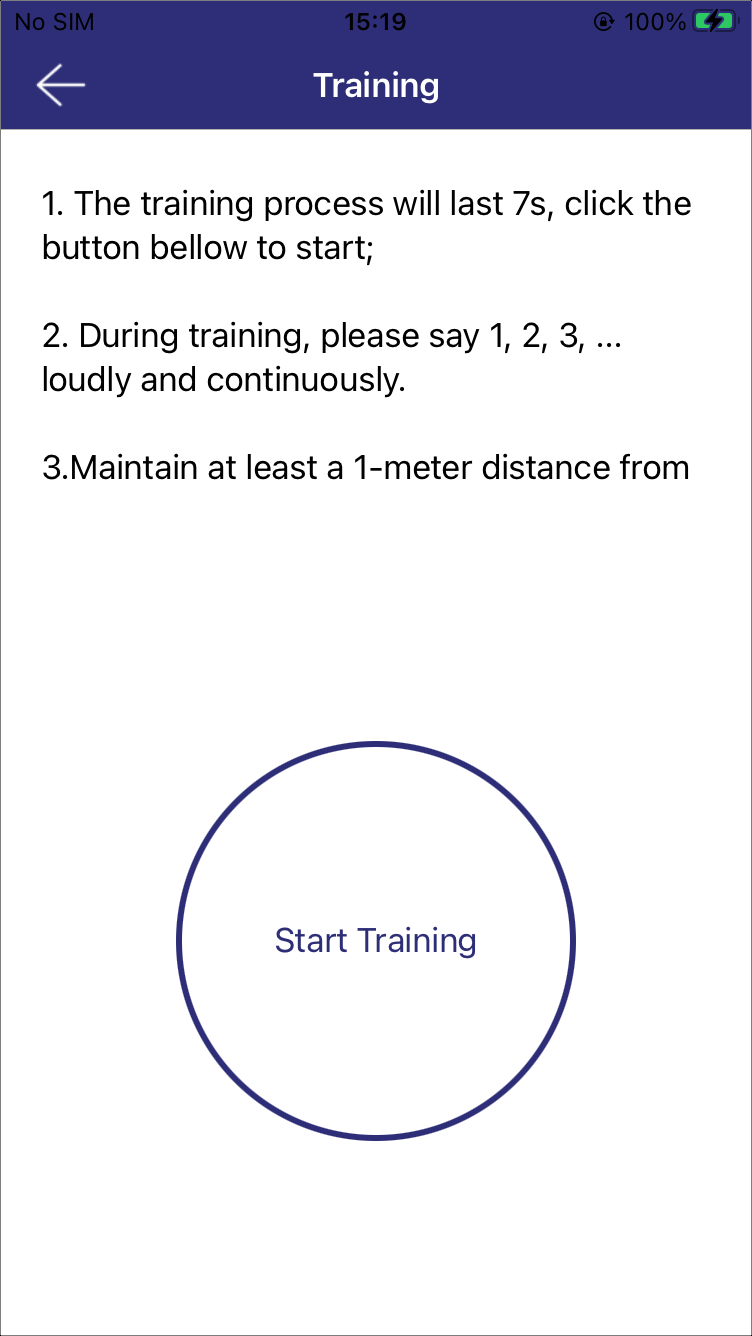
Start Training
Once the 7-second timer concludes, the training results will be displayed. Click Training Done to return to the listening enhancement page.

Training Timer
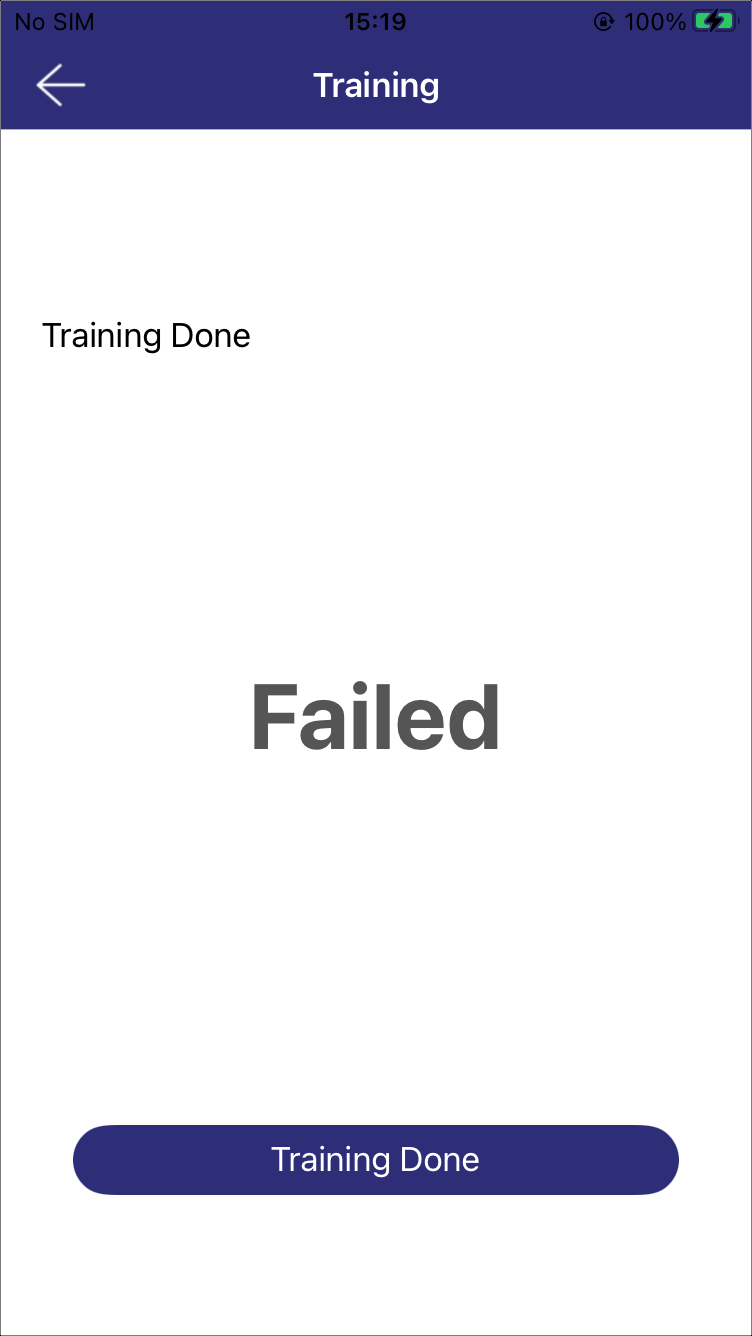
Training Result
Low Latency APT
What distinguishes LLAPT from Normal APT is its ability to significantly reduce latency, making it ideal for scenarios requiring precise audio and video synchronization, such as watching movies or playing games.
Low Latency APT
In this mode, the new configuration items include:
-
Scenario
The supported group scenarios available for users to choose from are listed on the page.
LLAPT Scenarios
-
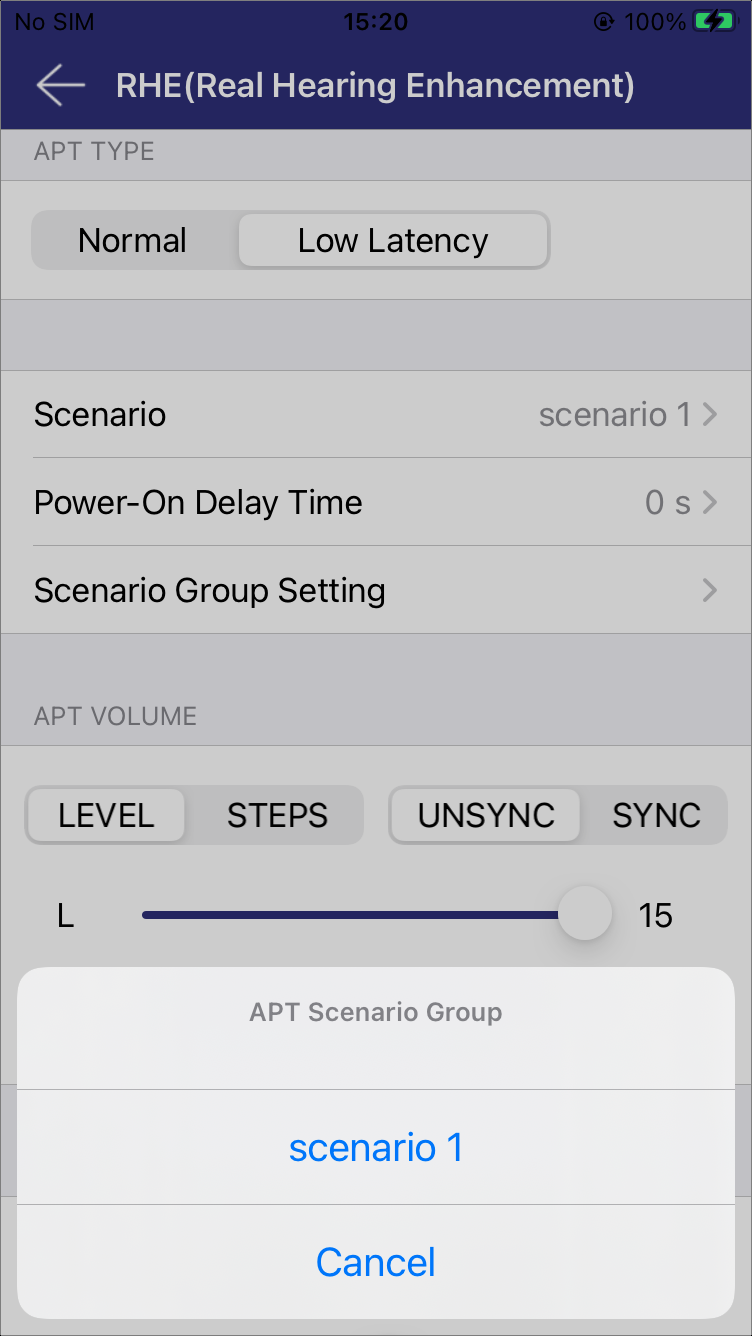
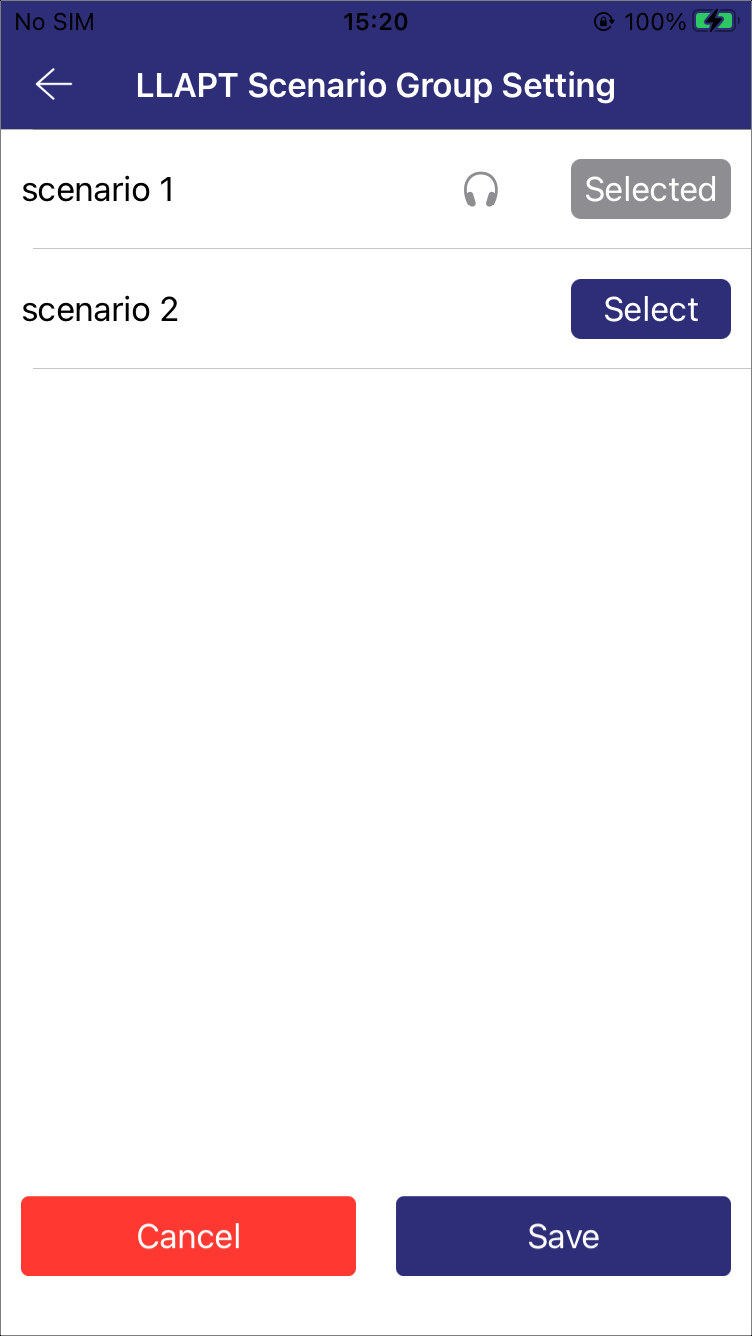
Scenario Groups Setting
All alternative scenarios are listed on the page.
Click Select, a headset icon will appear, click it to listen to the temporary effect. Click Selected to deselect.
Click Cancel or Save to end the configuration.
Note
If have listened or saved, the listening mode will automatically switch to OFF. When LLAPT is turned on again, the scenario list displayed in LLAPT Scenarios will update.
LLAPT Scenarios Group Setting
-
APT Volume
Adjustable by LEVEL|STEPS. Selecting SYNC synchronizes the volume for both earbuds, while UNSYNC allows different volume levels for each earbud.
-
APT Brightness
Adjustable by LEVEL|WEIGHT. Selecting SYNC synchronizes the brightness for both earbuds, while UNSYNC allows for different brightness levels in each earbud.
ANC+APT
This mode includes all adjustable settings available in ANC and Normal APT. However, if the device exclusively supports LLAPT, this mode is not available.
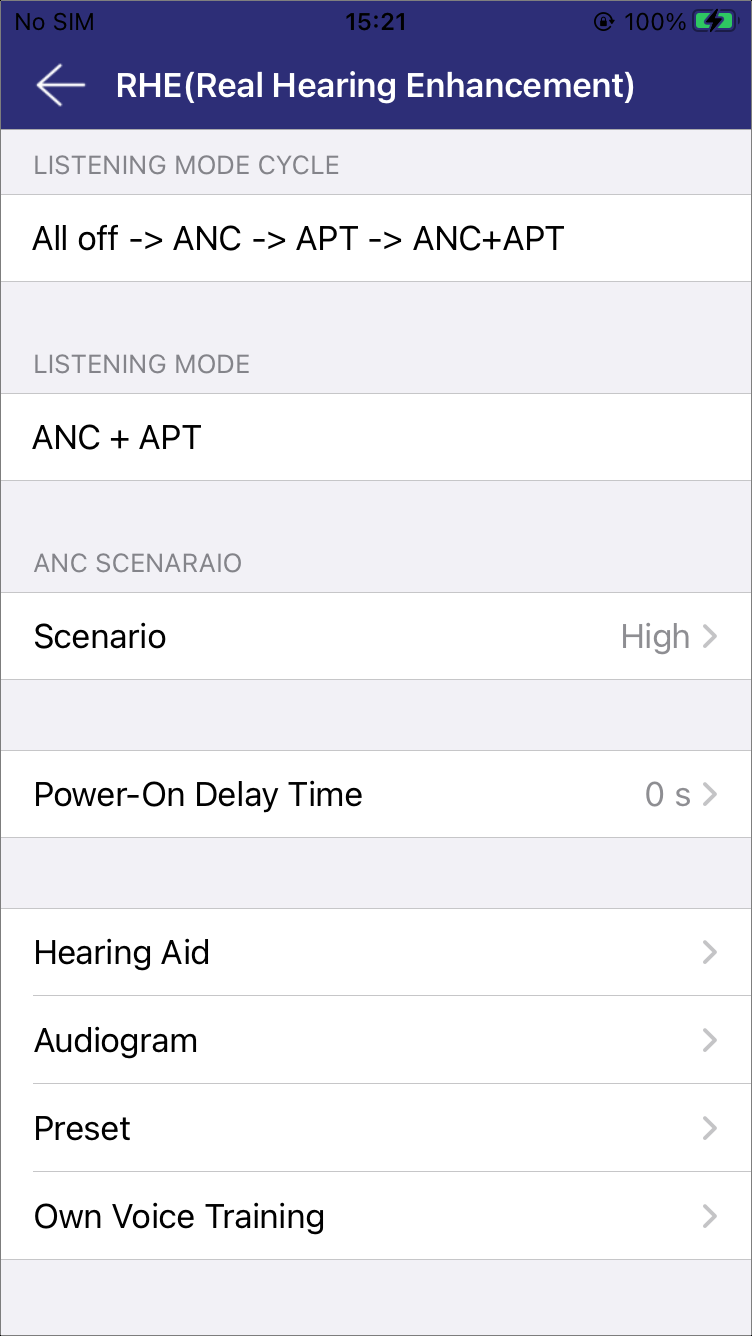
ANC+APT
Hearing Assessment Test
To provide suitable configuration settings for the user, the APP offers a simple and easy-to-use Hearing Assessment Test to understand the user's hearing condition. When conducting this test, please follow these steps:
-
Ensure the environment is quiet enough.
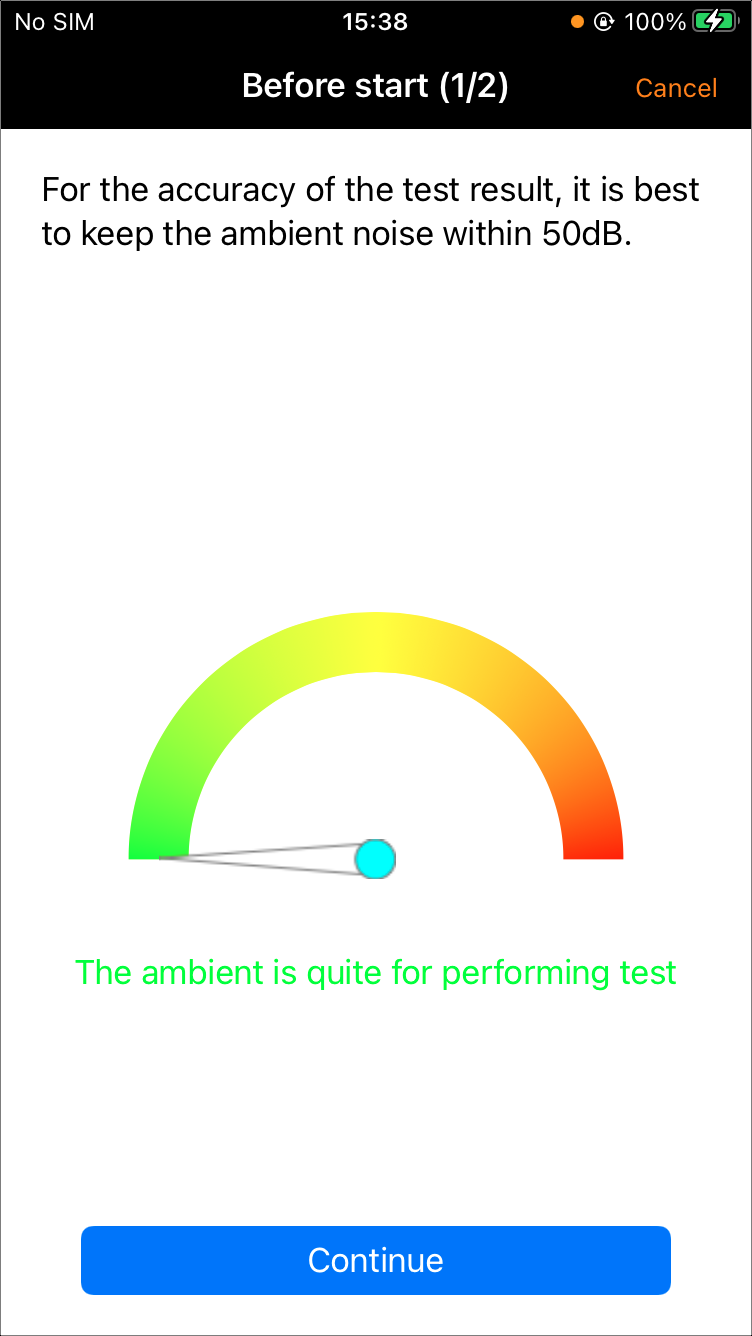
Ambient Sound
-
Select the earbud to test.
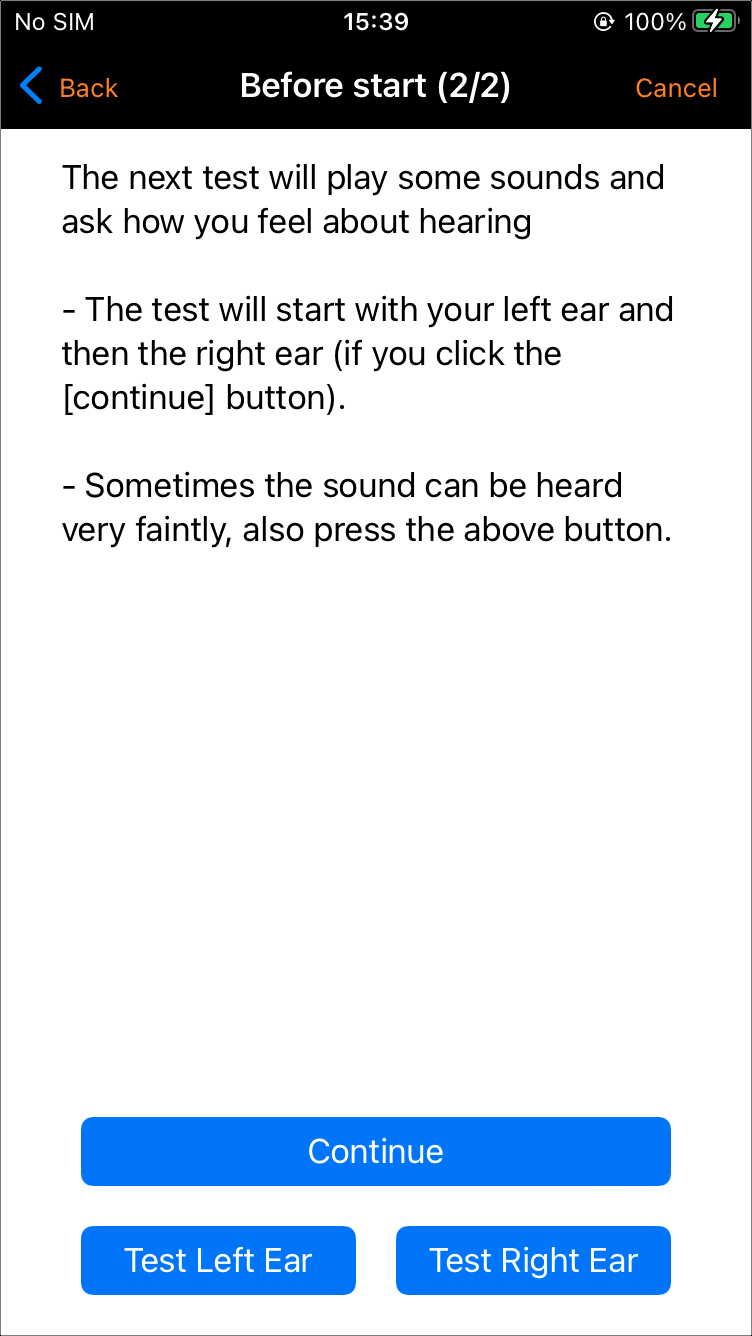
Choose the Earbud
-
Listen carefully to the pure tone. Press and hold the I can hear beeps button when the sound is audible. Release it when it is no longer heard.
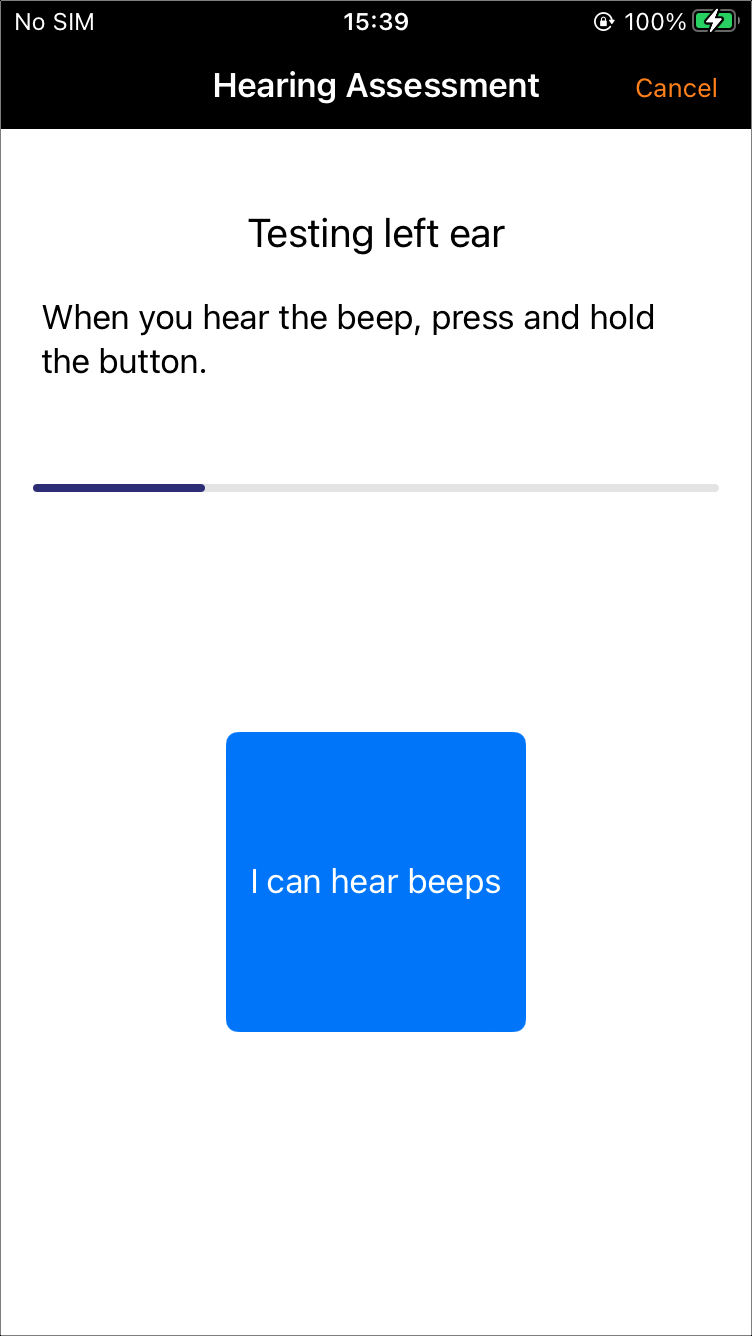
Performing Test
-
Review the test results, and apply compensation to the earbud if any hearing loss is detected.
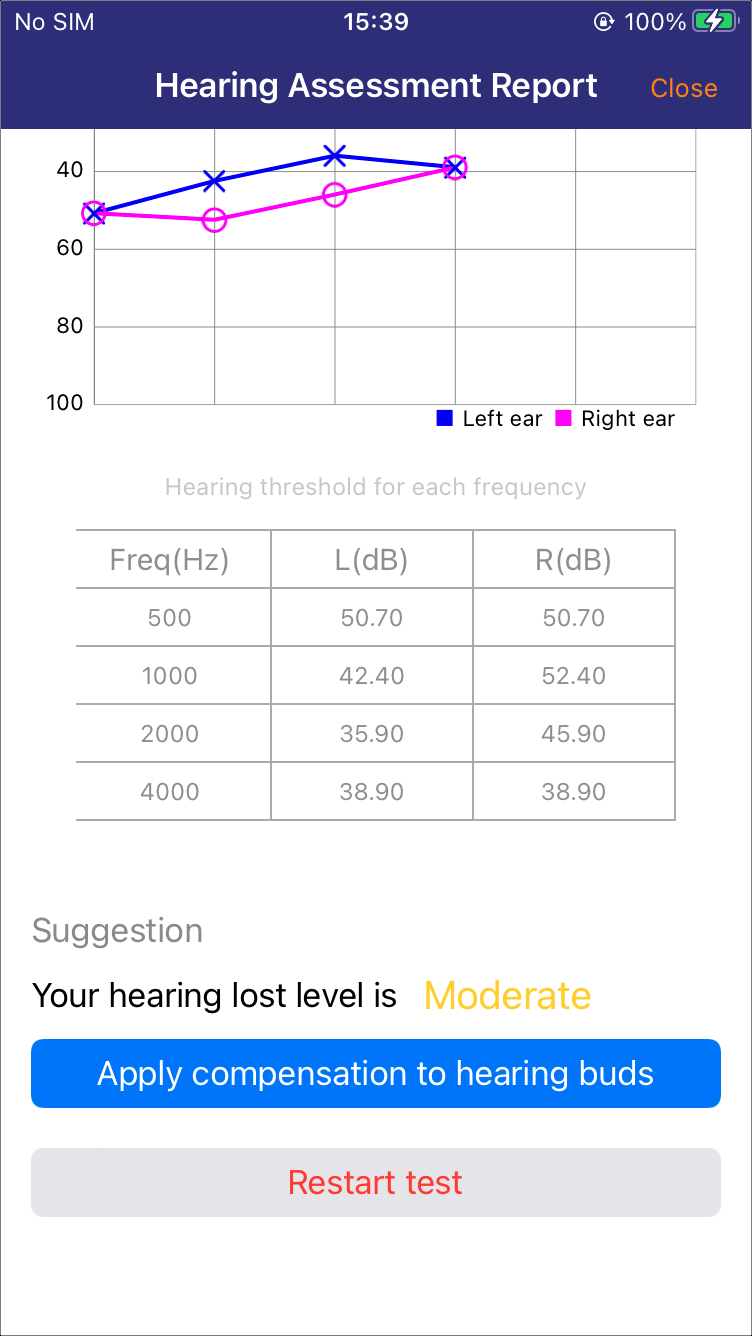
Test Result
Hearing Aid Adjustment
When the listening mode is set to APT, the Hearing Aid option becomes available, allowing to adjust its configuration settings, as shown in Hearing Aid 1 - Hearing Aid 6.
Hearing Aid 1 |
Hearing Aid 2 |
Hearing Aid 3 |
-
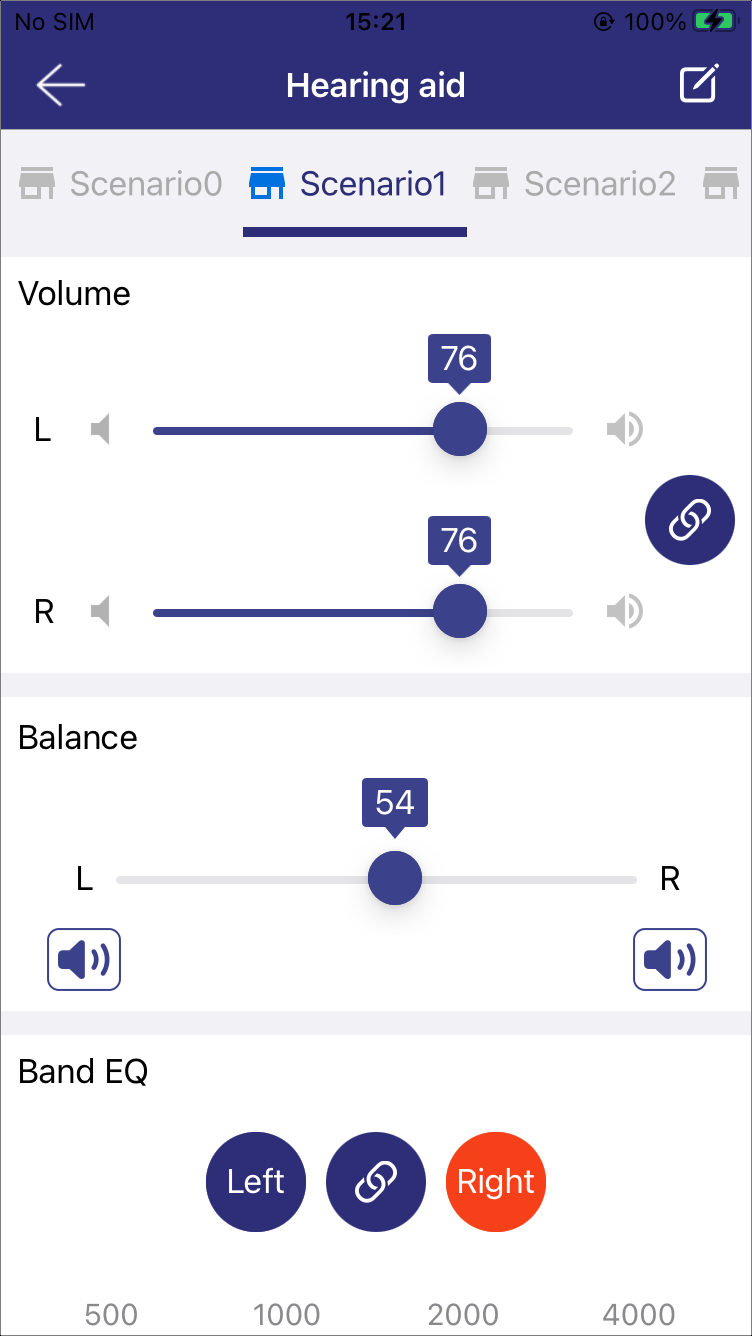
Scenarios
A horizontal bar at the top of the page shows various scenario names. The highlighted name indicates the currently active scenario. Each scenario contains a set of configuration settings, which are applied to the earbud once selected.
Scroll the bar to view additional scenarios off-screen.
Click the icon in the top right corner to rename the scenario.
-
Volume and Balance
Use the corresponding sliders to adjust APT volume or balance of the connected earbuds.
-
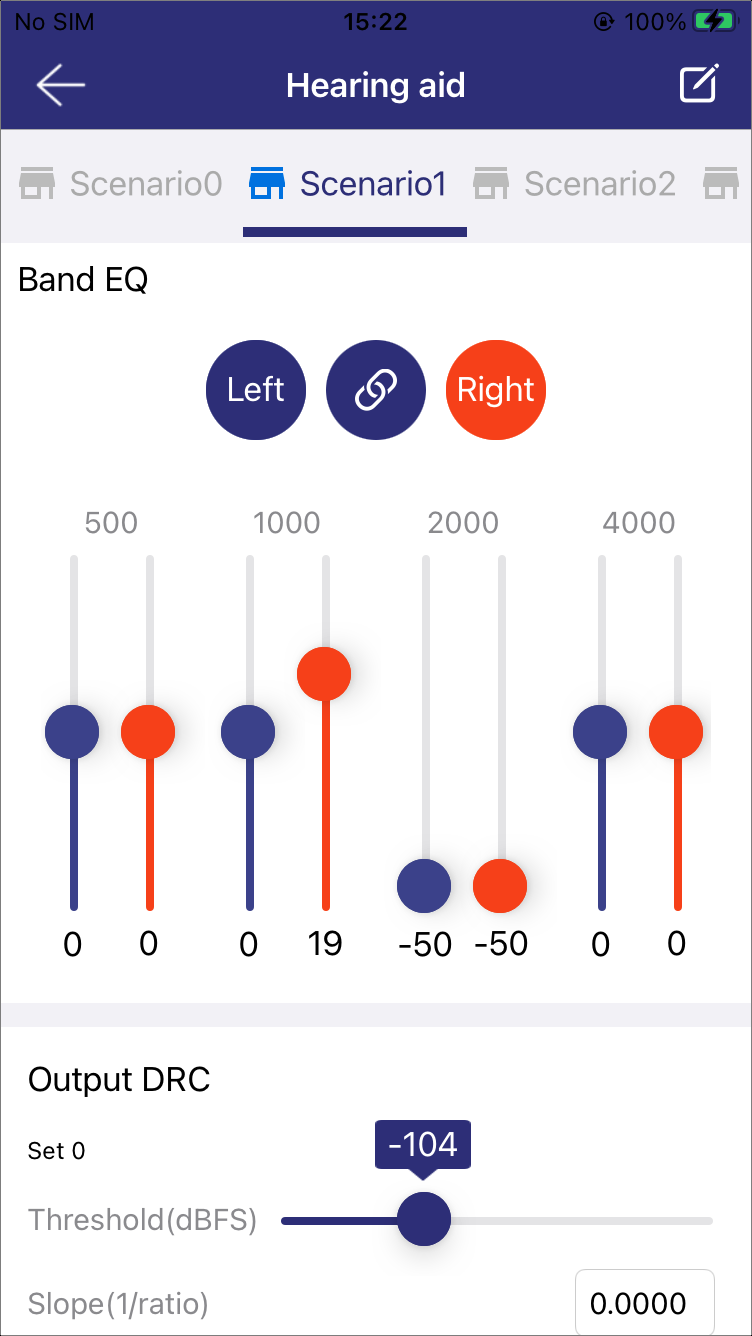
Band EQ
Set gain levels at supported frequencies: 500Hz, 1000Hz, 2000Hz and 4000Hz.
-
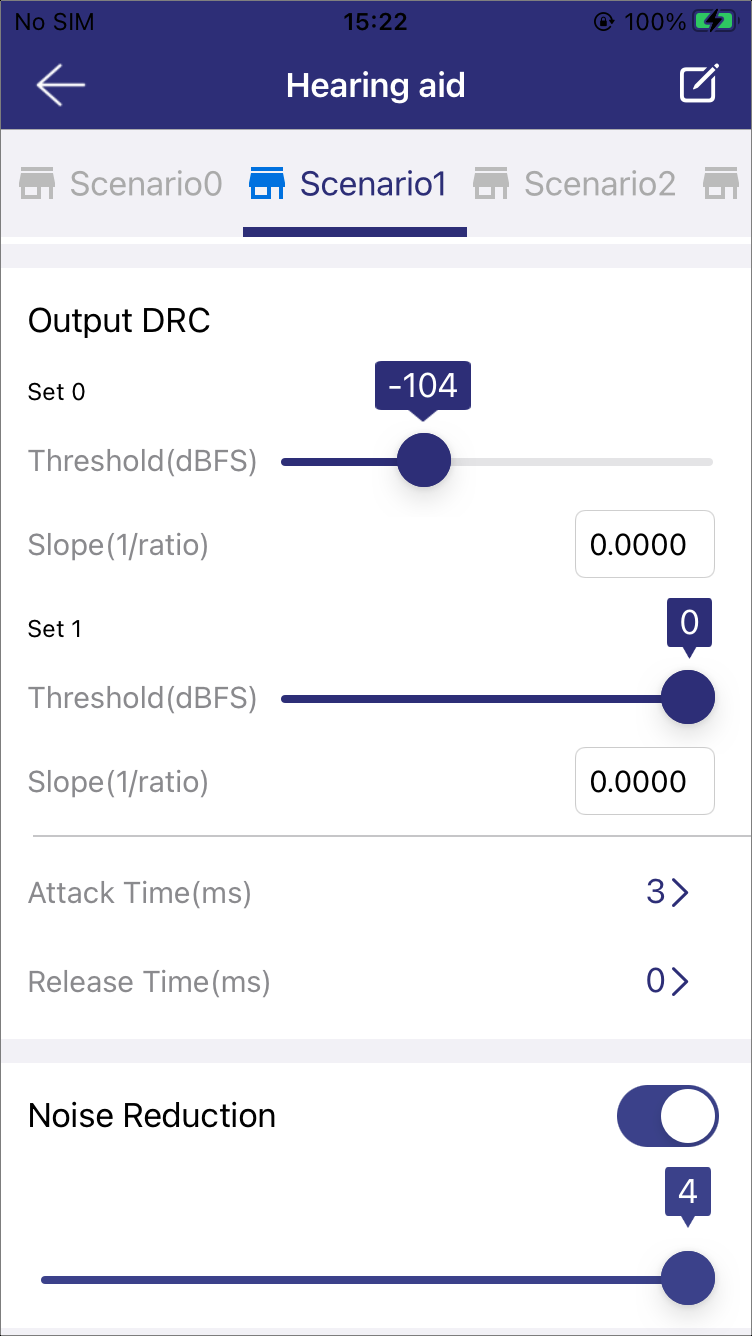
Output DRC
Manages the output signal level.
Set 0 and Set 1: Two different compression setting groups, which can be individually adjusted to cater to different audio processing needs.
Attack Time: Control the gain decreasing time.
Release Time: Control the gain increasing time.
-
Noise Reduction
Toggle this feature on or off with a switch, and adjust the aggressiveness level with the slider. Level 0 represents the least aggressive noise suppression, while level 4 is the highest. Lower levels may allow more ambient noise to pass through.
-
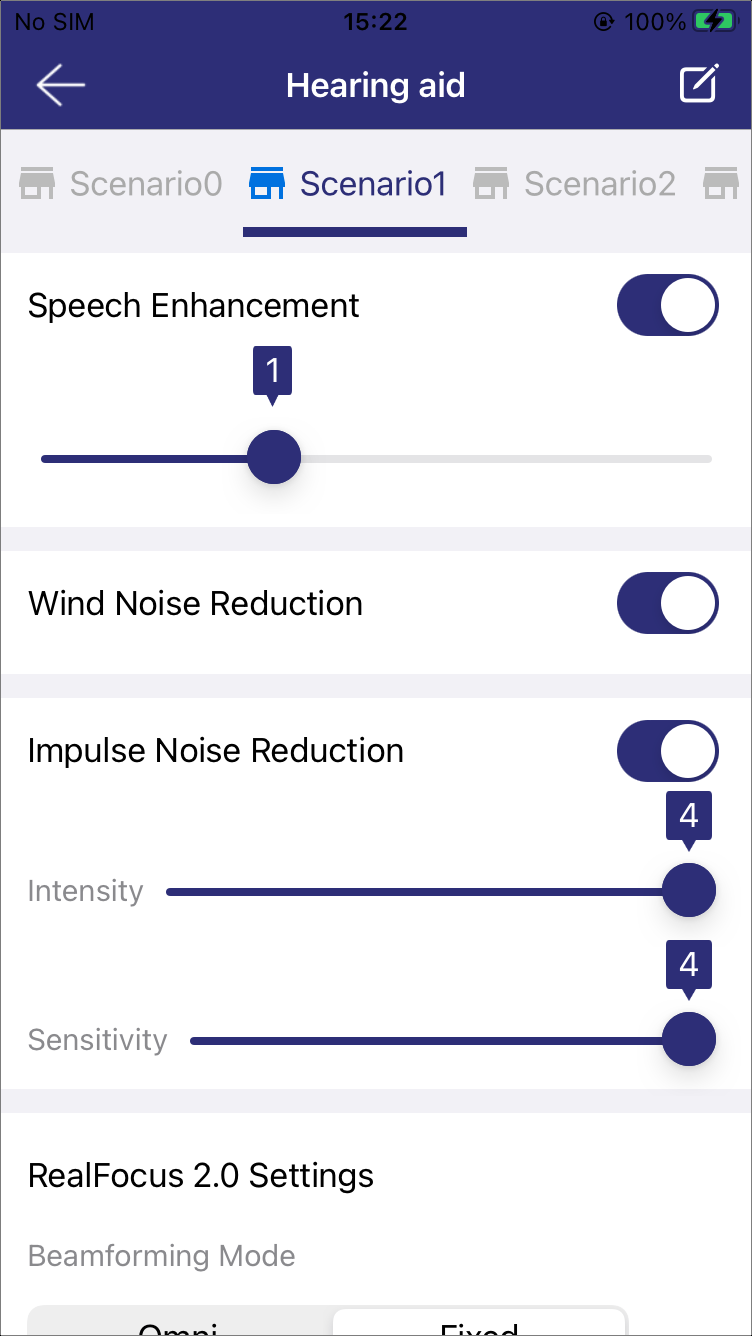
Speech Enhancement
Enhances the speech component of input signal. At level 0, all frequencies are equally weighted but as the level increases, speech frequencies are emphasized more.
Hearing Aid 4 |

Hearing Aid 5 |
Hearing Aid 6 |
-
Wind Noise Reduction
Mitigates the negative effects of wind noise.
-
Impulse Noise Reduction
Reduces the impact of sudden and impulsive noises, offering two adjustable parameters:
Intensity: Level 0 for minimal suppression, Level 4 for maximum.
Sensitivity: Level 0 triggers easily, while Level 4 requires more to activate.
-
RealFocus 2.0 Settings
Improves audio quality by adjusting microphone directionality and noise suppression.
-
Beamforming Mode
Omni: Captures sound from all directions.
Fixed: Focuses on a fixed direction.
-
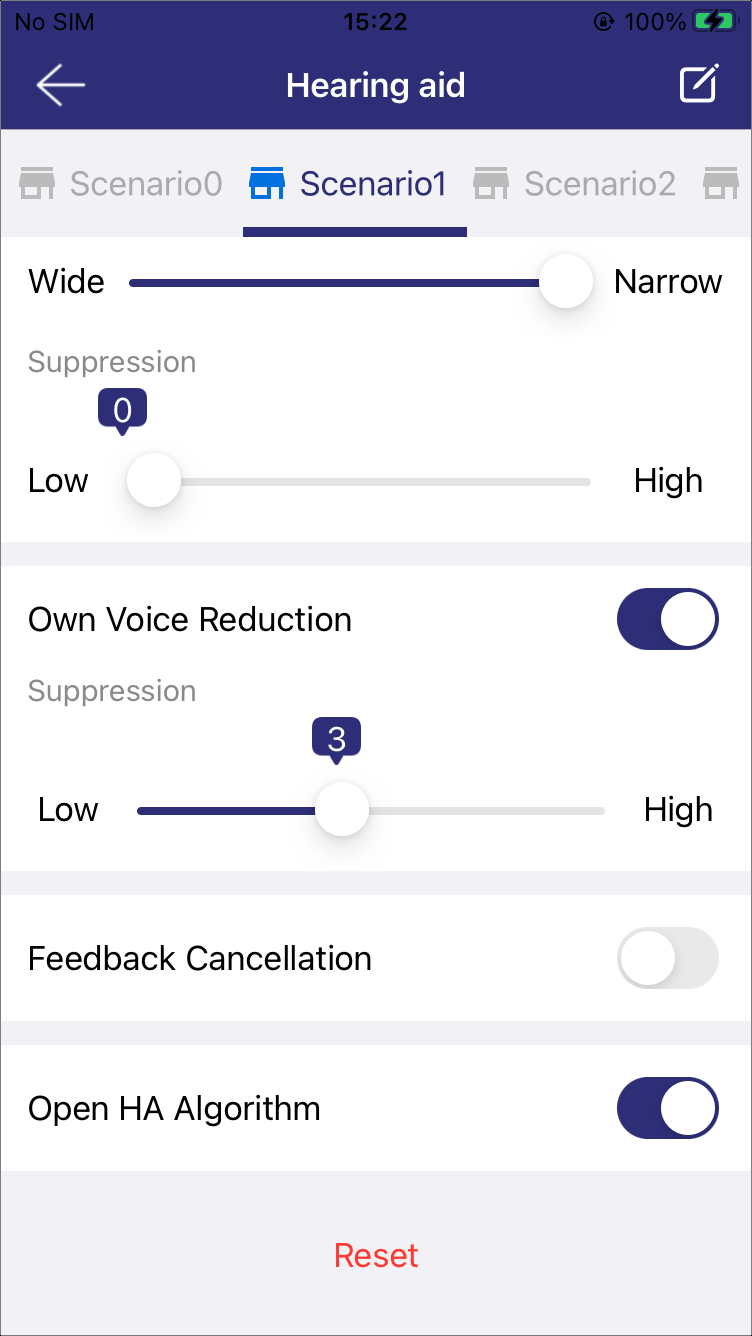
Directional Hearing
Wide: Captures sound from a broader area.
Narrow: Focuses on a specific direction for precise sound capture.
-
Suppression
Low: Reduces background noise slightly, preserving ambient sounds.
High: Significantly reduces background noise for clearer audio.
-
-
Own Voice Reduction
Minimizes the impact of the user's voice on the amplified sound. Users can train the OVR through Own Voice Training. Adjust the suppression level if needed for a better listening experience. The recommended level is 4.
-
Feedback Cancellation
Uses an adaptive filter to model the feedback path. The filter's output is subtracted from the microphone signal to cancel unwanted feedback, allowing more gain in the hearing aid.
-
Open HA Algorithm
When enabled, the RHA function operates normally. When disabled, specific algorithms including NR, OVR, beamforming, and others are turned off.
Equalizer
This module allows users to adjust the built-in sound effects for music.
The page displays the active EQ mode, with priority order: Gaming Mode > ANC Mode > Normal Mode.
-
Users can select a preset sound effect or create a custom one by adjusting the sliders.
Click Save to store the custom effect.
Click Reset to restore the factory default effect.
LEFT|RIGHT allows selection of the earbud.
Compensation will be available once users complete the hearing test, as shown in Test Result.
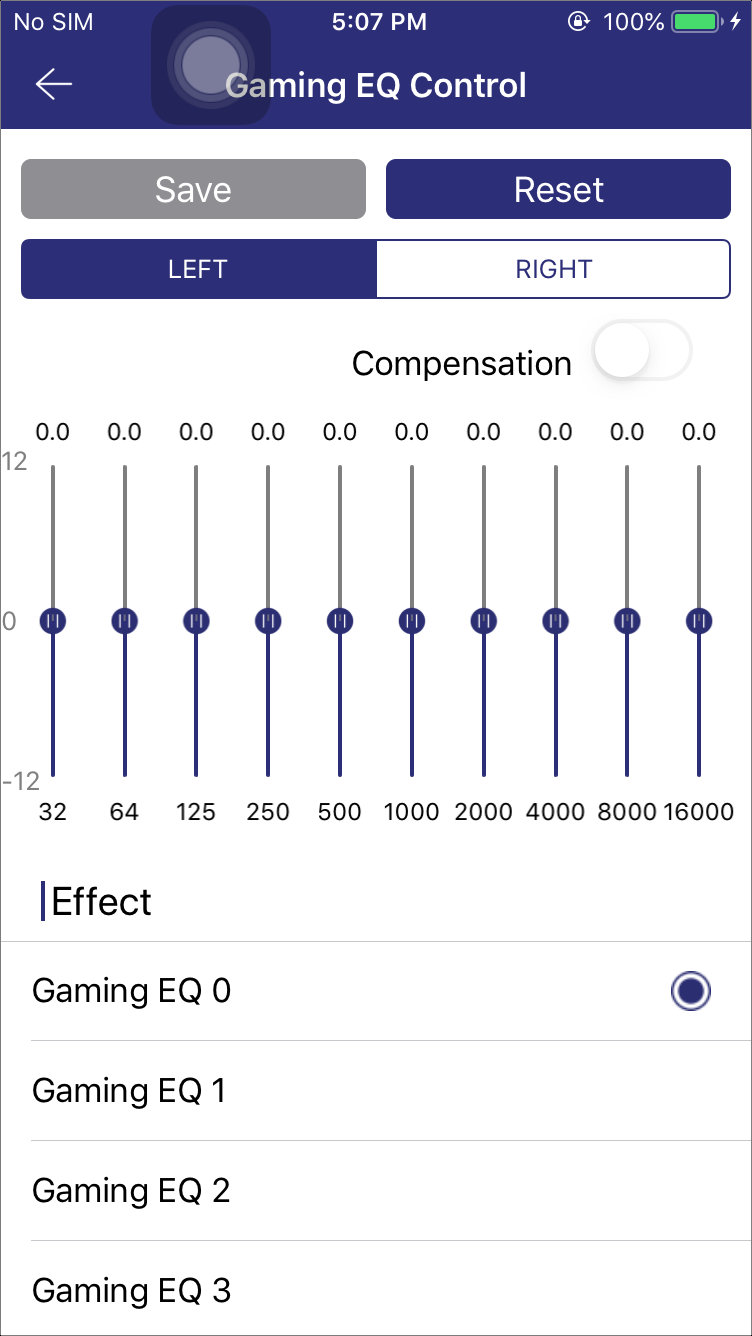
Gaming EQ |

ANC EQ |
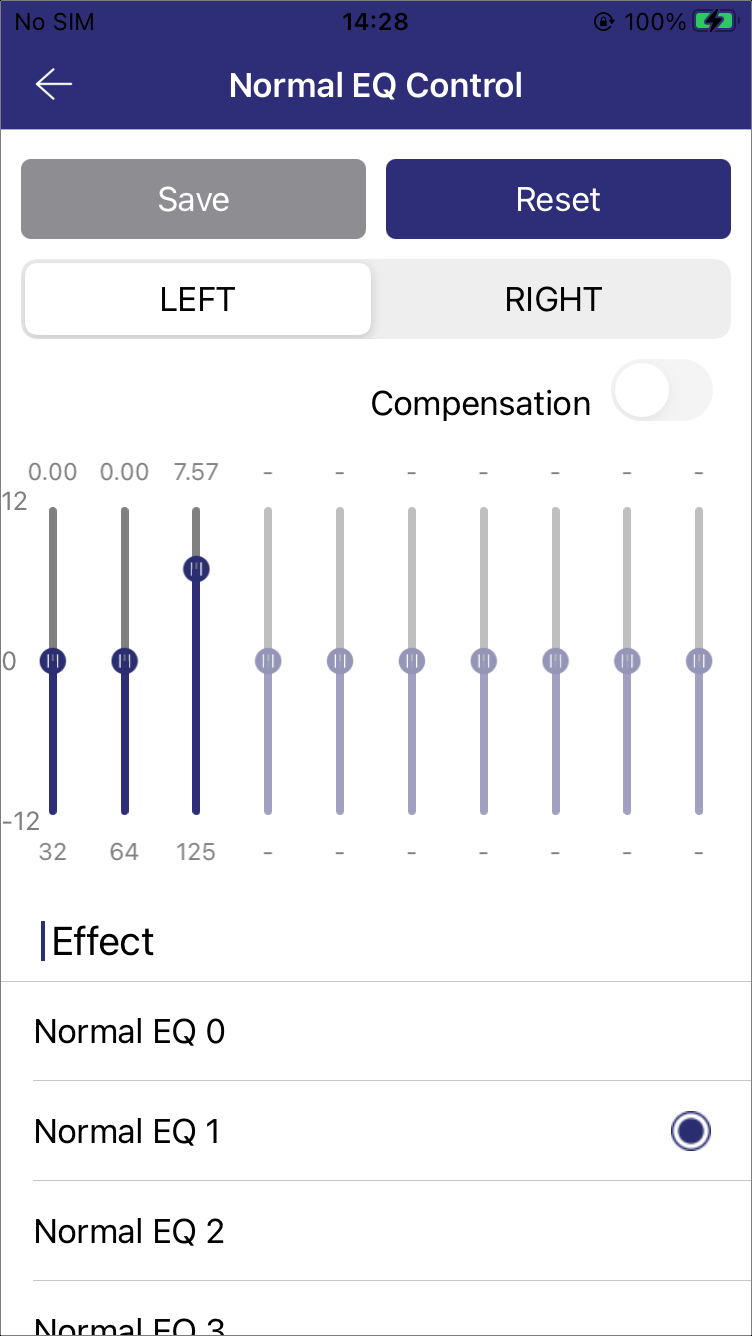
Normal EQ |
Voice EQ
This module allows adjustment of EQ parameters during a call. Changes made while not on a call will be applied to the next call.
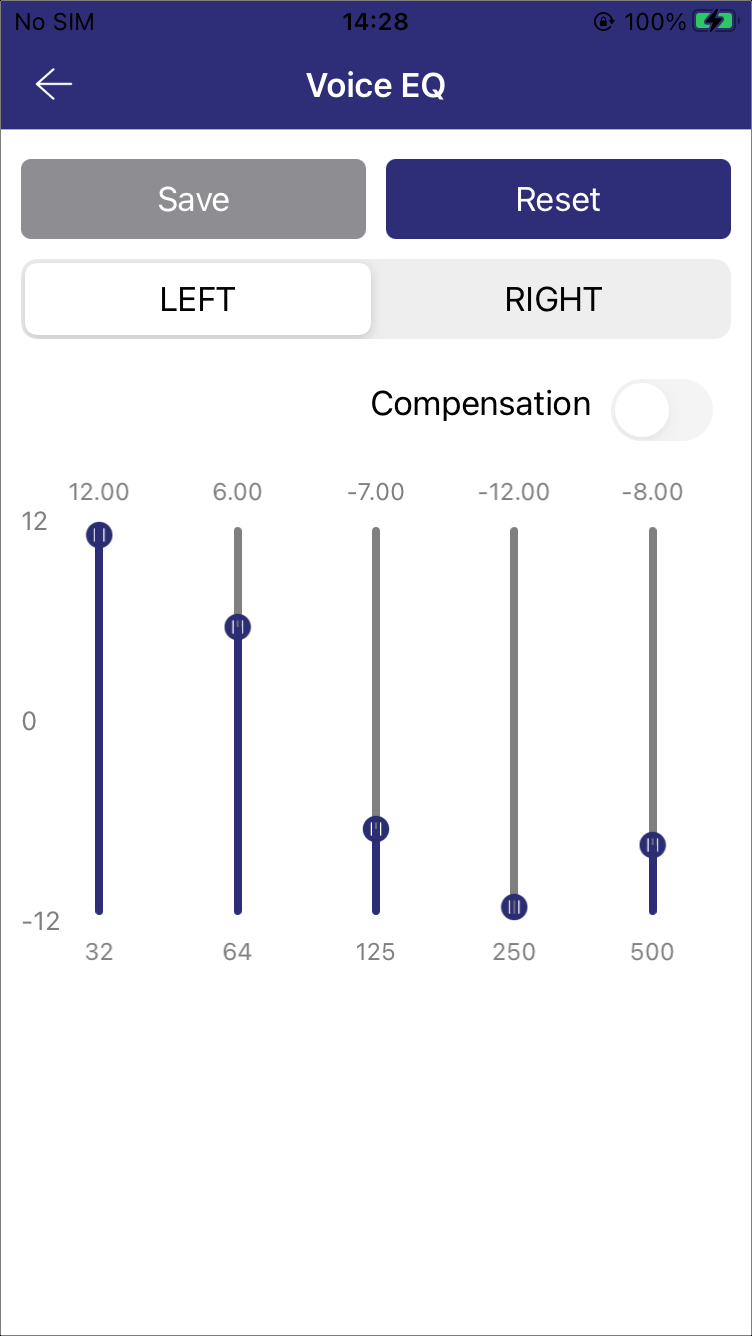
Voice EQ
TTS
The TTS module is designed to provide users with caller information before they answer a call. When an incoming call is received on an iPhone, the application reads the caller's information and sends it to the device. Users then hear a voice announcement of the caller's name or number.
Once activated, if receive a call from James, the device will broadcast 'James is calling you' or '124839411 is calling you'.
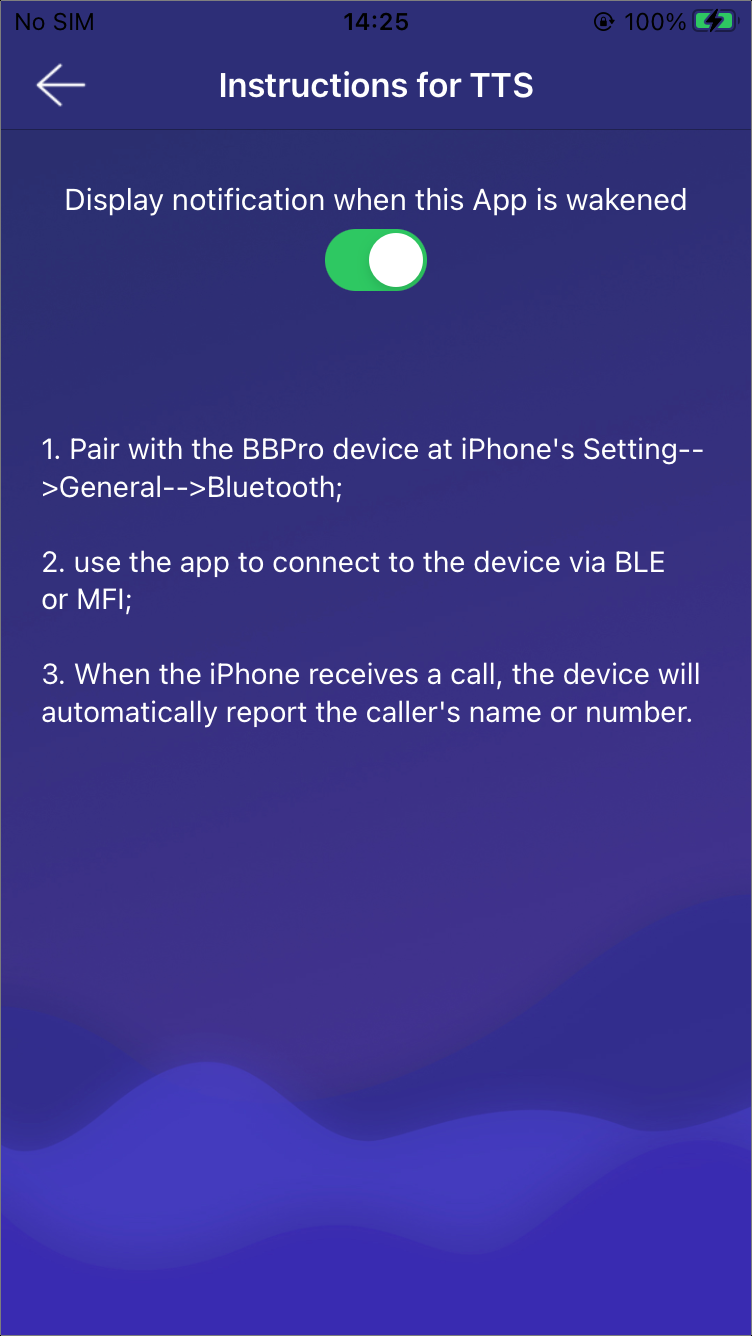
TTS
Gaming Mode
This module allows users to manage the activation of gaming mode and offers five selectable latency levels.
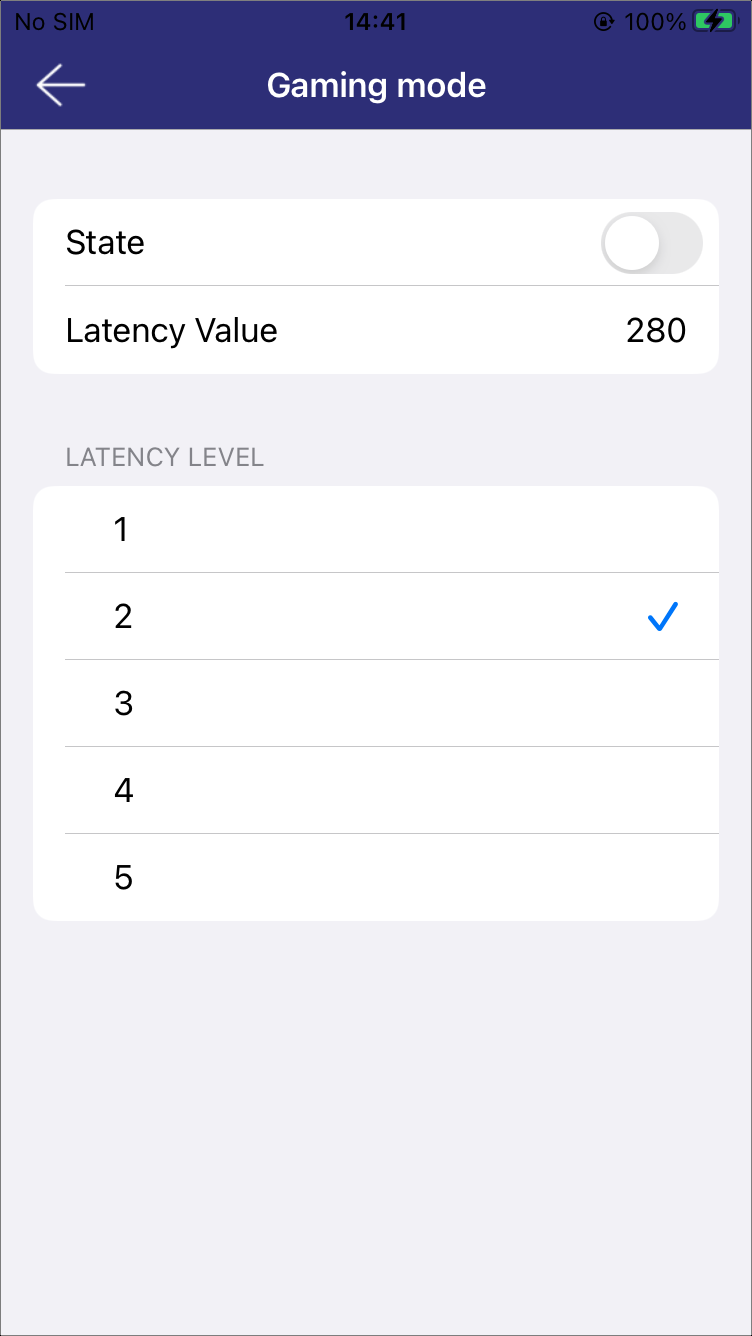
Gaming Mode
Key Mapping
This module displays the relationship between key actions and their corresponding functions, as illustrated in Key Mapping UI.
By clicking on a row, a pop-up menu appears, allowing users to select, as illustrated in Function List.
Click Reset, users can reset the mapping for the left bud, right bud, or both buds, restoring them to factory settings.
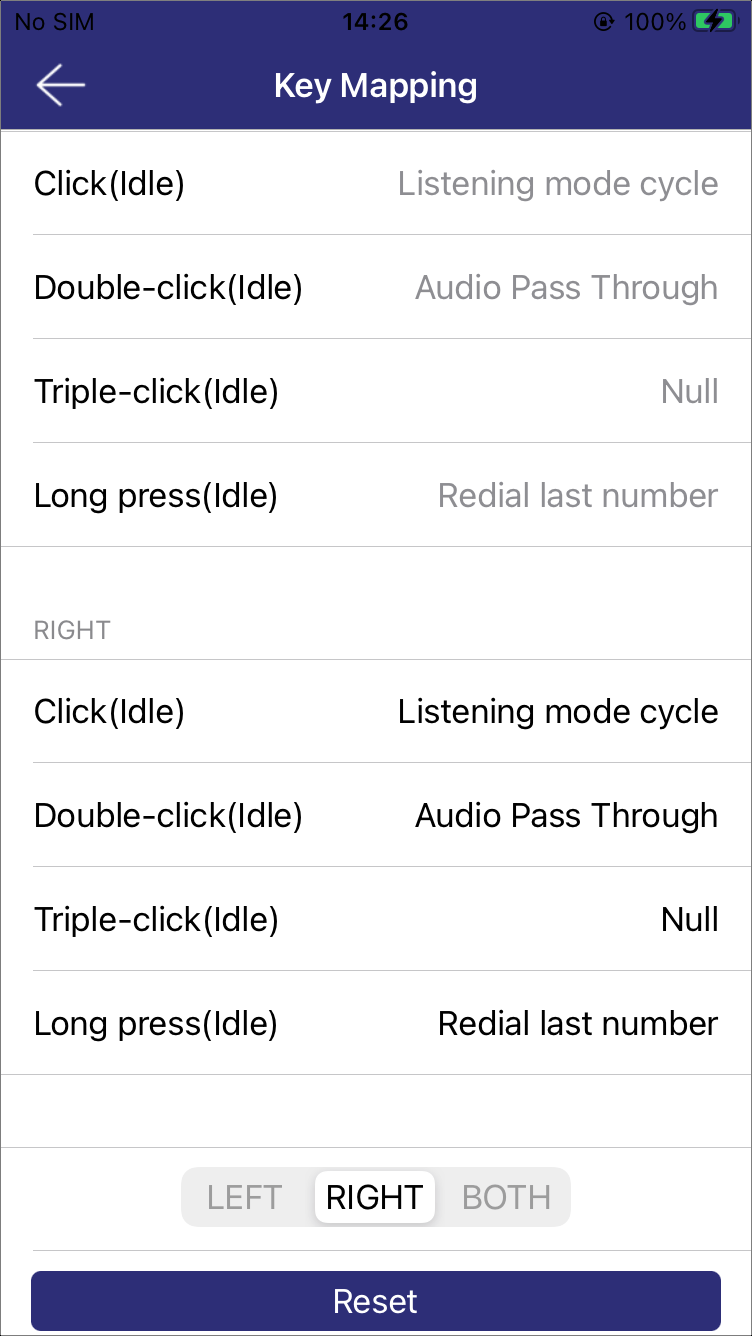
Key Mapping UI |
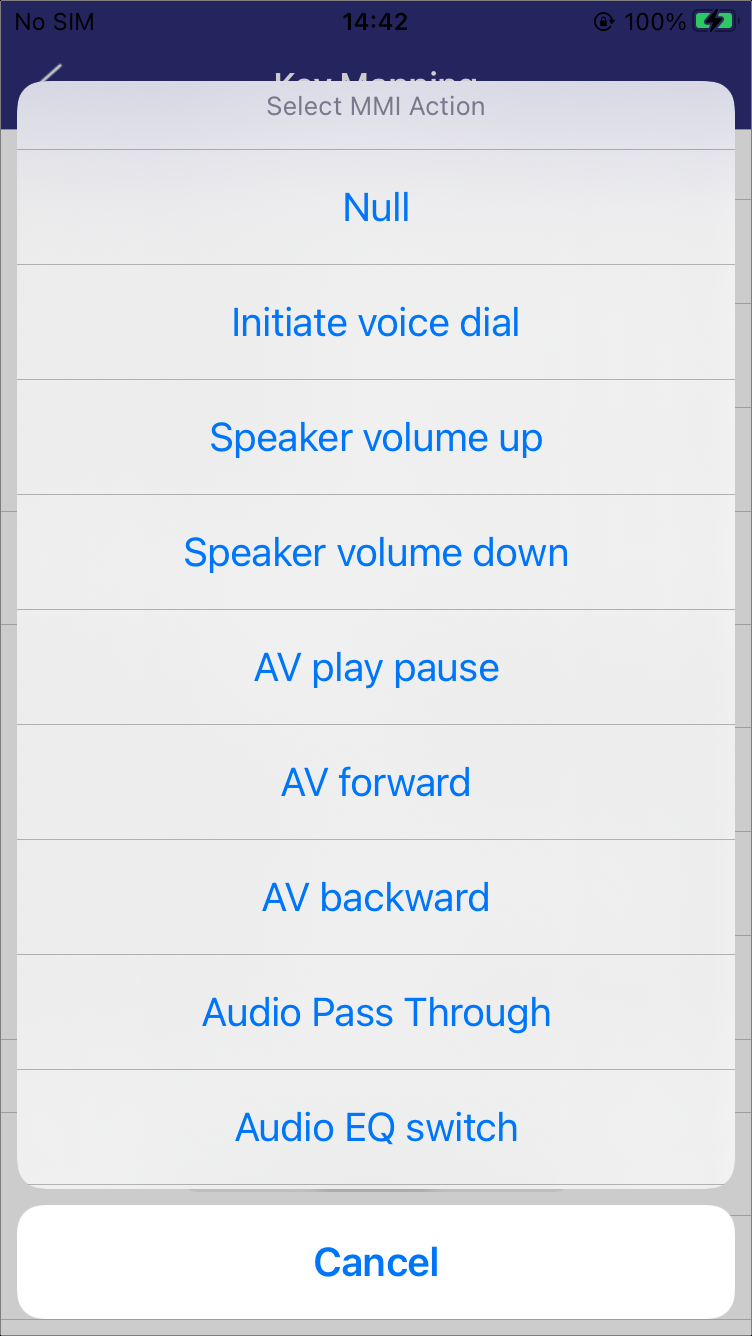
Function List |
VP/Ringtone Volume
This module allows users to adjust the volume for voice talk and ringtone.
Enable the SYNC segment to adjust the volume for both earbuds simultaneously.
Enable the UNSYNC segment to adjust the volume for each earbud individually.
.png)
VP/Ringtone Volume (Sync) |
.png)
VP/Ringtone Volume (Unsync) |
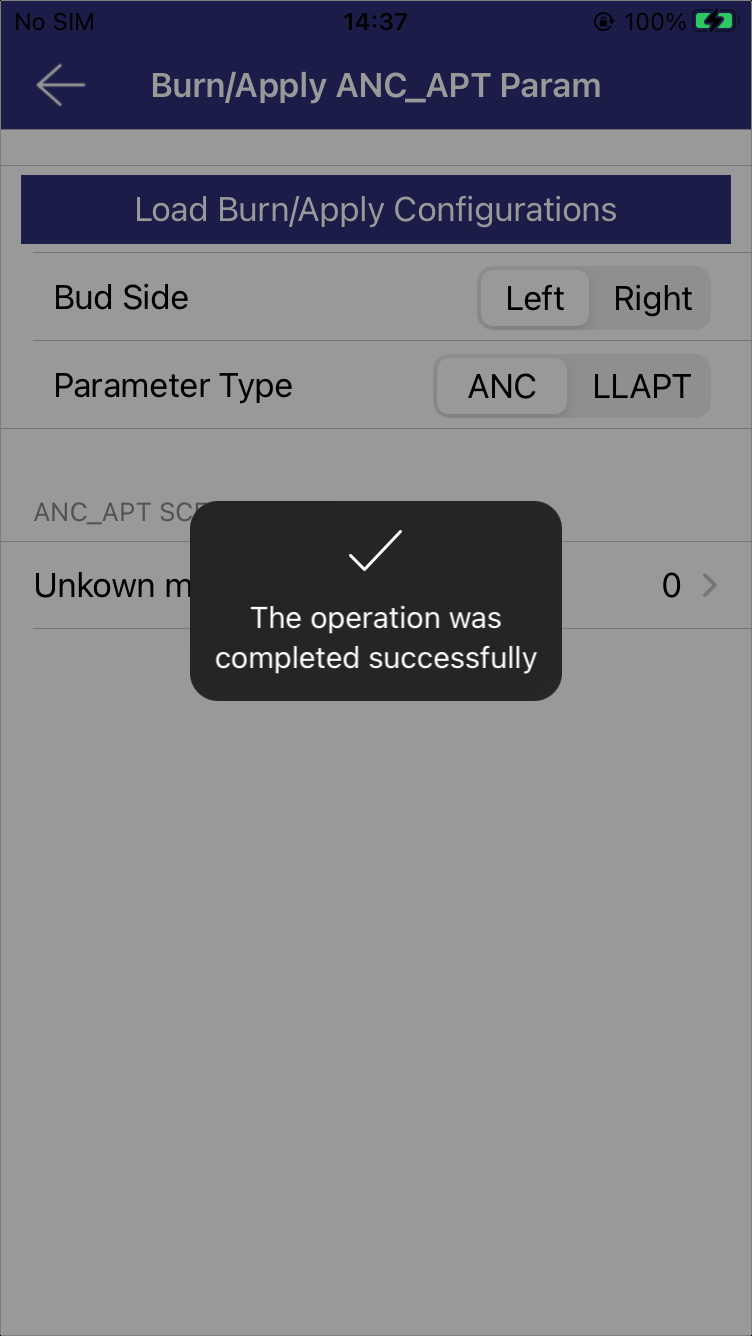
Burn/Apply ANC_LLAPT Parameters
By configuring ANC or LLAPT parameters on the device, users can perform personalized gain and compensation for ANC or LLAPT scenarios.
Load Burn/Apply Configurations |
Select Filter Type |
Stage Out of Limit |
Apply/Burn Parameters |
-
Parameters Initialization
Choose the target earbud and type, then click Load Burn/Apply Configurations to get the current parameter settings, as shown in Load Burn/Apply Configurations. If the earbud side is switched, click the button again to refresh the settings.
-
Scenario Selection
Choose the ANC or LLAPT scenario to enter the Set Group Parameters page.
-
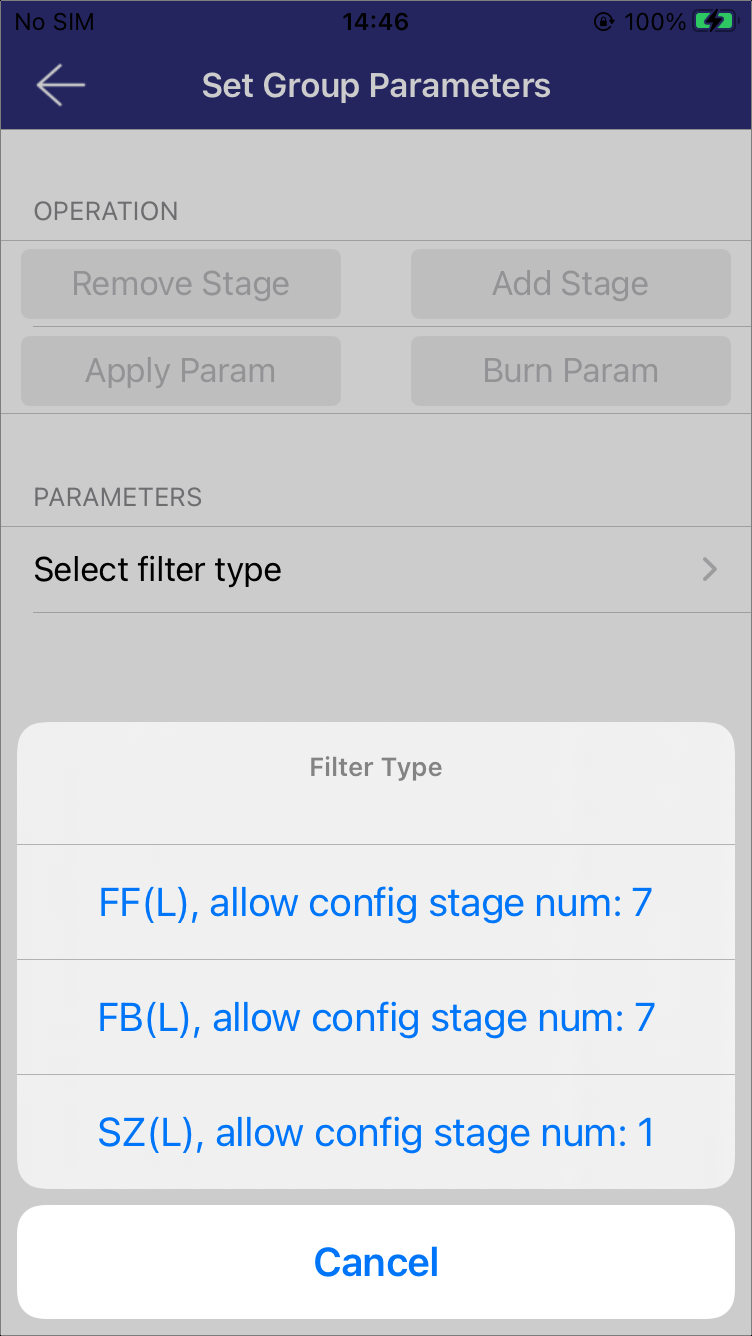
Filter Configuration
Click Select filter type to view the configurable filter types and coefficients for each filter, as shown in Select Filter Type. Select the target filter type, then proceed with the following configurations.
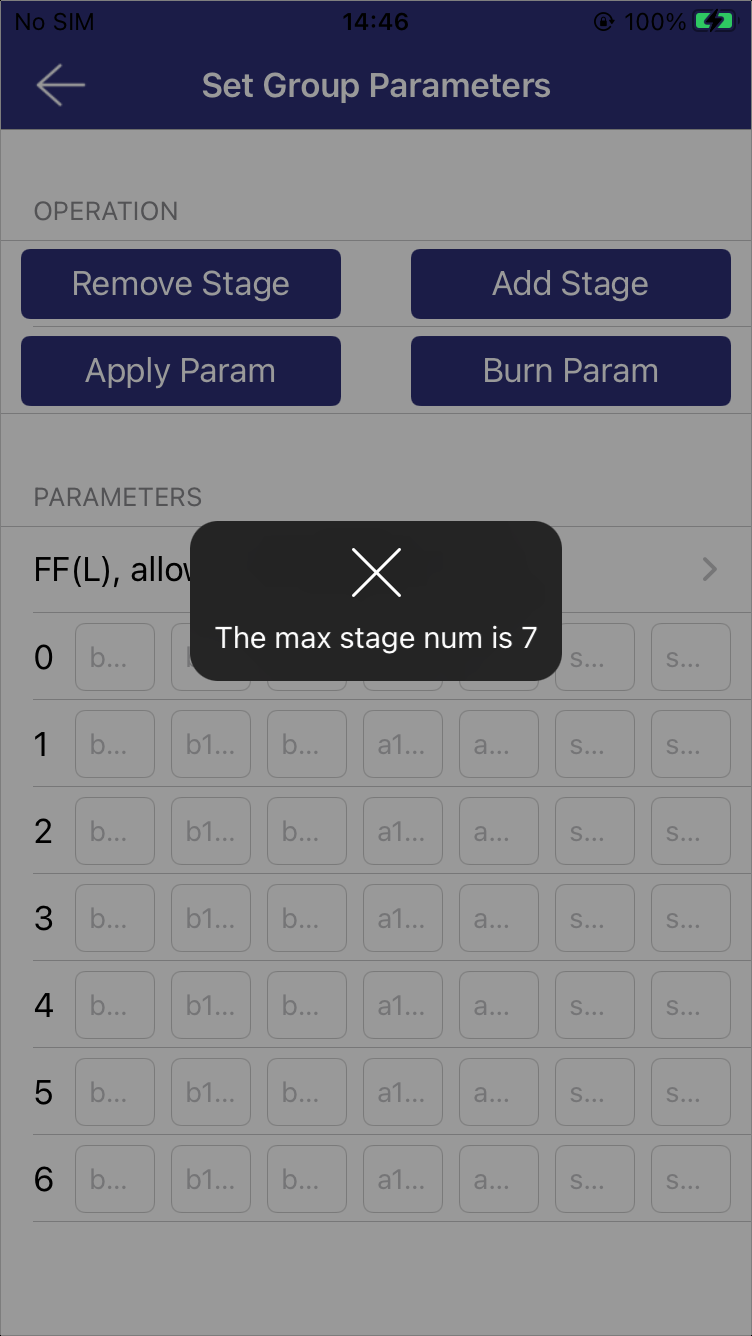
Remove Stage: Delete a configured set of coefficients.
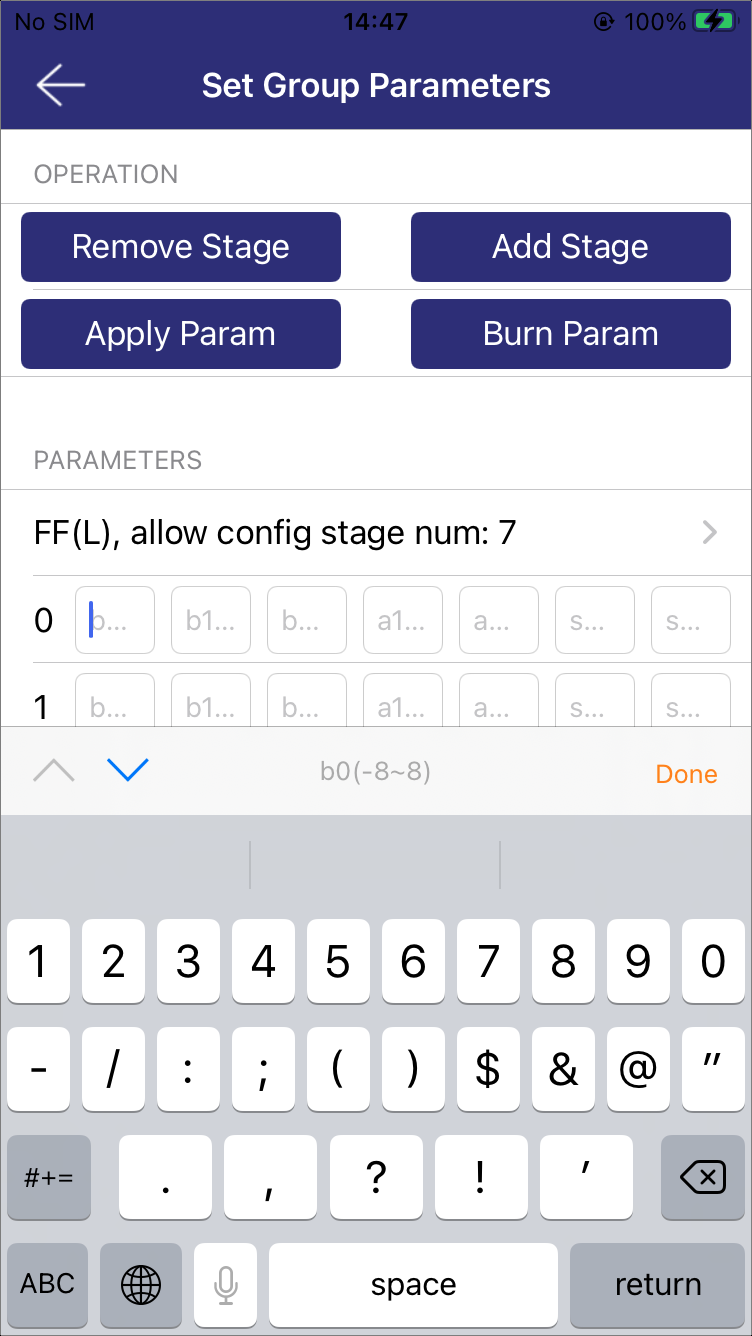
Add Stage: Add a new set of coefficients for configuration (the total number cannot exceed the stage num limit, see Stage Out of Limit). The configured parameters need to be kept within the specified range, see Apply/Burn Parameters.
Apply Param: Apply the current configuration immediately (temporary, not stored on the device).
Burn Param: Apply and save the current configuration to the device in real time.
Data Capture V2
ANC/LLAPT parameters can be fine-tuned based on the data captured using this feature.
Data Capture Configuration |
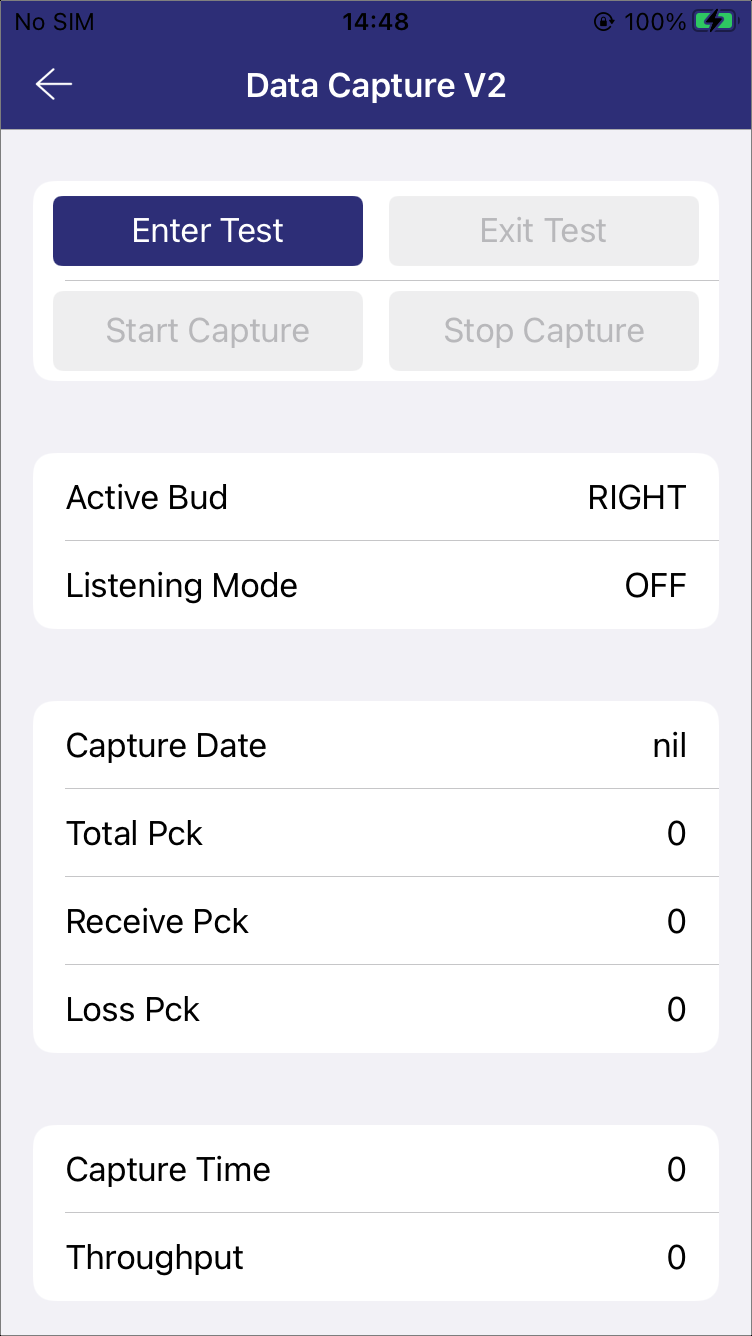
Data Capture Results |
-
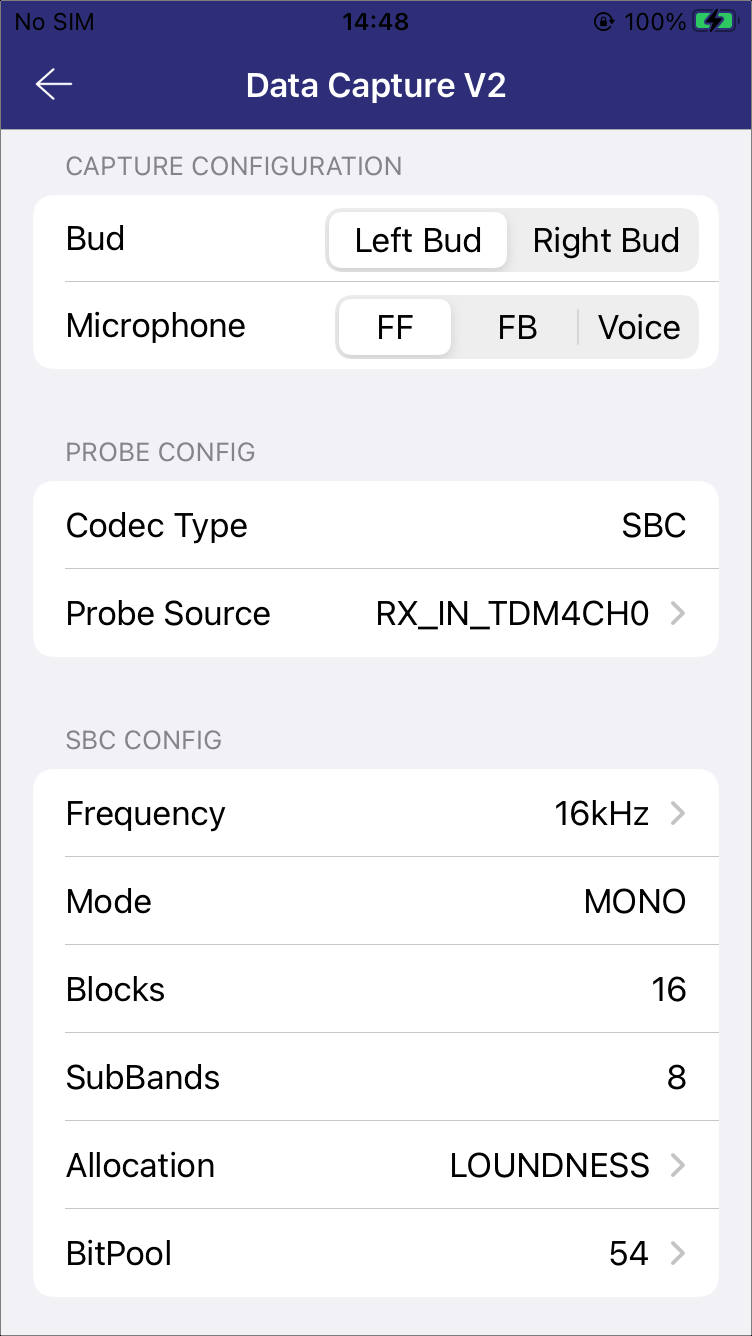
Parameter Configuration
Select the target bud and microphone, then adjust the following options as needed.
Probe Source: Capture point defined in audio route.
Frequency: Sampling frequency used in the SBC codec.
Allocation: Bit allocation method used in the SBC codec (options: SNR, Loudness).
Bitpool: Bitwidth-like parameter in the SBC codec. A higher value improves signal quality but increases transfer bandwidth.
-
Enter Test Mode
The operation is disabled during music, calls or APT is active.
If the selected target earbud does not match the active earbud, the operation needs to be triggered twice. Once the target and active earbuds are consistent, the operation can proceed.
-
Start Capture
When the Probe Source is set to TX, the operation can only be performed after playing music. After a successful start, the capture results will be recorded, as shown in Data Capture Results.
Total Pck: Total number of packets.
Receive Pck: Number of packets received by the phone.
Loss Pck: Number of packets lost.
Capture Time: Duration of the Capture operation.
Throughput: Current data throughput.
-
Stop Capture
Once the capture is stopped, the data files can be accessed in the following directory:
Audio Connect\Documents\Data Capture Files\.... Refer to Data Capture File Path and Data Capture File Description for details on the captured documents.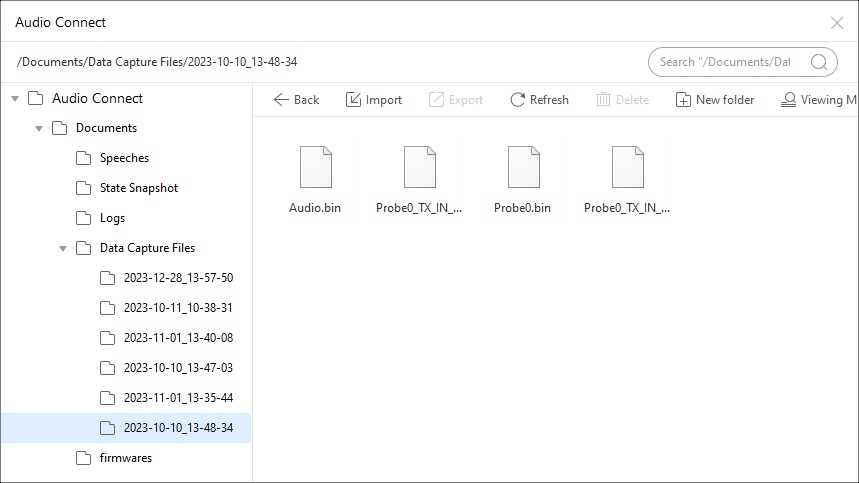
Data Capture File Path
Data Capture File Description File Name
File Content
Audio.binRaw data received from the device.
Probe[n].binData corresponding to each probe.
Probe[n]_[source].pcmPcm data in
probe[n].bin.Probe[n]_[source].sbcData parsed by SBC algorithm.
-
Exit Test Mode
The operation cannot be performed while music is playing.