MPCli Tool
The MPCli Tool is a multi-platform command line tool compatible with Windows, Linux, and macOS, supporting UART one-to-one operation mode. Its core functions include:
Burning files
Reading Flash content
Modifying the content at a specified Flash address
Setting Bluetooth address and TX Power
Writing eFuse
Download the MPCli Tool from the RealMCU platform.
Command Options Overview
Run the command mpcli -h to view all command options supported by the application. Long options and short options function the same.
Short Option |
Long Option |
Function |
|---|---|---|
-h |
--help |
menu |
-V |
--version |
tool version |
-c |
--com |
set the serial port number |
-b |
--baud |
set serial port baud rate |
-a |
--auto |
used with -f specify multiple separate image files burning modes |
-f |
--json |
configuration json file |
-P |
--packetimage |
input packed image file |
-e |
--pageerase |
erase function requires specifying the starting address of the Flash to be erased and the erase range |
-p |
--program |
burn function requires specifying the burn file and the burn Flash address |
-v |
--verify |
verify whether the specified file has been programmed to the specified Flash address |
-s |
--savebin |
save file requires specifying the address of Flash and size and file name. |
/ |
--dump_data |
display Flash data in the command prompt window |
-m |
--modify |
modify data at the specified address in flash |
-A |
--address |
input 16-Hex flash address |
-S |
--size |
size |
-F |
--filepath |
specify the file path |
/ |
--spi_pin_config_json |
SPI PIN config json file |
/ |
--set_tx_power |
set TX Power |
-T |
--set_xtal_calibration |
set 40MHz XTAL Internal Cap Calibration |
-x |
--set_mac |
set bluetooth address |
-u |
--efuse_json |
burn eFuse json file |
-U |
--efuse_otp |
write eFuse as OTP |
-I |
--get_euid_mac |
dispaly EUID and bluetooth address |
-B |
--get_back_mac |
keep the Bluetooth address in the flash unchanged during burning |
/ |
--get_back_xtal_calibration |
keep the 40MHz XTAL Internal Cap Calibration in the flash unchanged during burning |
-D |
--debugpassword |
e.g.-D 00:11:22:33:44:55:66:77:88:99:AA:BB:CC:DD:EE:FF |
-E |
--chiperase |
full chip erase |
-C |
--erase |
full chip erase but retain first 4k |
-r |
--reboot |
reboot IC |
Note
The following will take the Windows platform as an example to provide a detailed introduction to command formats and common functions, helping users easily complete burning tasks. It is important to note that parameter information in the command line is provided as an example to illustrate its function; please replace it with correct configuration information according to actual needs when using.
Basic Burning Functions
MPCli Tool supports the following two burning modes, allowing users to complete multiple file burning tasks with a single command.
Multiple Separate Image File Burning Mode
Prepare Files
In the same directory as mpcli.exe, locate the mptoolconfig.json configuration template file and supplement the following necessary information:
Configure Serial Port: Enter the serial port number of the device to be burned in the 'port' item, and enter the baud rate in the 'baud' item.
File Information: Fill in the folder
binwhere multiple separate image files are located in the 'relativepath' item. Please ensure that this folder is in the same directory level asmptoolconfig.json.Burn Information: Enter the burn addresses of the separate image files in the 'address' item, fill in the file names in the 'name' item, and enable burning of the separate files through the 'enable' item.
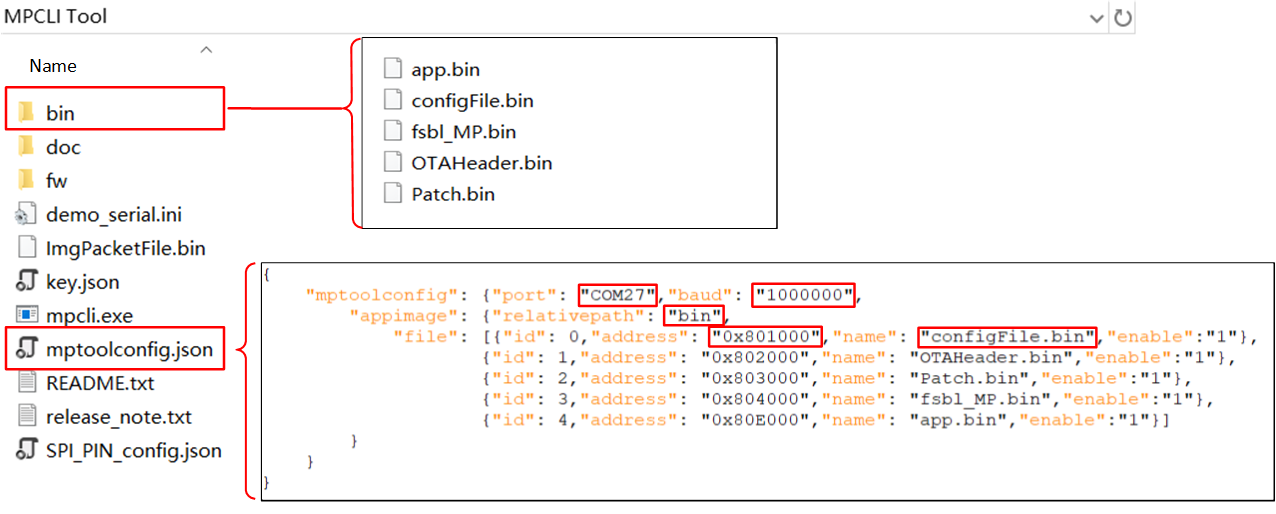
Example of Filling JSON with Multiple Separate Image Files
Note
All entries must be enclosed in double quotes.
To ensure the stability of the burning process, it is recommended to set the baud rate to no more than 2Mbps, with a default baud rate of 1Mbps.
The burn address must be filled in using a hexadecimal string format.
If the enable field is deleted, the burn operation will be executed by default.
Pay attention to punctuation when adding or deleting id entries to avoid JSON parsing errors.
Burning
Ensure the device to be burned enters burn mode. (Specific operation: pull P0_3 low, then reset IC for 100ms)
Call mpcli.exe -a -f "mptoolconfig.json" -r or mpcli.exe -c com27 -b 115200 -a -f "mptoolconfig.json" -r
-
Parameter Description:
If the -c option is used in the command parameters to specify the serial port number, then that serial port number will be used.
If the command parameters include the -b option, then the baud rate specified by -b will be used.
It is recommended to use the -r option to automatically restart after the flashing is completed. This can omit the step of manually entering the flashing mode, thus enabling continuous flashing tests.
Packet File Burning Mode
Refer to MP Pack Tool to package multiple separate image files into one package file
ImagePackedFile.bin.Execute mpcli.exe -c com27 -P ImagePackedFile.bin -r to complete the flashing.
-
Parameter Explanation:
-c: Specify the serial port number (mandatory).
-P: Specify the path of the package file (mandatory), which can be a full path or a relative path to
mpcli.exe.-b: Specify the baud rate. If not specified, the program's default value will be used.
-r: Specify whether to restart the IC after flashing is completed. It is recommended to enable this option.
Before starting the flashing, confirm that the DUT enters the flashing mode.
Note
Erase Instruction In the above mode,
mpcli.exewill automatically calculate and erase the required Flash range. This process is automatically determined based on the address and size of the flashing file, no manual setup is needed.
Option Function
The MPCli Tool can be invoked as follows: mpcli [option] [value].
Note
[option]: Please refer to Command Options Overview, long options or short options can be used.
[value]: Depending on the attribute of the option, it may require a value to be passed in.
Burn a Single Image File
Users can specify the Flash erase range, programming file, and programming address in the command line parameters. mpcli.exe will perform operations such as erasing Flash, programming, and verifying the image file based on these parameters. In this way, users can flexibly control the programming process, ensuring that data is accurately written to the specified address area and verified after programming to ensure data correctness.
There are two ways to program an image file:
-
One-step Execution
Complete erasing, programming, and verification in one step: mpcli.exe -c com27 -e -p -v -F "filename.bin" -A 0x801000 -S 4096 -r
-
Step-by-step Execution
Erase: mpcli.exe -c com27 -e -A 0x801000 -S 4096 -r
Program: mpcli.exe -c com27 -p -A 0x801000 -F "filename.bin" -r
verify: mpcli.exe -c com27 -v -A 0x801000 -F "filename.bin" -r
-
Parameter Description:
-e: Enable erase function.
-p: Enable programming function.
-v: Enable verification function.
-A: Specify the Flash address of the device, must be filled in hexadecimal string format, e.g. 0x801000.
-S: Specify the erase range, aligned up to the nearest 4K boundary.
-F: Specify the programming file.
Note
If the Flash area on the device is confirmed to be empty, it is possible to skip the erase -e to save time.
Modify Content at Specified Position
mpcli.exe supports modifying continuous bytes of content starting at a specified position in the device's Flash.
Command example: mpcli.exe -c com27 -m 01:02:03:04:05:06 -A 0x801409 -r
-
Parameter explanation:
-c: Specifies the serial port number of the device, ensuring the correct port number is selected.
-m: Defines the content to be written. Hexadecimal values separated by colons, with each value represented by two characters. The maximum modification length for a single command execution is 32 bytes.
-A: Specifies the start address in Flash for the modification operation. The address should be in hexadecimal string format, such as 0x801409.
-r: Used to reboot the device after the operation is completed.
Save Content at Specified Position to File
mpcli.exe supports saving continuous content from a specified address in the device's Flash to a designated file.
Command example: mpcli.exe -c com27 -s -A 0x801000 -S 128 -F "output.bin" -r
-
Parameter explanation:
-c: Specifies the serial port number of the device, ensuring the correct port number is selected.
-s: Indicates a save operation, saving the specified Flash content to a file.
-F: Specifies the filename (including path) to save the read data to. Ensure the path is valid and has write permissions.
-A: Specifies the starting address of the Flash content to be saved. The start address should be in hexadecimal format to ensure the correct memory location is read.
-S: Specifies the length of data (in bytes) to read and save. In this example, it is 128 bytes, which can be adjusted according to actual needs.
Display Content at Specified Position
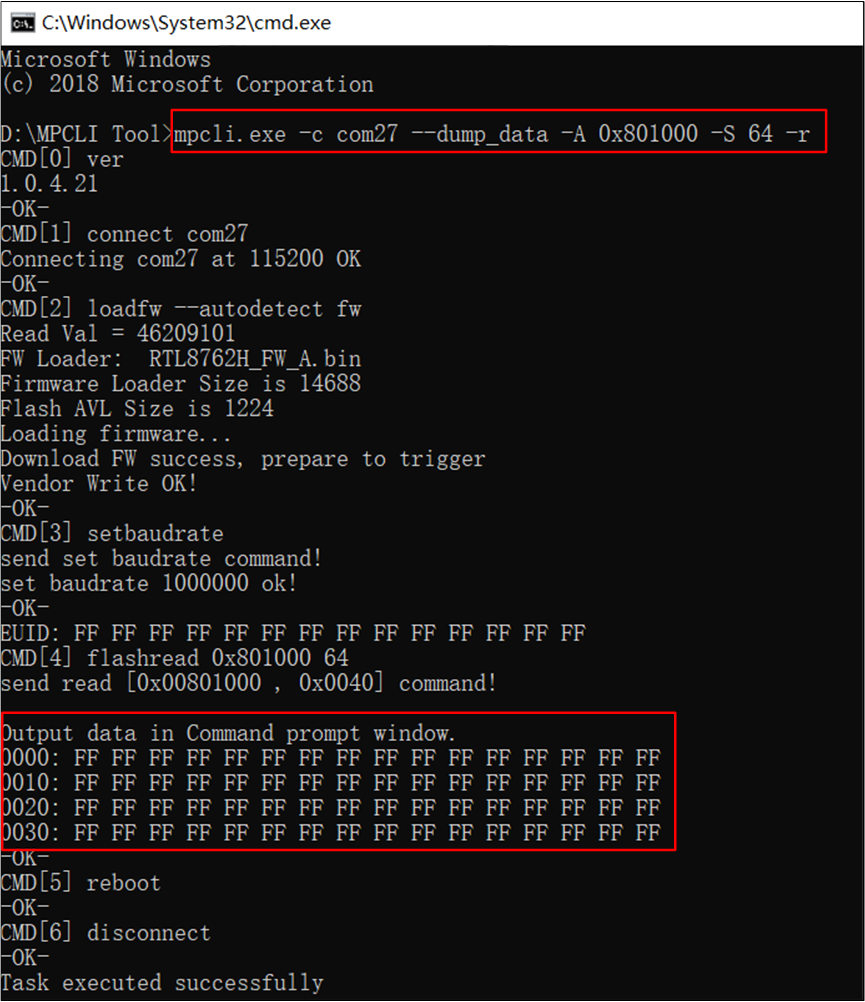
mpcli.exe supports displaying a continuous section of content from the device's Flash in the command prompt window.
Command example: mpcli.exe -c com27 --dump_data -A 0x801000 -S 64 -r
-
Parameter explanation:
-c: Specifies the serial port number of the device. Ensure the correct port number is selected.
--dump_data: Indicates that the content should be displayed in the command prompt window.
-A: Specifies the starting address to display the Flash content. The starting address is given in hexadecimal format to ensure the correct memory location is read.
-S: Specifies the length of the data (in bytes). In this example, it is 64 bytes, which can be adjusted as needed.
Display Specified Content
Modify Bluetooth Address
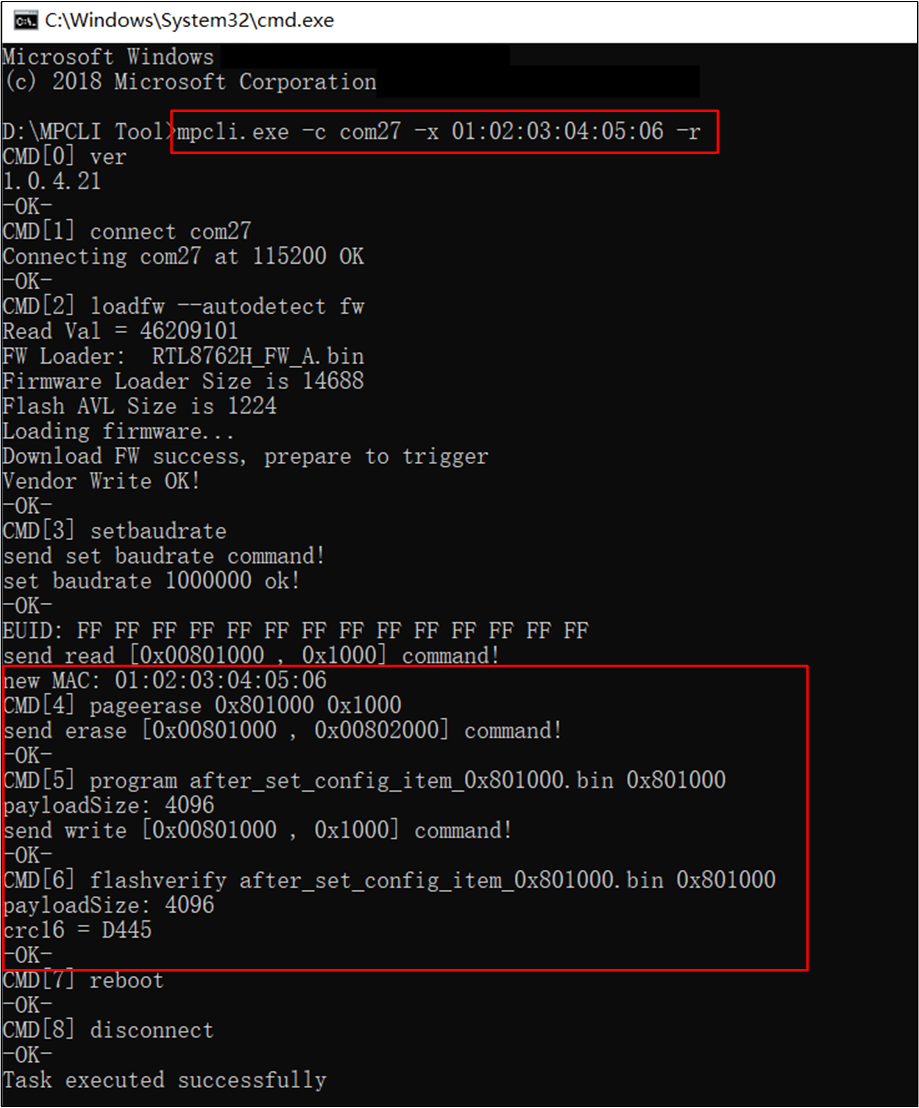
mpcli.exe supports modifying the Bluetooth address in the device's Flash.
Command example: mpcli.exe -c com27 -x 01:02:03:04:05:06 -r
Modify Bluetooth Address
Note
Parameter Format: Ensure that each byte of the Bluetooth address is represented by a two-digit hexadecimal number, with bytes separated by a colon.
Update Restriction: If the configuration region in Flash is empty, the Bluetooth address cannot be modified.
Update Logic: If the configuration region is initialized but does not yet contain a Bluetooth address entry, a new entry will be added. If an address entry already exists, only the 6-byte Bluetooth address will be replaced.
Parameter Combination: Can be used together with the programming image file to enhance production efficiency.
Modify XTAL Internal Cap Calibration
mpcli.exe supports modifying the XTAL Internal Cap Calibration in the device's Flash.
Command example: mpcli.exe -c com27 -T 3F -r
-
Parameter Description:
-c: Specify the device's COM port number, ensuring the correct port number is selected.
-T: Set the frequency offset value, which must be a 2-character hexadecimal string ranging from 00 to 7F.

Modify XTAL Internal Cap Calibration
Note
Update Restriction: If the configuration region in Flash is empty, the modification cannot be performed.
Parameter Combination: Can be used together with the programming image file to enhance production efficiency.
Modify TX Power
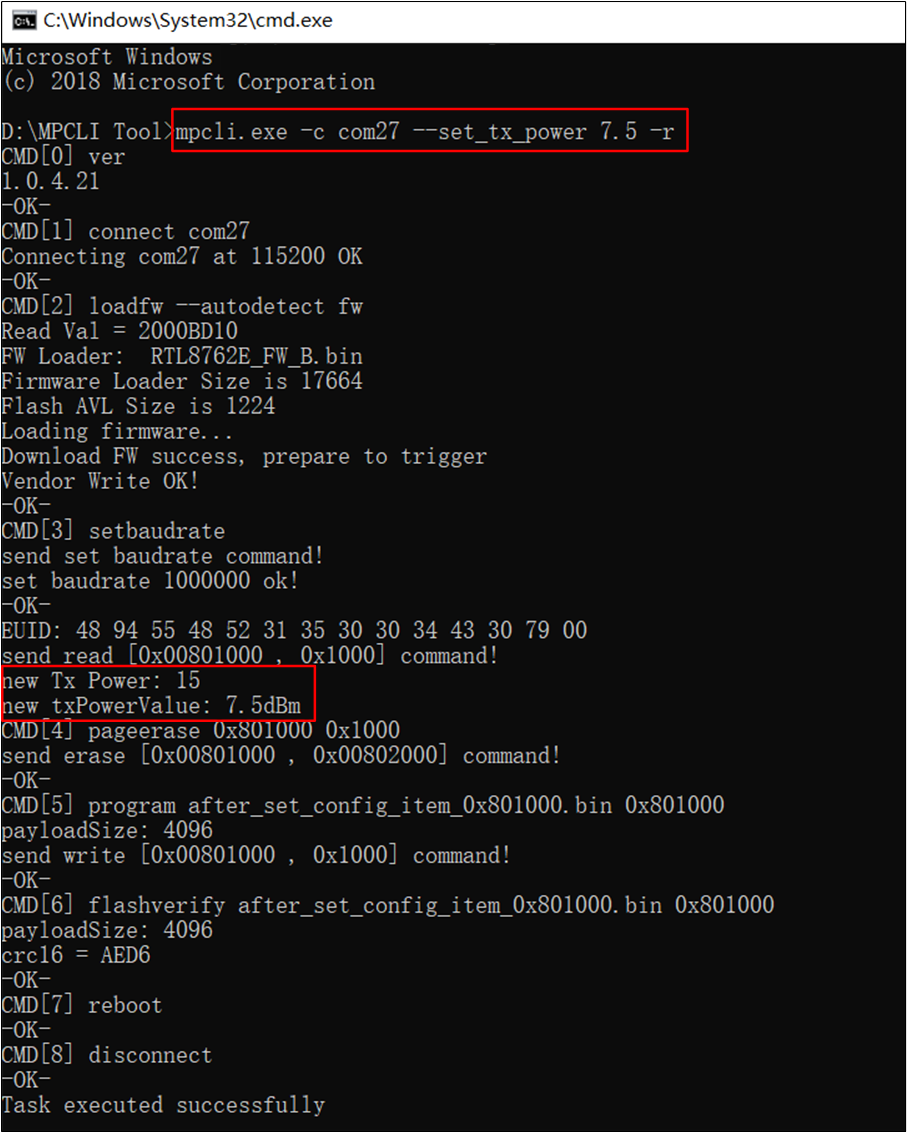
mpcli.exe supports modifying the TX Power in the device's Flash.
Command example: mpcli.exe -c com27 --set_tx_power 7.5 -r
-
Parameter explanation:
-c: Specify the device's serial port number, ensuring the correct port number is chosen.
--set_tx_power: Set the TX Power (in dBm), ensuring the value is within the supported range of the device to avoid affecting performance.
Modify TX Power
Note
Update Restriction: If the configuration region in Flash is empty, modifications cannot be performed.
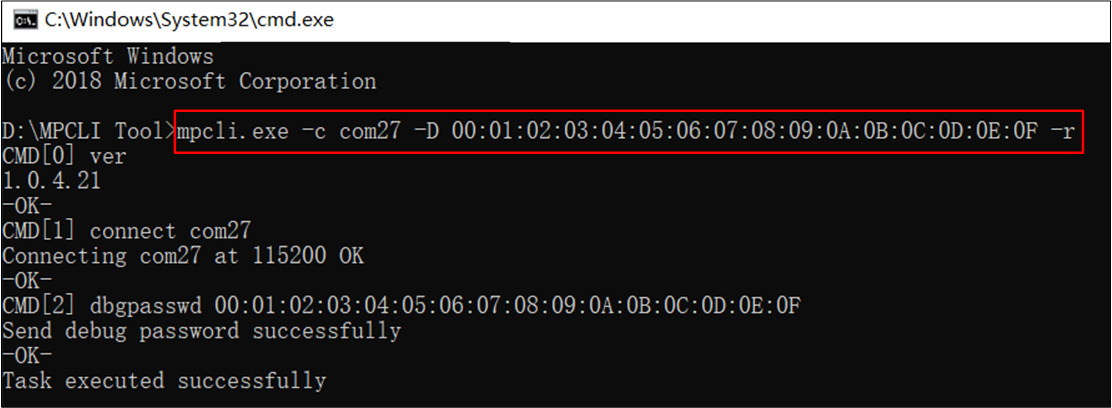
Password Debugging
mpcli.exe supports unlocking locked chips to enable debugging features.
mpcli.exe transmits a 16-byte Password via HCI UART, and then the IC will automatically restart and check if the Password is correct. If correct, the feature is enabled.
Command example: mpcli.exe -c com27 -D 00:01:02:03:04:05:06:07:08:09:0A:0B:0C:0D:0E:0F -r
-
Parameter description:
-c: Specify the serial port number of the device, ensure the correct port number is selected.
-D: Set the password, input in a colon-separated 16-byte hexadecimal data format.
Password Debug
Note
The password needs to be re-entered each time the IC restarts to enable this feature.
Full Chip Erase Command
mpcli.exe supports erasing all the contents of the device's Flash.
Command example: mpcli.exe -c com27 -E -r
-
Parameter description:
The -E option can be used for multiple independent image file burning mode and package file burning mode. In these modes,
mpcli.exewill prioritize performing a full chip erase operation.
Note
Use mpcli.exe -c com27 -C -r to perform a full chip erase operation starting from an offset of 4K from the beginning of the Flash.
Serial Port Flow Control Configuration
mpcli.exe supports parsing the serial.ini file located in its directory, automatically controlling the high and low levels of specified serial port pins without manual operation, thereby easily achieving specific actions.
Below is an example of the content of the demo_serial.ini file.
The specific configuration steps are as follows:
Create a new
serial.inifile in the directory wherempcli.exeis located.Configure the required module actions, such as RTS, DTR, and sleep operations.
When
mpcli.exeopens the serial port, it will automatically parse theserial.inifile.If the related function is not needed, you can rename or delete the
serial.inifile.
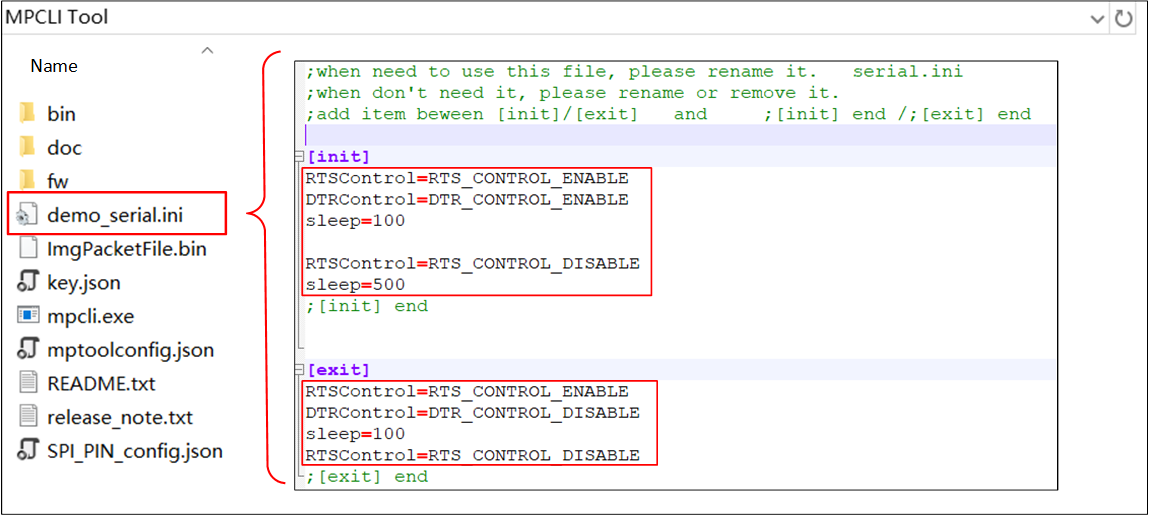
serial.ini Configuration Instructions
Note
Entries can be added or deleted within the red box.
Only the following three keywords are supported: RTSControl, DTRControl, and sleep.
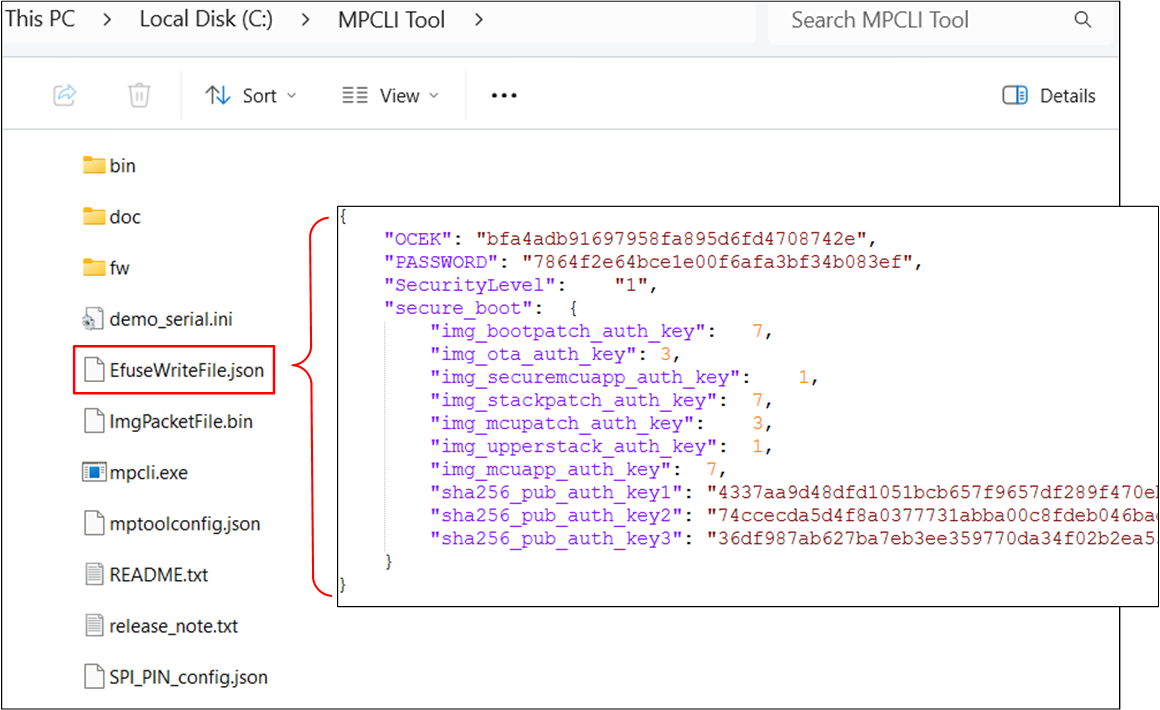
Write eFuse File
The eFuse file is in JSON format and is used to record data that needs to be programmed into the device, including security mechanisms and Flash power-on parameter settings. The file format can refer to the following EfuseWriteFile.json example.
mpcli.exe supports burning the data from the eFuse file into the device. Before writing the content of EfuseWriteFile.json into the device, the FW Loader will perform a blank check to verify whether the current key is valid. If the current key is deemed valid, the program will indicate success, and no bytes will be written. If the current key is invalid, the program will indicate failure, and similarly, no bytes will be written.
Command example: mpcli.exe -c com27 -u EfuseWriteFile.json -r
Writing eFuse File
Note
Using the eFuse json format, it is possible to configure multiple nodes in
EfuseWriteFile.jsonto enhance the efficiency of writing multiple pieces of information at once.The node types in
EfuseWriteFile.jsonmust be supported by the device, otherwise, the write operation will fail. Please use only supported node types in the JSON file to ensure correct configuration application.Suitable for batch configuration and rapid application of multiple parameter settings.
Write eFuse as OTP
mpcli.exe supports writing eFuse data to a specified address. After writing is completed, mpcli.exe will display the data at the target location in the command prompt window for user verification and inspection.
Command example: mpcli.exe -c com27 -U 010203040506 -A 0x8800119 -r
-
Parameter explanation:
-U: Specifies the eFuse data, the number of characters must be even, i.e., a complete byte.
-A: Specifies the burn-in address. If the existing content of the target address is identical to the content to be burned in, the system will prompt that a valid eFuse content already exists, indicating a successful operation and normal exit; if the content is inconsistent, a conflict will be prompted, causing the operation to fail and exit.
Note
This operation requires specifying a specific address for writing to eFuse, which means you need to clearly define where the data will be burned.
Each operation can only write one piece of information at a time, which requires the user to specify and operate individually for multiple entries.
Suitable for precise and personalized writing of specific information.
This feature is only supported by the RTL8762C/D chips.
When burning on the RTL8762C board, the length of the eFuse data is limited to 32 characters (16 bytes).
The RTL8762C/D chips have a relatively large eFuse space, which can reserve up to 36 bytes for the APP, recording data that is written only once, such as the serial number.
Display Bluetooth Address
mpcli.exe supports reading EUID and the Bluetooth address from the device's Flash and displays the results in a fixed format in the command prompt window for easy extraction and analysis by the user.
Command example: mpcli.exe -c com27 -I -r
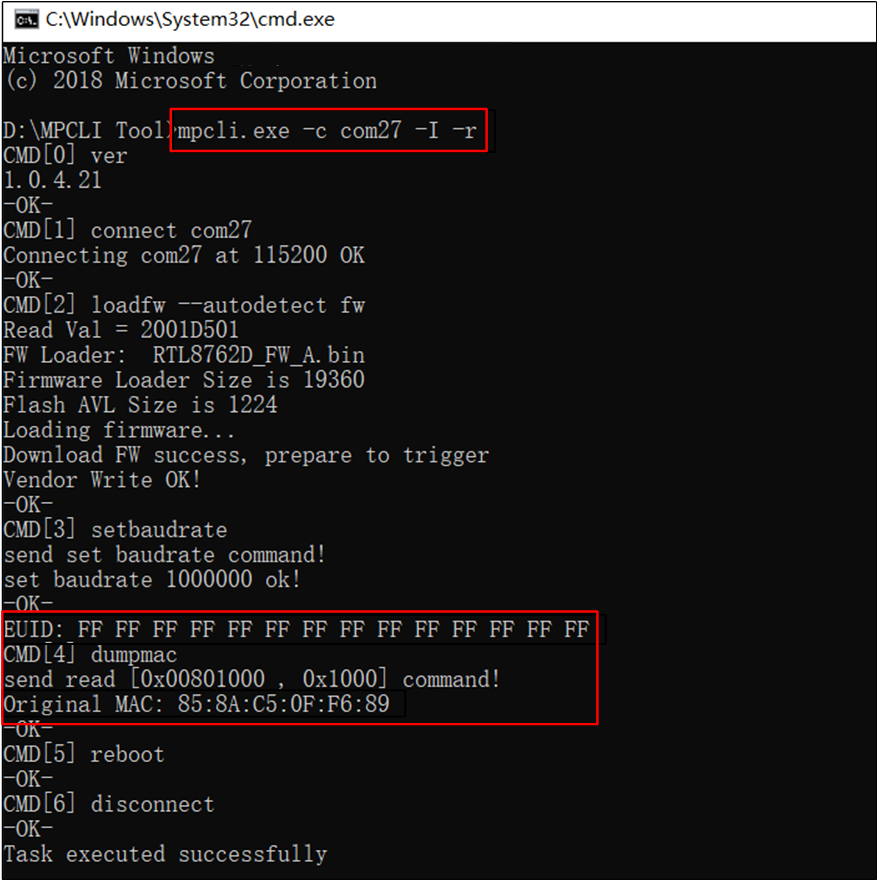
Display Bluetooth Address and EUID
Note
The value of EUID in the figure is only a print sample and has no meaning.
The -I option has no usage restrictions and can be used with other options in the same command.
Read Back Bluetooth Address and Burn
mpcli.exe supports using the -B option to protect the device's Bluetooth address from being overwritten when burning the image file.
The tool specifically operates as follows:
Before erasing the Flash,
mpcli.exefirst reads the current Bluetooth address of the device from the Flash.It reads the content of the file to be programmed and replaces the original Bluetooth address of the device into the corresponding position in
configFile.bin.It performs the operations of erasing, programming, and verification.
Command example: mpcli.exe -c com27 -a -f mptoolconfig.json -B -r, the tool execution log is as follows.
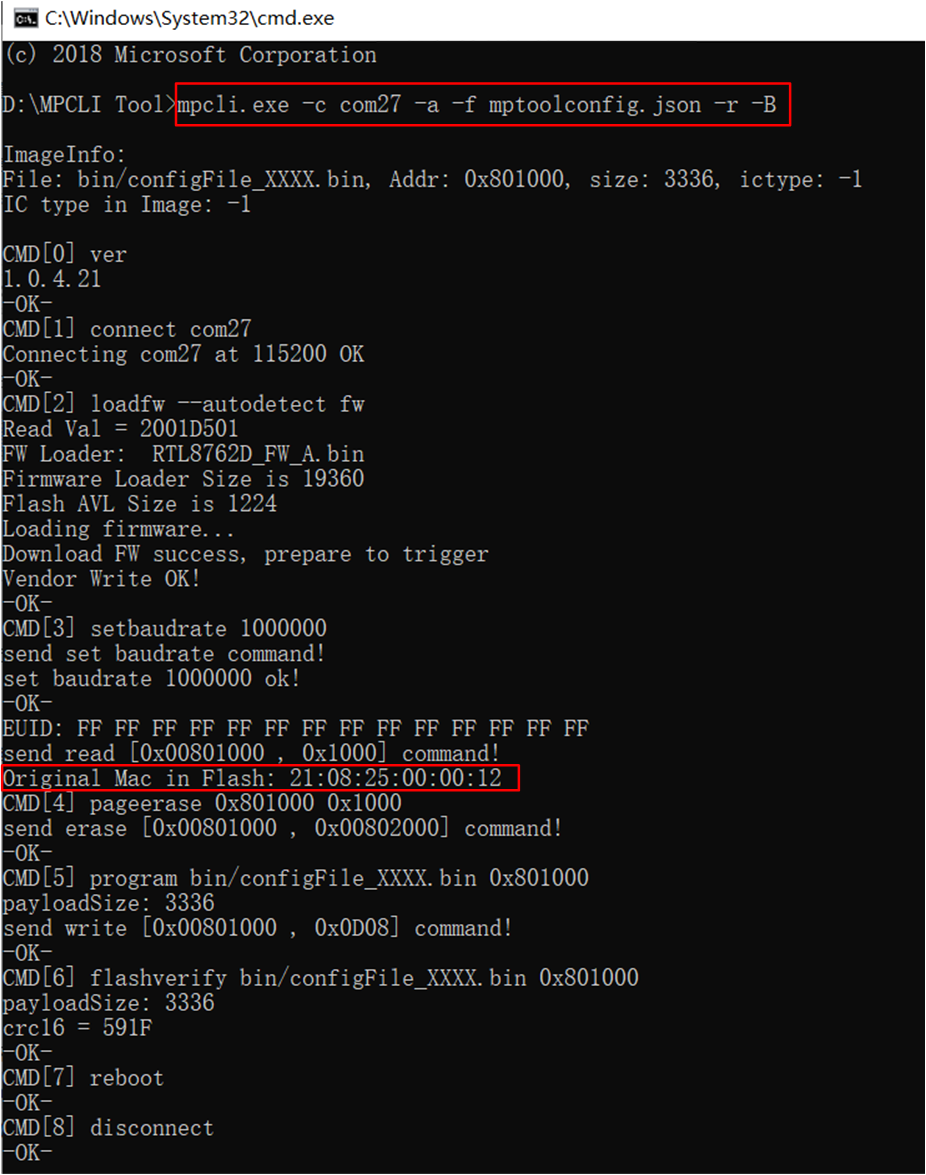
Readback and Burn Bluetooth Address
Note
Usage Requirement: When -B is selected but the programming option is not chosen, the readback and write action cannot be completed.
Usage Requirement: When -B is selected and the programming option is chosen, but the programming file does not contain
configFile.bin, the -B option is invalid.Content Check: When reading the configuration region of the Flash, if the Bluetooth address is empty, the program logs an error and exits.
Replacement Principle: During the running of
mpcli.exe, the Bluetooth address replacement is implemented, but the original file is not modified.
Readback XTAL Internal Cap Calibration and Program
mpcli.exe supports using the --get_back_xtal_calibration option to protect the device's frequency offset calibration value from being overwritten when programming the image file.
The specific approach of the tool is as follows:
mpcli.exefirst reads the current frequency offset calibration value of the device from Flash.It reads the content of the file to be programmed and replaces the original frequency offset calibration value of the device into the corresponding position in
configFile.bin.It performs the operations of erasing, programming, and verification.
Command example: mpcli.exe -c com27 -a -f mptoolconfig.json --get_back_xtal_calibration -r, the tool execution log is as follows.
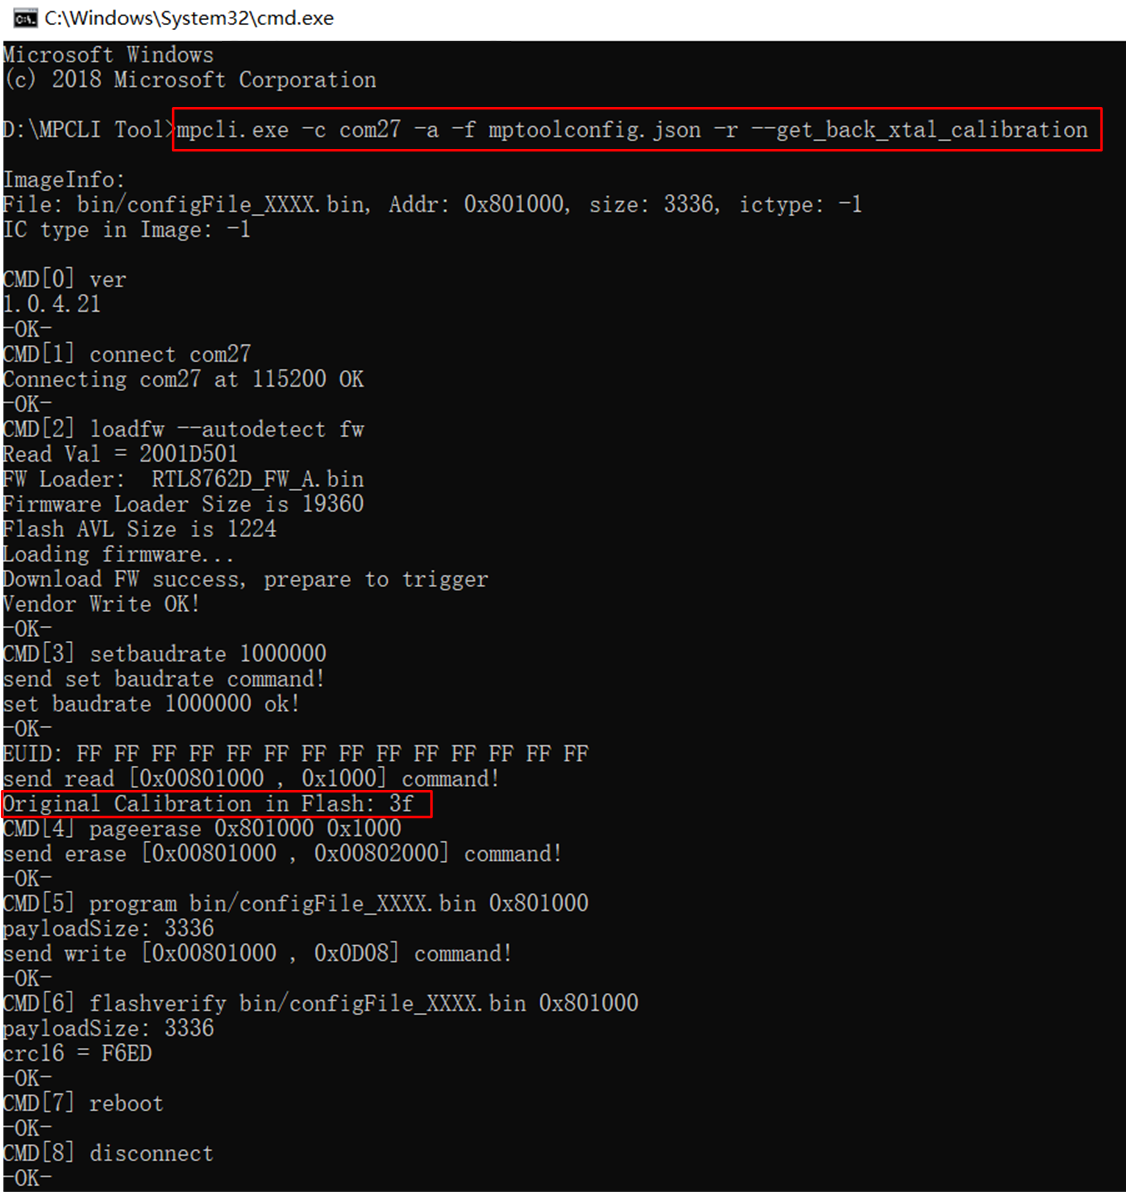
Readback XTAL Internal Cap Calibration and Burn
Configure SPI Flash PIN
mpcli.exe supports using the --spi_pin_config_json option to configure the SPI Flash Pin in a file for burning.
The user's configuration steps are as follows:
Open the
SPI_PIN_config.jsonfile and update the pin configuration for SCLK, MISO, MOSI, and CS.Use
mpcli.exeto complete the burning process.
-
Command examples:
mpcli.exe –c comX –P packedimage.bin --spi_pin_config_json SPI_PIN_config.json –r
mpcli.exe –c comX –a –f fileconfig.json --spi_pin_config_json SPI_PIN_config.json –r
-
Parameter explanation:
--spi_pin_config_json: Specifies the
SPI_PIN_config.jsonfile, as shown in the figure below.Must be used together with the burning image file option.
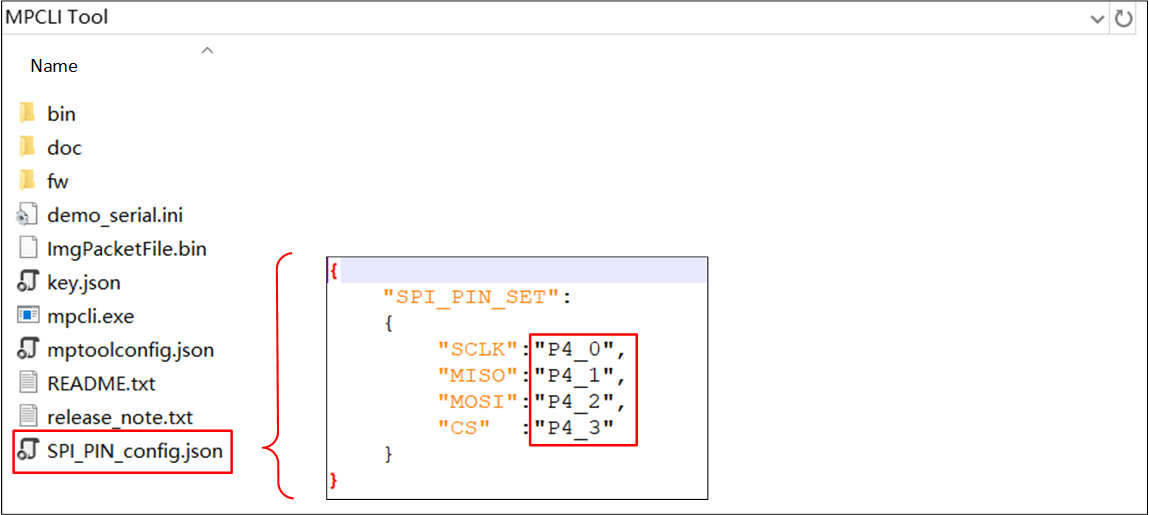
Configure SPI Flash PIN
Notes
Burning Parameters Explanation
-
Burn Address
The burn address must be 4-byte aligned.
-
Erase Range
When burning the image file, if the command line options do not include -E or -C, the size of the Flash to be erased will be extended upwards based on the size of the file to be burned, reaching a 4KB alignment.
-
Burn Firmware
mpcli.exeautomatically loads the firmware file from thefwfolder according to the IC type. Users must not modify or delete thefwfile in the release package.
Cross-Platform Usage Issues
When using mpcli on Linux or macOS platforms, please note the following:
-
Pay attention to the serial port format settings.
Command example: ./mpcli -c /dev/tty.usbserial-XXXX -r
-
If you encounter issues with the serial port being inaccessible or failing to open, it is possible to resolve them by changing the permissions of the device file. Refer to the following:
Use the chmod command to grant read and write permissions to the serial port device sudo chmod 777 /dev/ttyXXXX
Use the adduser command to add the current user to the dialout group sudo adduser username dialout
Error Code
After executing the mpcli.exe tool, an integer value will be returned (Error Code), indicating the program's running status.
Users can determine the execution result of mpcli.exe by Capture Error Code and analyze the cause of the error with reference to the following Error Code Table.
Error Code Table
Error Code |
Indication |
Reason |
|---|---|---|
0 |
success |
|
1 |
parameter error |
Users need to ensure the accuracy of the input parameters/file paths and options |
2 |
port number error |
The entered serial port number is incorrect or the serial port is already in use |
3 |
open file error |
The file does not exist or is corrupted. |
4 |
IC type error |
Unable to match the corresponding firmware or the tool does not support this IC type option |
5 |
no ready error |
Caused by firmware not loaded or serial port not opened |
6 |
hci Event error |
Common reason is the DUT not entering the programming mode |
7 |
mp event error |
Errors occurring during the programming transfer process |
8 |
crc check error |
Incorrect CRC check during UART data transmission |
9 |
timeout error |
Timeouts are usually due to unstable serial port connections |
10 |
flash read error |
Failed to read Flash content |
11 |
flash verify error |
Verification error after writing to Flash is usually due to incorrect data writing |
12 |
configuration signature error |
Does not match expectations when verifying Flash Config Region |
13 |
packed image parse error |
Error parsing the packed file possibly due to file length error or file content issue |
14 |
make temp dir error |
Failed to create temporary file path |
15 |
alloc error |
Failed during heap memory allocation |
16 |
save error |
Error occurred while saving the file |
17 |
delete error |
Error occurred while deleting the file |
18 |
dump data error |
Failed while displaying Flash content |
Capture Error Code
Below are several methods to capture error code, which users can refer to.
-
Log File
Parse the runtime log of
mpcli.exe:When executed successfully, print the log Task executed successfully
When execution fails, print the error code and log Task execution failure
-
Batch Script
Users can use %errorlevel% to get the return value.
-
PowerShell
Users can use $LASTEXITCODE to get the return value.
-
Python
Users can use the subprocess module to get the return value.
-
VS Solution
Users can obtain it by using the method to get the process return value, for example: Process.ExitCode