Testing Matter with Realtek Matter SDK
The Realtek Matter SDK supports the Matter over Thread solution, enabling Matter devices to communicate via the Thread network. This solution requires a Thread Border Router and a Controller. The Thread Border Router allows Matter devices in the Thread network to communicate with external networks, such as Wi-Fi. The Controller allows the commissioning of a Matter device into the network and communication with it using Matter messages.
Environment Setup
A Matter over Thread development environment can be set up in the following two ways:
Configuring Border Router and Controller on Separate Devices, referred to below as the two-device environment setup
Configuring Border Router and Controller on One Device, referred to below as the single-device environment setup
Two-Device Environment Setup
This section describes the scenario of running the Thread Border Router and Matter Controller on different devices. You can install the Matter Controller on a PC and run the Thread Border Router on a Raspberry Pi. The Matter Controller and Thread Border Router must be on the same local area network(LAN).
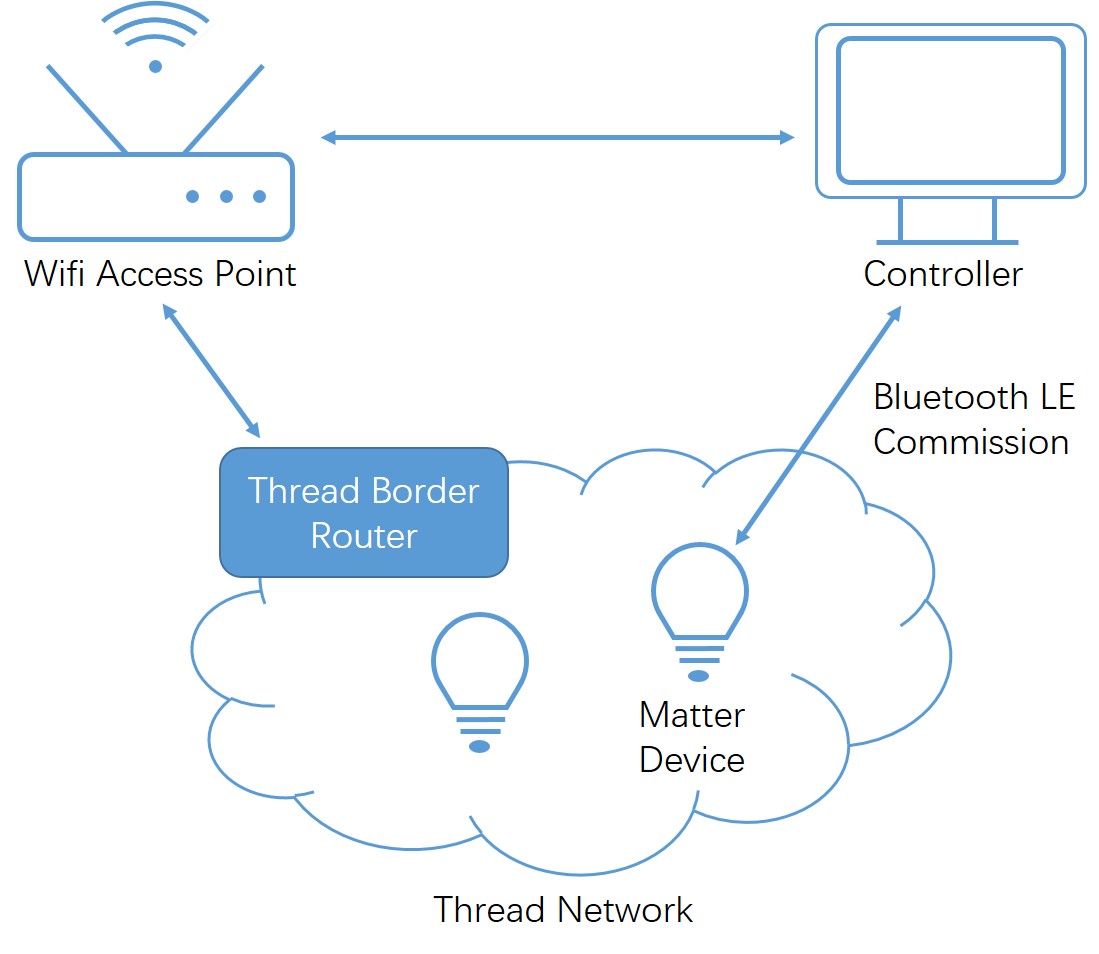
Border Router & Controller on Separate Devices
Requirements
Device |
Num |
|---|---|
PC(Ubuntu 22.04) |
1 |
Raspberry Pi 3B+ or newer, with an SD card of at least 8 GB |
1 |
Wi-Fi Access Point supporting IPv6 (without IPv6 Router Advertisement Guard enabled) |
1 |
Radio Co-Processor (RCP) device |
1 |
Matter device |
1 |
Prepare Environment
Thread Border Router
You can refer to OpenThread Border Router Build and Configuration to prepare the Thread Border Router.
Matter Controller
The CHIP Tool (chip-tool) is a Matter Controller implementation that allows commissioning a Matter device into the network and communicating with it using Matter messages.
To build the target, follow the steps listed on the CHIP Tool.
Matter Device
You can refer to Lighting to prepare your matter device.
Single-Device Environment Setup
This section describes the scenario of running the Thread Border Router and Matter Controller on one device. You can run them on a PC or a Raspberry Pi.
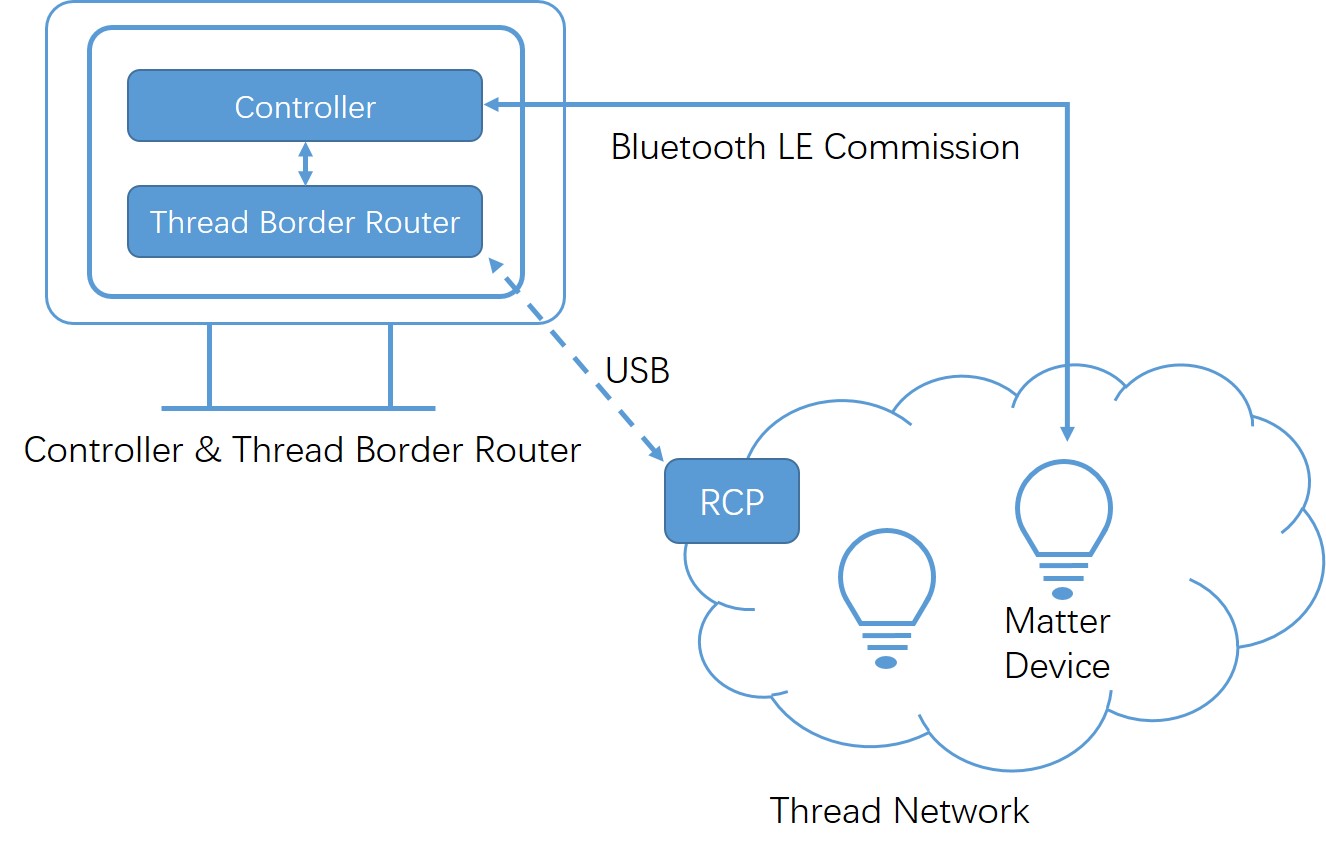
Border Router & Controller on One Device
Requirements
Device |
Num |
|---|---|
PC (Ubuntu 22.04) / Raspberry Pi 3B+ or newer (installed with Ubuntu 22.04 instead of Raspberry Pi OS) |
1 |
Radio Co-Processor (RCP) device |
1 |
Matter device |
1 |
Prepare Environment
Thread Border Router
Refer to OpenThread Border Router Build and Configuration to prepare Thread Border Router.
Matter Controller
The CHIP Tool (chip-tool) is a Matter Controller implementation that allows commissioning a Matter device into the network and communicating with it using Matter messages.
To build the target, follow the steps listed on the CHIP Tool.
Matter Device
Refer to Lighting to prepare the matter device.
Commissioning the Device
After the Matter device is ready, follow these steps for device commissioning.
Ensure that the Chip Tool and Thread Border Router are on the same network segment.
-
Form a Thread network with Thread Border Router.
$ sudo ot-ctl factoryreset
$ sleep 1
$ sudo ot-ctl dataset init new
$ sudo ot-ctl dataset channel 25
$ sudo ot-ctl dataset panid 0x5b35
$ sudo ot-ctl dataset extpanid 5b35dead5b35beef
$ sudo ot-ctl dataset networkname 5b35
$ sudo ot-ctl dataset networkkey 00112233445566778899aabbccddeeff
$ sudo ot-ctl dataset commit active
$ sudo ot-ctl prefix add fd11:35::/64 pasor
$ sudo ot-ctl dataset meshlocalprefix fd73:b7bd:20e5:053d::
$ sudo ot-ctl dataset commit active
$ sudo ot-ctl ifconfig up
$ sleep 1
$ sudo ot-ctl thread start
$ sleep 1
$ sudo ot-ctl state
$ sudo ot-ctl netdata register
$ sleep 1
$ sudo ot-ctl netdata show
$ sudo ot-ctl ipaddr
Please ensure that the Thread Border Router is the leader.
$ sudo ot-ctl state
leader
done
-
Obtain the device's PIN code and Discriminator.
PIN code: A 27-bit value used to authenticate the device. Default: 20202021
Discriminator: A 12-bit value used to discern between multiple commissionable device advertisements. Default: 3840
If you are using factory data, you can scan the QR code generated in section Factory Data Generation to obtain this information.
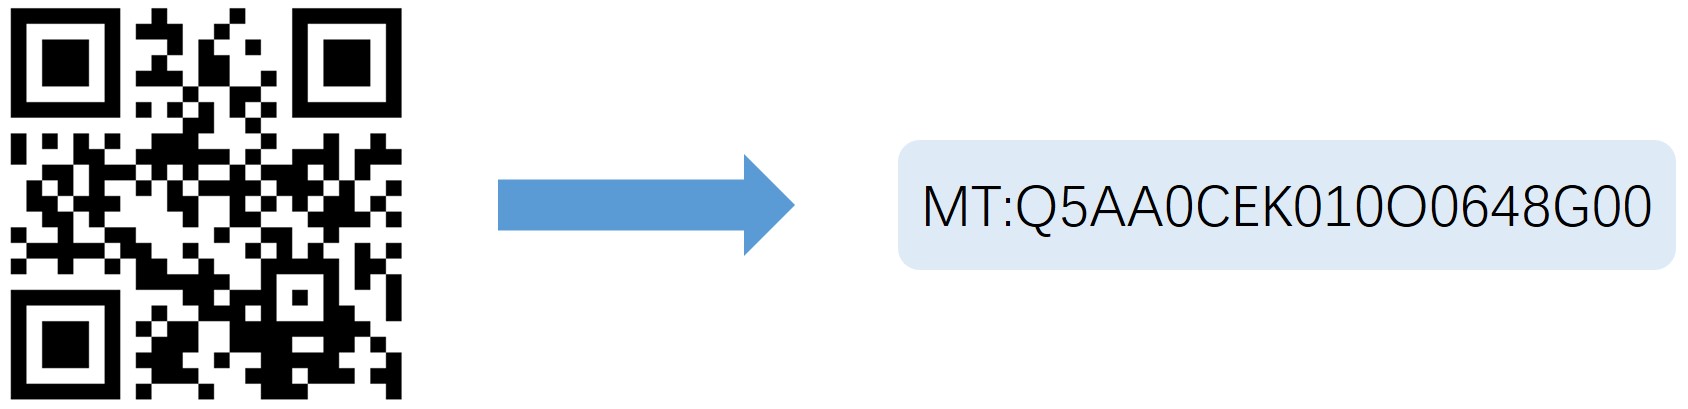
QR Code & Scan Results
You can parse its content through CHIP Tool, as in the following example:
$ ./chip-tool payload parse-setup-payload "MT:Q5AA0CEK010O0648G00"
CHIP:DL: ChipLinuxStorage::Init: Using KVS config file: /tmp/chip_tool_kvs
CHIP:SPL: Parsing base38Representation: MT:Q5AA0CEK010O0648G00
CHIP:SPL: Version:             0
CHIP:SPL: VendorID:            4886
CHIP:SPL: ProductID:           32769
CHIP:SPL: Custom flow:         0    (STANDARD)
CHIP:SPL: Discovery Bitmask:   0x02 (BLE)
CHIP:SPL: Long discriminator:  3841   (0xf01)
CHIP:SPL: Passcode:            20202022
-
Commission device into a Thread network over Bluetooth LE.
$ ./chip-tool pairing ble-thread <node_id> hex:<operational_dataset> <pin_code> <discriminator> --bypass-attestation-verifier true
<node_id>: User-defined ID of the node being commissioned.<operational_dataset>: Current Active Operational Dataset from the Thread Border Router. To obtain it, executesudo ot-ctl dataset active -xin the terminal of device with Thread Border Router.<pin_code>: Obtained in step 3.<discriminator>: Obtained in step 3.--bypass-attestation-verifier: Use this to bypass the attestation verifier. If this flag is not provided or it is provided with the value false, the attestation verifier is not bypassed. If it is provided with the value true, the commissioning will continue in case of the attestation verification failure. The failure can be caused by errors in Certification Declaration, PAA or PAI certificates, or in the Device Attestation Certificate. This option can be helpful if one wants to quickly commission a device with PAI and DAC certificates based on an unknown PAA and/or with a Certification Declaration signed by an unknown key.
For example:
$ ./chip-tool pairing ble-thread 2 hex:0e08000000000001000035060004001fffe00410df7d53dd16ad16f407cd13efa93b285e0c0402a0f7f800030000190102123402081111111122222222030431323334051000112233445566778899aabbccddeeff0708fb73b7bd20e5053d 20202022 3841 --bypass-attestation-verifier true
Commissioning might take a while. If it's successful, the following message will appear in logs:
Device commissioning completed with success