IEEE 802.15.4 Simple TRX
This example uses two EVBs to play the roles of TX and RX respectively. TX device can send messages to RX device periodically to demonstrate the basic usage of IEEE 802.15.4 MAC driver API.
Requirements
The sample supports the following development kits:
Hardware Platforms |
Board Name |
|---|---|
RTL8752H HDK |
RTL8752H EVB |
For more requirements, please refer to Quick Start.
Wiring
Please refer to RTL8752H EVB Interfaces and Modules in Quick Start.
Configurations
For the configuration related to IEEE 802.15.4, please refer to the file subsys\zb-mac-test\test\rtk_mac\mac_test_common.c specifically the function zb_mac_drv_init.
Default configuration: PanID=0x05, ShortAddr=1, Channel=12.
Note
Both devices should use the same IEEE 802.15.4 configuration.
IEEE 802.15.4 sample projects use P3_0 as the TX pin for Data UART, and use P3_1 as the RX pin for Data UART by default.
The project contains the zb_tst_cfg.h file, which contains the definition of the Data UART pin. Data UART pin can be configured according to the hardware environment.
#else // For EVB board
#define ZB_DBG_UART_TX_PIN                  P3_0
#define ZB_DBG_UART_RX_PIN                  P3_1
The baud rate of Data UART is set to 2,000,000, and other parameters for serial port assistant tool in PC can be set as shown Serial Port Setup.

Serial Port Setup
Building and Downloading
This sample can be found in the SDK folder:
Project file: sdk\board\evb\ieee802154_test\mdk
Project file: sdk\board\evb\ieee802154_test\gcc
To build and run the sample, follow the steps listed below:
Open project file.
To build the target, follow the steps listed on the Generating App Image in Quick Start.
After a successful compilation, the APP bin
app_MP_sdk_xxx.binwill be generated in the directory bin.To download APP bin into evaluation board, follow the steps listed on the MP Tool Download in Quick Start.
Press reset button on evaluation board and it will start running.
Experimental Verification
After programming the sample to two evaluation boards, use the serial tool to view the running results.
Testing
After pressing the reset button and inputing the demo command, the device will periodically do a sleep - wake up - send loop.
After pressing the reset button, the device will receives frame automatically.
For example, by entering demo 2000000, the parameter 2000000 represents time, with the unit in microseconds, you can see the log information shown in the image below:
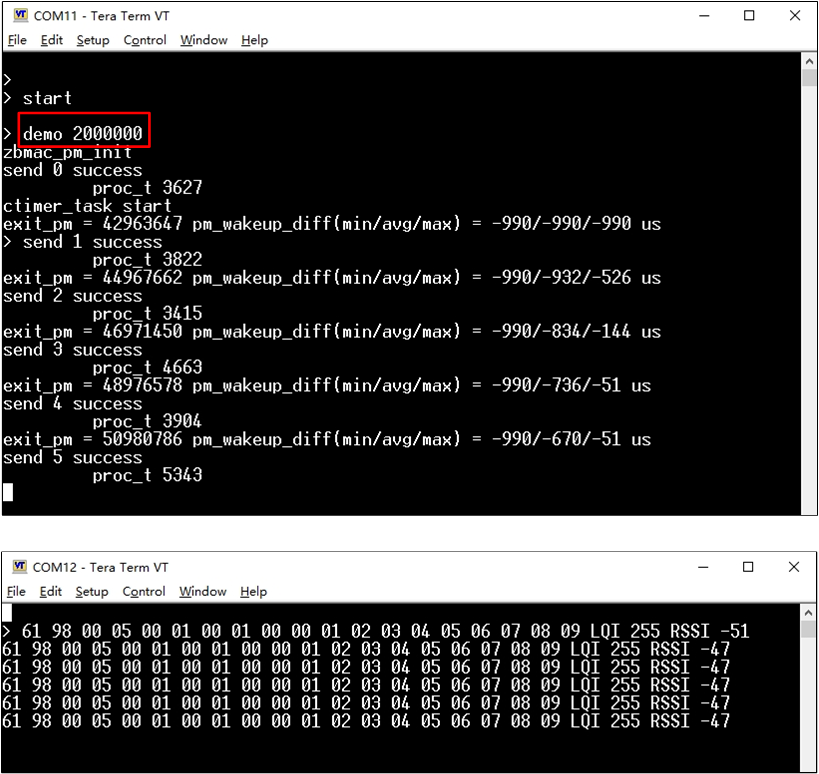
Example Log Information
Code Overview
The main purpose of this chapter is to help APP developers become familiar with the development process. This chapter will be introduced according to the following several parts:
Initialization introduces the initialization flow of the chip.
TX/RX Flow introduces radio initialization and running process.
Source Code Directory
Source files in the application project are currently categorized into several groups as below:
└── Project: ieee802154_test
    └── ieee802154_test
        ├── include
        ├── Lib                      includes all binary symbol files that user application is built on
            ├── gap_utils.lib
            ├── lowerstack.lib
            ├── rtl87x2g_sdk.lib
            ├── libzb_mac_driver.lib
            ├── ROM.lib
            └── zb_ROM.lib
        ├── cmsis
        ├── peripheral               includes all peripheral drivers and module code used by the application
        ├── profile                  includes profiles or services used by the sample application
        ├── app                      includes the IEEE 802.15.4 user application implementation
            ├── overlay_mgr.c
            ├── ancs.c
            ├── app_task.c
            ├── main.c
            └── peripheral_app.c
        ├── shell                    includes the shell implementation
        └── rtk_mac                  includes the IEEE 802.15.4 application implementation
            ├── dbg_printf.c
            ├── zb_main.c
            ├── mac_test_cmd.c
            ├── mac_802154_frame.c
            └── mac_test_common.c
Initialization
When the EVB board boots up and the chip is reset, the main function will be called, which executes the following initialization functions:
int main(void)
{
   extern uint32_t random_seed_value;
   srand(random_seed_value);
   board_init();
   pwr_mgr_init();
   zb_task_init();
   os_sched_start();
   return 0;
}
pwr_mgr_init initializes the DLPS power management module.
zb_task_init initializes the app task and registers the task main function.
os_sched_start() starts the os scheduler. When the scheduler is started, zb_task_init will be called and invoke the zigbee main function zb_test_task and radio main function rx_test_task.
void zb_task_init(void)
{
   mac_Initialize_Patch();
   zb_pin_mux_init();
   zb_periheral_drv_init();
   zb_mac_interrupt_enable();
   zb_mac_drv_enable();
   bool zb_sem_create = false;
   zb_sem_create = os_sem_create(&zb_sem, "zb_sem", 0, 16);
   if (zb_sem_create)
   {
      DBG_DIRECT("os_sem_create true");
   }
   else
   {
      DBG_DIRECT("os_sem_create false");
   }
   os_task_create(&zb_task_handle, "zb_test", zb_test_task, NULL, ZB_TASK_STACK_SIZE,
                  ZB_TASK_PRIORITY);
   os_task_create(&rx_task_handle, "rx_test", rx_test_task, NULL, ZB_TASK_STACK_SIZE,
                  ZB_TASK_PRIORITY);
}
TX/RX Flow
After input demo command, the demo function will be called.
This demo function cmd_demo is mainly used to set some global variables based on command line parameters, create a new task ctimer_task, which will periodically call the function demo_cb, and initialize power management.
The purpose of the demo_cb function is to generate and send an IEEE 802.15.4 data frame, and record the processing time.
The specific steps are as follows:
Define and initialize some variables, including frame control field (fc), start time (start), PAN ID (panid), source address (saddr), and destination address (daddr).
Set various attributes of the frame control field (fc) such as frame type, addressing mode, etc.
Use the
generate_ieee_framefunction to generate a data frame and store it in the global variableg_tx_buf.Call the
GEN_SEQ_DATA_MV_PTRmacro to generate sequence data.Use the
mac_txn_payload_set()function to load the data frame into the tx buffer.Reset transmission status.
Call the
mac_txn_trig()function to trigger sending of the data frame.Wait for transmission completion.
Call the
print_tx_resultfunction to output the transmission result.Record the end time and calculate processing time, then output processing time information.
Set power management and enter sleep mode.
Radio Interrupt Handler
After TX or RX, the radio will run and trigger the corresponding interrupt. The interrupt type can be found in RXMAC Interrupts and TXMAC Interrupts.
See Also
Please refer to the relevant API Reference: