LVGL
LVGL(Light and Versatile Graphics Library)是一个开源的嵌入式图形库,用于创建漂亮、高性能且可定制的图形用户界面(GUI)。它设计简单、灵活,适用于各种嵌入式平台,包括微控制器和单片机。
概述
本文介绍了基于 Realtek RTL8772GWP 的 LVGL 方案相关信息,旨在帮助用户搭建开发环境,包括了解 SDK、编译和烧录固件及系统测试方法等。开发者可烧录 SDK 中的测试文件,确保开发环境配置得当、EVB 可以正常工作。
备注
本文所述示例方案采用 Realtek RTL8772GWP EVB,搭配 st7701s 驱动的 RGB(480 * 480) LCD 显示、gt911 驱动的触控屏模组,开发者若选用本文相同的硬件环境,可直接运行 SDK 中的样例工程。
如需适配其他型号的显示屏和输入设备,请参考 GUI 任务 小节 ,适配到新的显示和输入设备。
Realtek RTL8772GWP 芯片支持的显示接口:i8080、qspi/spi、RGB888/RGB565。
实用案例
下图显示了 LVGL 应用包含的模块:
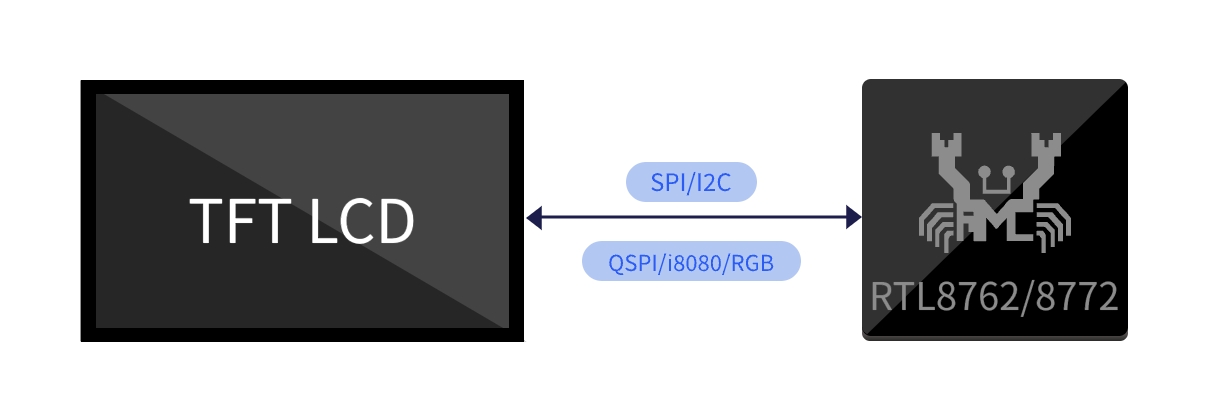
LVGL 系统模块组成
支持功能
Realtek LVGL 应用程序提供完备功能支持:
支持 LVGL
支持蓝牙 BLE OTA
环境需求
RTL87x2GWP EVB
LCD 屏幕模块 (480*480 st7701s + gt911)
ARM Keil MDK: ArmMDK
MPTool_kits: RealMCU-Tool
DebugAnalyzer: RealMCU-Tool
scons 4.4.0: python 环境运行 pip install scons==4.4.0
硬件连线
EVB
EVB 提供了用户开发和应用调试的硬件环境。LVGL 应用使用 Model B EVB 进行演示,EVB 由母板和子板组成。EVB 具有下载模式和工作模式,下载模式用于烧录固件等功能,工作模式为正常运行应用程序模式,开发者需要配置 EVB 以进入所需的模式。有关 EVB 母板的详细介绍和使用方法请参阅 评估板指南。
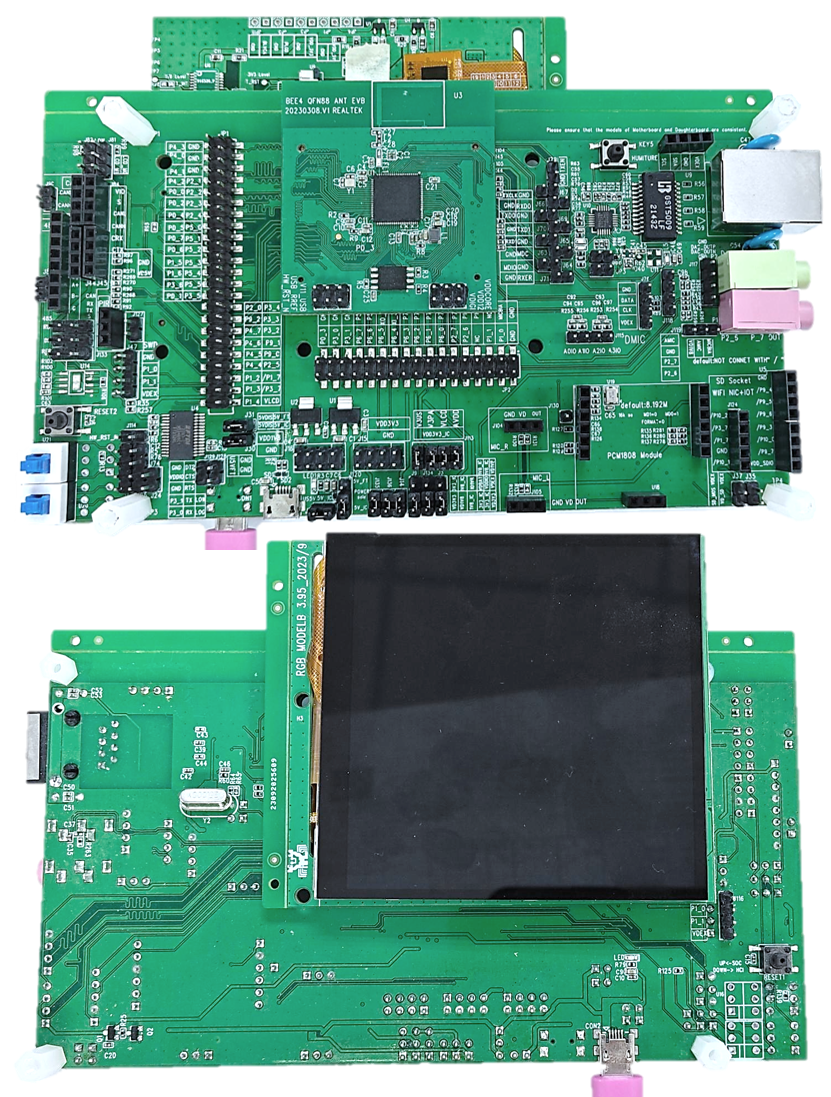
LVGL EVB 接线
配置选项
SDK 中 LVGL 方案的配置在 SDK\applications\lvgl\proj\menu_config.h 中,可在 Keil 使用 Configuration Wizard 配置,默认 BLE 配置如下:
#if (CONFIG_REALTEK_BLE_SERVICE == 1)
// <q> DFU_SERVICE
#define CONFIG_REALTEK_DFU_SERVICE 1
#endif
#if (CONFIG_REALTEK_BLE_SERVICE == 1)
// <q> OTA_SERVICE
#define CONFIG_REALTEK_OTA_SERVICE 1
#endif

// <e> BLE_OTA_ENABLED
#define CONFIG_REALTEK_BLE_OTA 1
#if (CONFIG_REALTEK_BLE_OTA == 1)
// <q> SILENT_OTA
// <i> Transmit images while application running
#define CONFIG_REALTEK_SILENT_OTA 1
// <q> NORMAL_OTA
// <i> Enter dfu mode to transmit images
#define CONFIG_REALTEK_NORMAL_OTA 1
#endif
// </e>

// <e> BLE_DEMO_APP
#define CONFIG_REALTEK_BLE_DEMO 1
#if (CONFIG_REALTEK_BLE_DEMO == 1)

// <o> BLE_DEMO_APP

// <0=> BLE_OTA_DEMO
// <1=> BLE_PERIPHERAL_DEMO
#define CONFIG_REALTEK_BLE_DEMO_APP 0    // select ble demo app

#if (CONFIG_REALTEK_BLE_DEMO_APP == 0)
#define CONFIG_REALTEK_BLE_OTA_DEMO
#elif (CONFIG_REALTEK_BLE_DEMO_APP == 1)
#define CONFIG_REALTEK_BLE_PERIPHERAL_DEMO
#endif

#endif
// </e>
备注
当配置修改后,根据所支持的编译方式重新构建工程后配置生效,构建方法请参考 编译和下载 步骤。
CONFIG_REALTEK_BLE_DEMO,CONFIG_REALTEK_BLE_DEMO_APP:配置是否启用 ble demo app,及选择 demo。CONFIG_REALTEK_BLE_OTA,CONFIG_REALTEK_DFU_SERVICE,CONFIG_REALTEK_OTA_SERVICE:ble OTA demo app 的底层支持,需与 OTA demo 一同启用,否则关闭配置。
编译和下载
请参阅 快速入门 进行编译和下载。值得注意的是:
-
生成 Flash Map 步骤:开发者需要根据
SDK\applications\lvgl\proj\flash_map.h生成flash_map.ini。 -
务必使能 psram power,其他功能可根据需要进行配置。
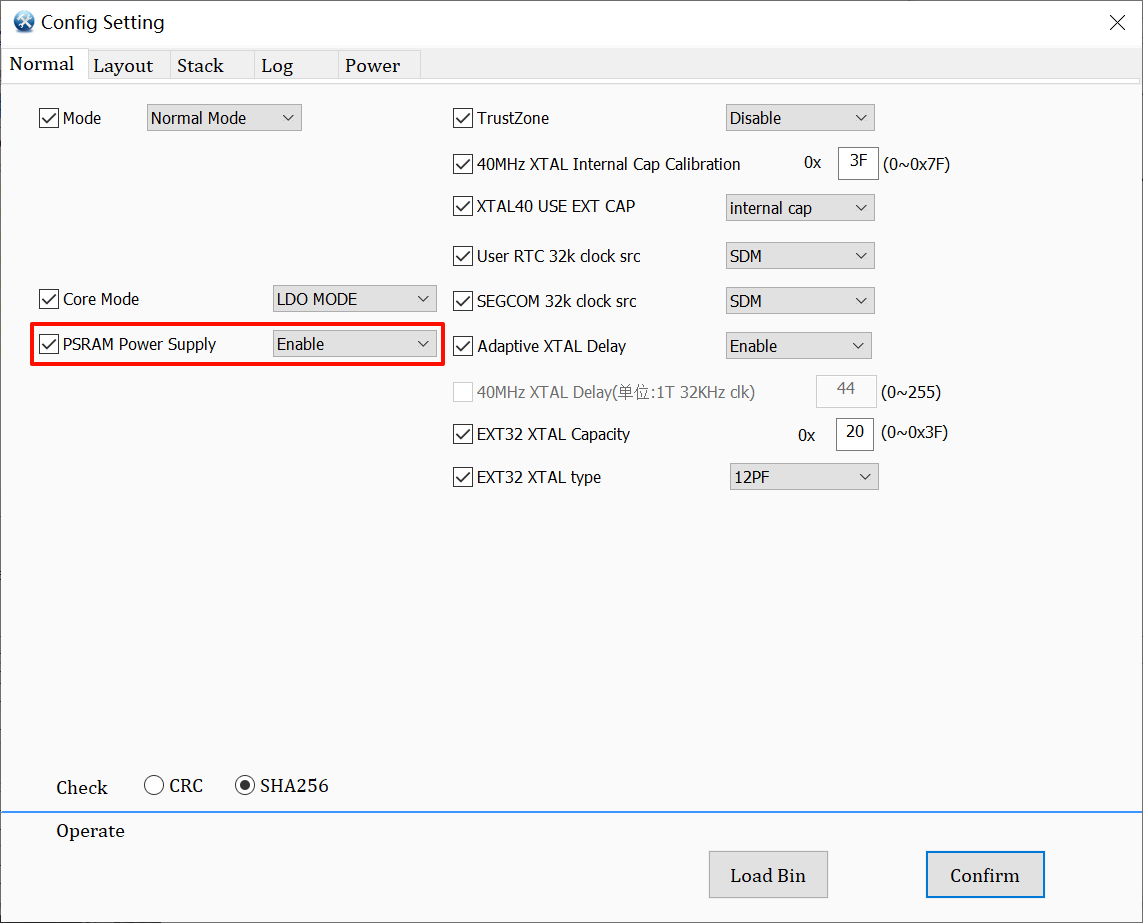
System Config 使能 Psram Power
-
构建 Keil MDK 工程,编译 APP Image 步骤:
LVGL SDK 工程路径为:
SDK\applications\lvgl\projKeil MDK 工程路径为:
SDK\applications\lvgl\proj\mdk当修改了工程的配置后,需要重新构建工程配置方可生效,构建后将会按配置生成全新工程文件,覆盖原有的工程文件。若开发者有手动在原工程中添加的文件或配置,将会在构建后失效不会保留到新的工程。
-
构建工程时,在工程路径下打开 cmd 窗口。
运行命令 scons --target=mdk5 构建 mdk 工程,打开 mdk 工程进行编译,APP image 将生成在以下路径中:
SDK\applications\lvgl\proj\mdk\bin。SDK\applications\lvgl\proj> scons --target=mdk5 scons: Reading SConscript files ... ... CC xxxx.o CC xxxx.o ... LINK app.elf fromelf --bin app.elf --output rtthread.bin fromelf -z app.elf scons: done building targets.
打开生成的 Keil MDK 工程,点击编译生成 app image,具体请参阅 编译 APP Image 。
下载烧录方法请参阅 文件下载 。
-
生成和下载 User Data:
LVGL 工程 User Data 打包路径:
SDK\subsys\gui\gui_engine\example\screen_lvgl工程用到的外部文件需要打包作为 User Data 下载,打开工程 User Data 打包路径,将需要打包的文件放置于
root\文件夹下,双击脚本mkromfs_0x4600000.bat生成 User Data 文件root(0x4600000).bin和资源映射地址resource.h。请使用 MP Tool 的 User Data 功能下载
root(0x4600000).bin,写入地址:0x04600000
测试验证
UI 测试流程
正确完成烧录固件后,令 EVB 切换到工作模式,复位重启。
设备重启后可以看到 LVGL 的 benchmark demo 运行,屏幕的左上角显示当前测试用例和测试进度,屏幕的右下角显示当前帧率和 CUP 占用率。
在完成所有测试用例前,不会有 log 输出,无触屏交互响应,完成所有测试用例后,测试结果将以 log 和表格的方式显示,可以触屏滑动浏览。
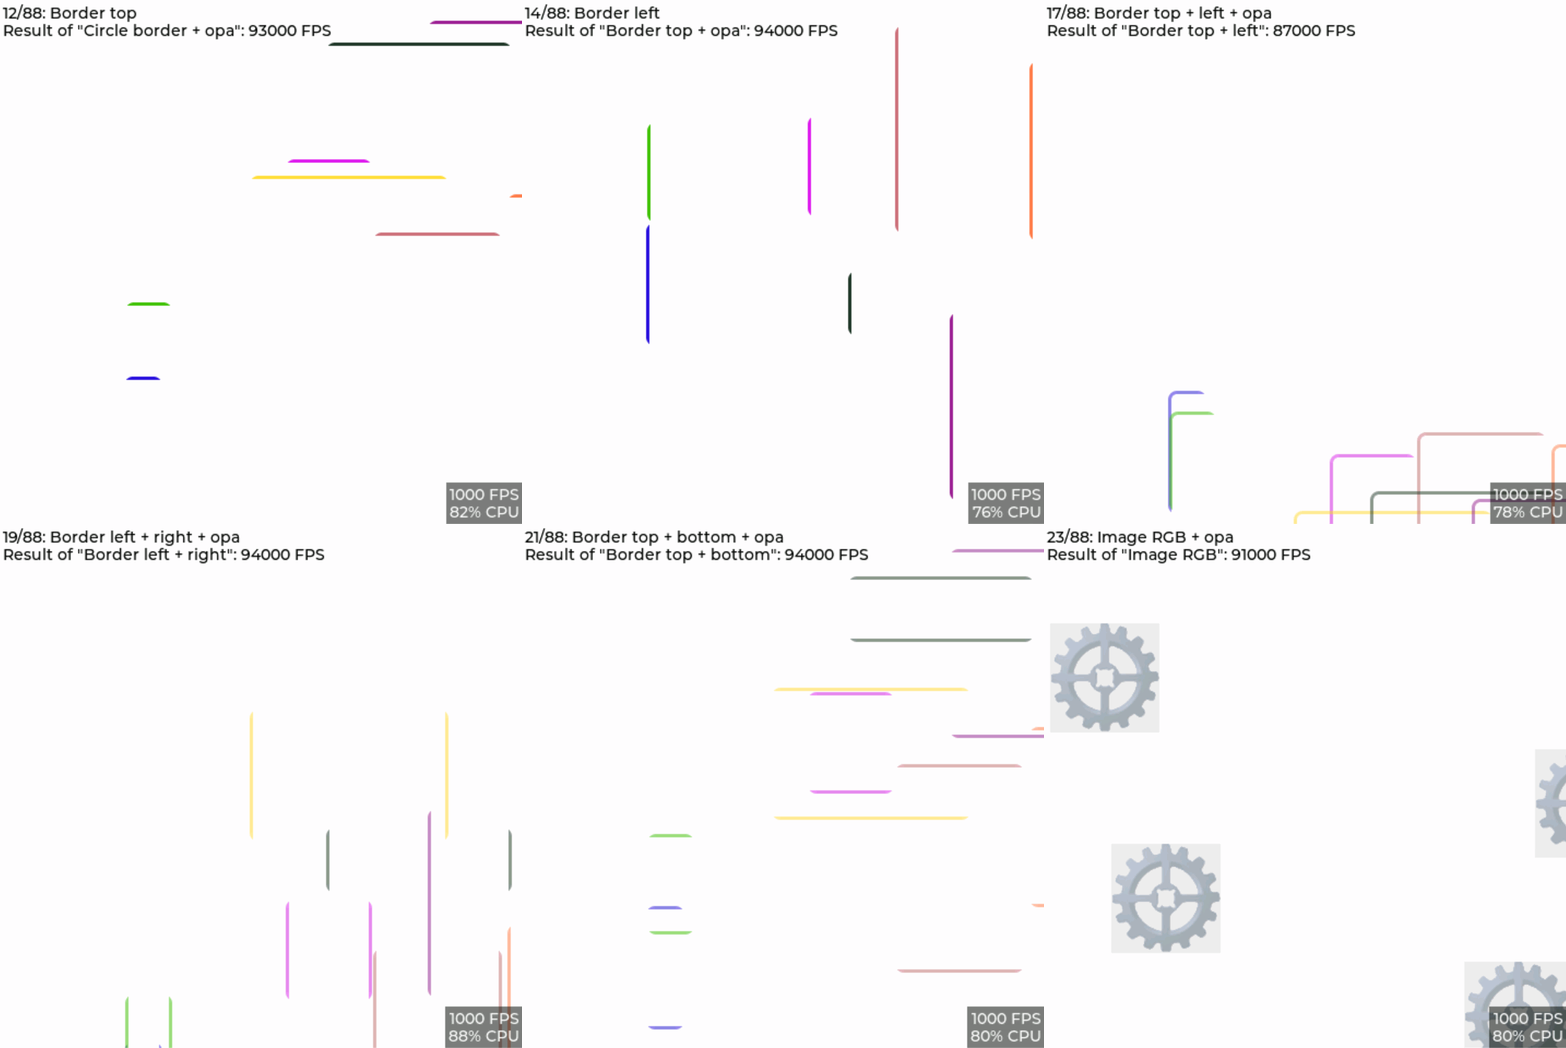
LVGL UI PC 模拟器演示
软件设计介绍
本章主要介绍 RTL8772GWP LVGL 解决方案的软件相关技术参数和行为规范,为 LVGL 的功能提供软件概述。
源代码目录
工程文件目录:
sdk\application\lvgl\proj源代码目录:
sdk\application\lvgl\src
LVGL SDK中的源文件目前分为以下几类:
└── Project: lvgl
    └── app                            includes the LVGL user application implementation
        ├── menu_config.h              project construct configurations
        ├── main.c
        └── lvgl_init.c                includes task and hardware init
    ├── lib
    ├── device
    ├── peripheral                     includes all peripheral drivers and module code used by the application
    ├── profile                        includes BLE profiles or services
    ├── dfu
    ├── dfu_task
    ├── LVGL                           includes all LVGL source
    ├── lcd_low_driver                 includes display pannel IC driver implementation
    ├── touch_driver                   includes touch IC driver implementation
    ├── hal_drivers
    ├── database
    ├── fs                              include file system implementation
    ├──  port_lvgl
        ├── gui_dlps.c                  includes gui dlps configurations
        ├── lv.conf.h                   includes LVGL configurations
        ├── lv_port_disp.c              includes LVGL display interface
        ├── lv_port_indev.c             includes LVGL input device interface
        ├── lvgl_demo.c                 includes LVGL demo, benchmark demo
        └── lv_port_fs.c                includes LVGL filesystem interface
    └── lvgl_assets                     includes user image and font C files
        ├── img_demo_lvgl_logo.c        lvgl logo image array
        ├── lv_font_harmony_32.c        harmony font array
        └── lvgl_example_assets.c       example shows how to set image and font source
    :
    └── ble_ota_app                    includes ble ota demo implementation
    :
    └── ble_app                        includes ble simple peripheral demo implementation
Flash布局
应用程序默认的 flash 布局头文件: sdk\application\lvgl\proj\flash_map.h
Example layout with a total flash size of 16 MB |
Size(byte) |
Start Address |
|---|---|---|
Reserved |
4K |
0x04000000 |
OEM Header |
4K |
0x04001000 |
Bank0 Boot Patch |
32K |
0x04002000 |
Bank1 Boot Patch |
32K |
0x0400A000 |
OTA Bank0 |
2456K |
0x04012000 |
|
4K |
0x04012000 |
|
32K |
0x04013000 |
|
60K |
0x0401B000 |
|
212K |
0x0402A000 |
|
2148K |
0x0405F000 |
|
0K |
0x04278000 |
|
0K |
0x04278000 |
|
0K |
0x04278000 |
|
0K |
0x04278000 |
|
0K |
0x04278000 |
|
0K |
0x04278000 |
|
0K |
0x04278000 |
OTA Bank1 |
0K |
0x04278000 |
Bank0 Secure APP code |
16K |
0x04278000 |
Bank0 Secure APP Data |
0K |
0x040AC000 |
Bank1 Secure APP code |
0K |
0x0427C000 |
Bank1 Secure APP Data |
0K |
0x0427C000 |
OTA Temp |
2148K |
0x0427C000 |
FTL |
16K |
0x04495000 |
APP Defined Section1 |
0K |
0x04499000 |
APP Defined Section2 |
0K |
0x04499000 |
重要
如需调整Flash布局,请参考 快速入门 中 生成 Flash Map 的步骤。
调整Flash布局后,必须使用新的
flash_map.ini重新进行 生成 OTA Header 和 生成 System Config File 步骤。
软件架构
系统软件架构如下图所示:
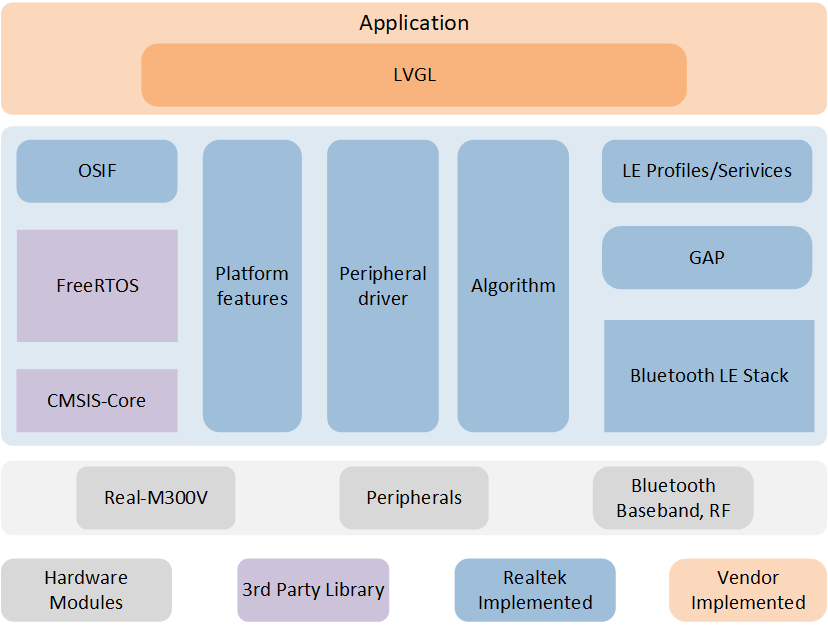
系统软件架构
Platform feature:包括 OTA、Flash、FTL 等。
Peripheral driver:提供对 RTL87x2G 外设接口的应用层访问。
OSIF:实时操作系统的抽象层。
GAP:用户应用程序与 BLE 协议栈通信的抽象层。
Application:应用层包含用户定义的各个应用任务。
任务和优先级
如下图所示,用户应用程序共创建了 5 个任务:
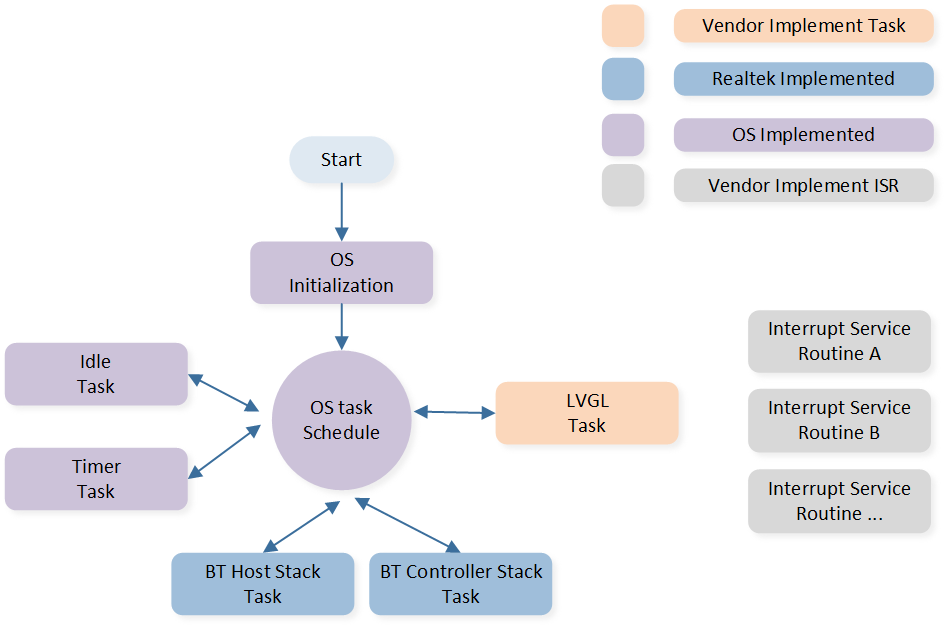
任务和优先级
各任务描述及优先级如下表:
任务 |
描述 |
优先级 |
|---|---|---|
Timer |
实现 FreeRTOS 所需的软件定时器 |
6 |
BT Controller stack |
实现 HCI 以下的BLE协议栈 |
6 |
BT Host stack |
实现 HCI 以上的BLE协议栈 |
5 |
LVGL |
处理 UI 显示及交互 |
1 |
Idle |
运行后台任务 |
0 |
备注
开发者可创建多个应用任务,并相应地分配内存资源。
GUI 任务
在本示例工程中 GUI 默认任务为 LVGL benchmark demo 工程,测试并展示了 LVGL 在该平台上各个场景下的性能表现,包括帧率和 CUP 负载水平。
UI
LVGL 主要的配置项目都在 sdk\application\lvgl\src\lvgl_port\lv_conf.h 中进行配置,包括显示设备尺寸和颜色深度、堆栈接口配置等,开发者可以根据需求进行定制。
关于 LVGL UI 的设计开发指南请参阅 使用 LVGL 设计应用程序 及 LVGL 在线文档 LVGL Documentation。 文档 使用 LVGL 设计应用程序 中对 PC 模拟器的使用、实机移植方法、benchmark 性能、UI 资源转换、LVGL 基本开发方法等做了详细介绍,文档 LVGL Documentation 为 LVGL 的开发文档,其中详细介绍了 LVGL 的功能与特性等,并配以丰富的示例。
DLPS
DLPS 为系统休眠模式,具有较低的功耗,以及较快的进出时间,同时 RAM 内容保持。系统如何进出 DLPS 及其具体行为,请参阅 低功耗模式。 PSRAM 的默认配置在进入 DLPS 后会掉电,所有数据丢失,需要改变掉电设置请参阅 PSRAM。
在本示例工程中,如需配置打开 DLPS 功能:
在文件
menu_config.h中使能 HAL 支持,修改后重新构建工程,构建方法请参考 编译和下载 小节:

LVGL DLPS HAL 使能开关
在文件
sdk\application\lvgl\proj\board.h中配置使能宏:

LVGL DLPS 使能开关
在本示例工程中,使能 DLPS 功能后,系统以显示激活时间是否超时作为休眠许可,当屏幕在一段时间内(如 5 秒)没有触屏事件发生,则停止刷屏,屏幕熄灭,系统进入休眠。系统在休眠时,若有新的触屏事件发生,则系统唤醒,点亮屏幕,程序继续运行,并进入新的休眠倒计时。具体的,进入休眠前系统将配置触屏 IC 的 INT 引脚作为唤醒源,当发生触屏事件时,触屏 IC 在 INT 引脚上将产生电平变化,从而唤醒 host,即 PAD 唤醒。
若使能了蓝牙功能,则蓝牙将会在休眠期间定期唤醒系统进行广播,但不会唤醒 GUI 任务。蓝牙任务的唤醒行为可由开发者按需开发(如是否需要通过蓝牙唤醒所有任务)。进出休眠时需要配置硬件和软件状态,均在定义在文件 sdk\application\lvgl\src\dlps\gui_dlps.c 中。
- 注意:
请勿在
gui_dlps.c中的函数bool gui_dlps_enter(void)()中执行长时间耗时动作,如 delay 等待
static void gui_hook_af(void)
{
   /*Add your hook function here*/
#if (DLPS_EN == 1)
   // Demo dlps
   /*Normal operation (no sleep) in < xx sec inactivity*/
   if (lv_disp_get_inactive_time(NULL) < 5000)
   {
      gui_dlps_set(false);
   }
   /*Sleep after xx sec inactivity*/
   else
   {
      // check other task state
      // wait transform done here
      gui_dlps_set(true);
   }
#endif
}

static void lvgl_demo_run(void *p)
{
   ...
   gui_dlps_init();
   ...
   while (1)
   {
      if (gui_dlps_check() == false)
      {
            /* hook function before lvgl event */
            gui_hook_bf();

            lv_task_handler();

            /* hook function after lvgl event */
            gui_hook_af();
            // os_delay(5);
      }
      else
      {
            // DBG_DIRECT("stop timer");
            /*Stop timer and suspend gui task*/
            os_timer_stop(&gui_timer0);
            os_task_suspend(lvgl_task_handle);
      }
   }
}
BLE 任务
BLE_OTA_DEMO 请参阅 OTA
BLE_PERIPHERAL_DEMO 请参阅 LE Peripheral