Audio
The document provides a comprehensive overview of an audio demo application for various Realtek development kits. It outlines how to implement audio functionalities such as VP, Ringtone, Audio Line, APT, LLAPT, ANC, Audio Pipe, and Audio Track. This document ensures that the users can efficiently configure, build, test, and verify various audio functionalities on supported Realtek hardware platforms using the provided tools and references.
This sample application note describes audio functionalities related information. The following topics are included to help users to establish audio demo environment.
Requirements
The sample supports the following development kits:
Hardware Platforms |
Board Name |
Build Target |
|---|---|---|
RTL87x3E EVB |
|
|
RTL87x3EP HDK |
RTL87x3EP EVB |
|
RTL87x3D HDK |
RTL87x3D EVB |
|
Note
To purchase EVB, please visit https://www.realmcu.com/en/Home/Shop.
This sample project can be found under sdk\board\evb\audio_demo in SDK folder structure.
Developers can choose the project according to the Board Name and choose the
Build Target according to the flash map.
When built for an xxx_4M_xxx build target, the sample is configured to compile and run with a 4M flash map.
When built for an xxx_8M_xxx build target, the sample is configured to compile and run with a 8M flash map.
When built for an xxx_16M_xxx build target, the sample is configured to compile and run with a 16M flash map.
The sample also requires MCUConfig Tool and DSPConfig Tool for configuration when implementing certain special functions like APT, Audio Line, ANC, etc.
To quickly set up the development environment, you can refer to Hardware Development Environment.
-
The TX and RX pinmux of console is defined in
app_audio_demo_main.c. It is important to note that the pinmuxes need to be wired in reverse, which means that the TX of console should be connected to P3_0, and the RX should be connected to P3_1 in order to establish a connection with the serial port.#define AUDIO_DEMO_UART_TX P3_1 #define AUDIO_DEMO_UART_RX P3_0
Configurations
APP configurable functions are defined in app_flags.h. The user can easily change the
value of the macro definition to switch the function.
#define NOTIFICATION_DEMO_SUPPORT   1
#define AUDIO_LINE_DEMO_SUPPORT     1
#define ANC_DEMO_SUPPORT            1
#define AUDIO_PIPE_DEMO_SUPPORT     1
#define AUDIO_TRACK_DEMO_SUPPORT    1
Building and Downloading
The detailed information about Building and Downloading can be found in Building and Downloading.
Take the project rtl87x3e_audio_demo.uvprojx and target audio_demo_4M_bank0 as an example,
to build and run the sample with Keil development environment, follow the steps listed below.
Open
rtl87x3e_audio_demo.uvprojx.-
Choose the build target
audio_demo_4M_bank0.
Choose Build Target
-
Building the target.
After a successful compilation, the APP bin file
audio_demo_bank0_MP-v0.0.0.0-xxx.binwill be generated in the directorysdk\board\evb\audio_demo\bin\rtl87x3e\flash_4M_dualbank\bank0.
Building
Download APP bin into EVB board.
Experimental Verification
The experimental verification section mainly introduces corresponding commands, API interfaces, and specific test steps involved in implementing various audio functions. The main functional sections are as follows:
Notification
APT
LLAPT
Audio Line
ANC
Audio Pipe
Audio Track
Notification Commands
Notification commands module is composed of VP play, Ringtone play and notification test.
VP Play
The reference API can be found in voice_prompt_play().
The specific flow of VP play is illustrated as follows. The contents of the dotted boxes in the
diagram may vary depending on the specific functions of audio demo. For the purpose of introducing
audio commands, we will primarily focus on the flow within the dotted box. This flow describes how
the console command is processed, ensuring consistency across different audio commands.
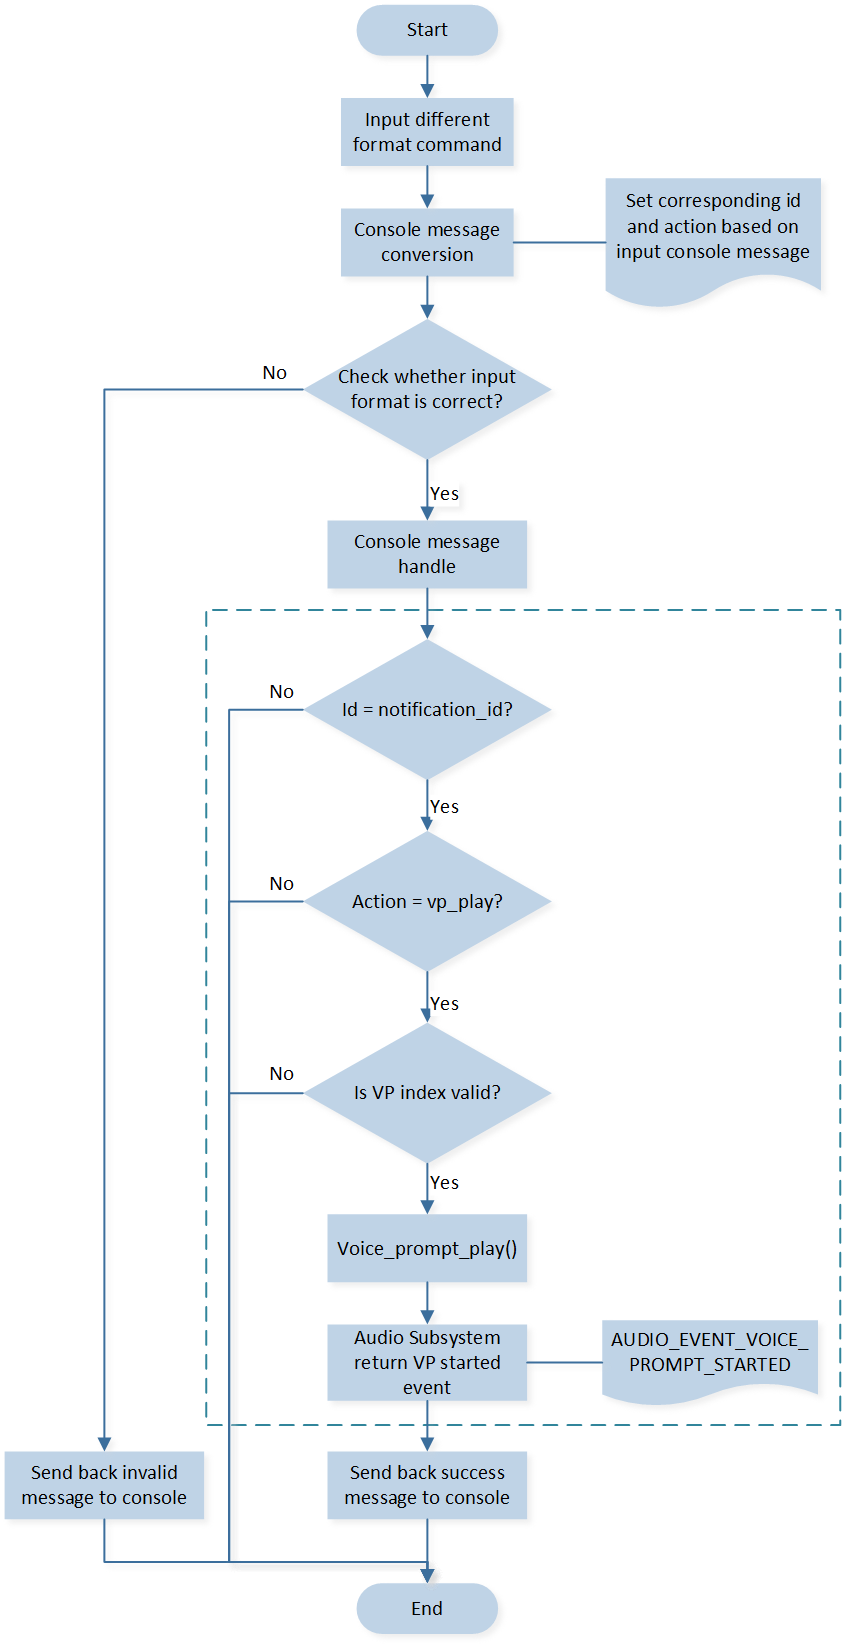
Notification VP Flow
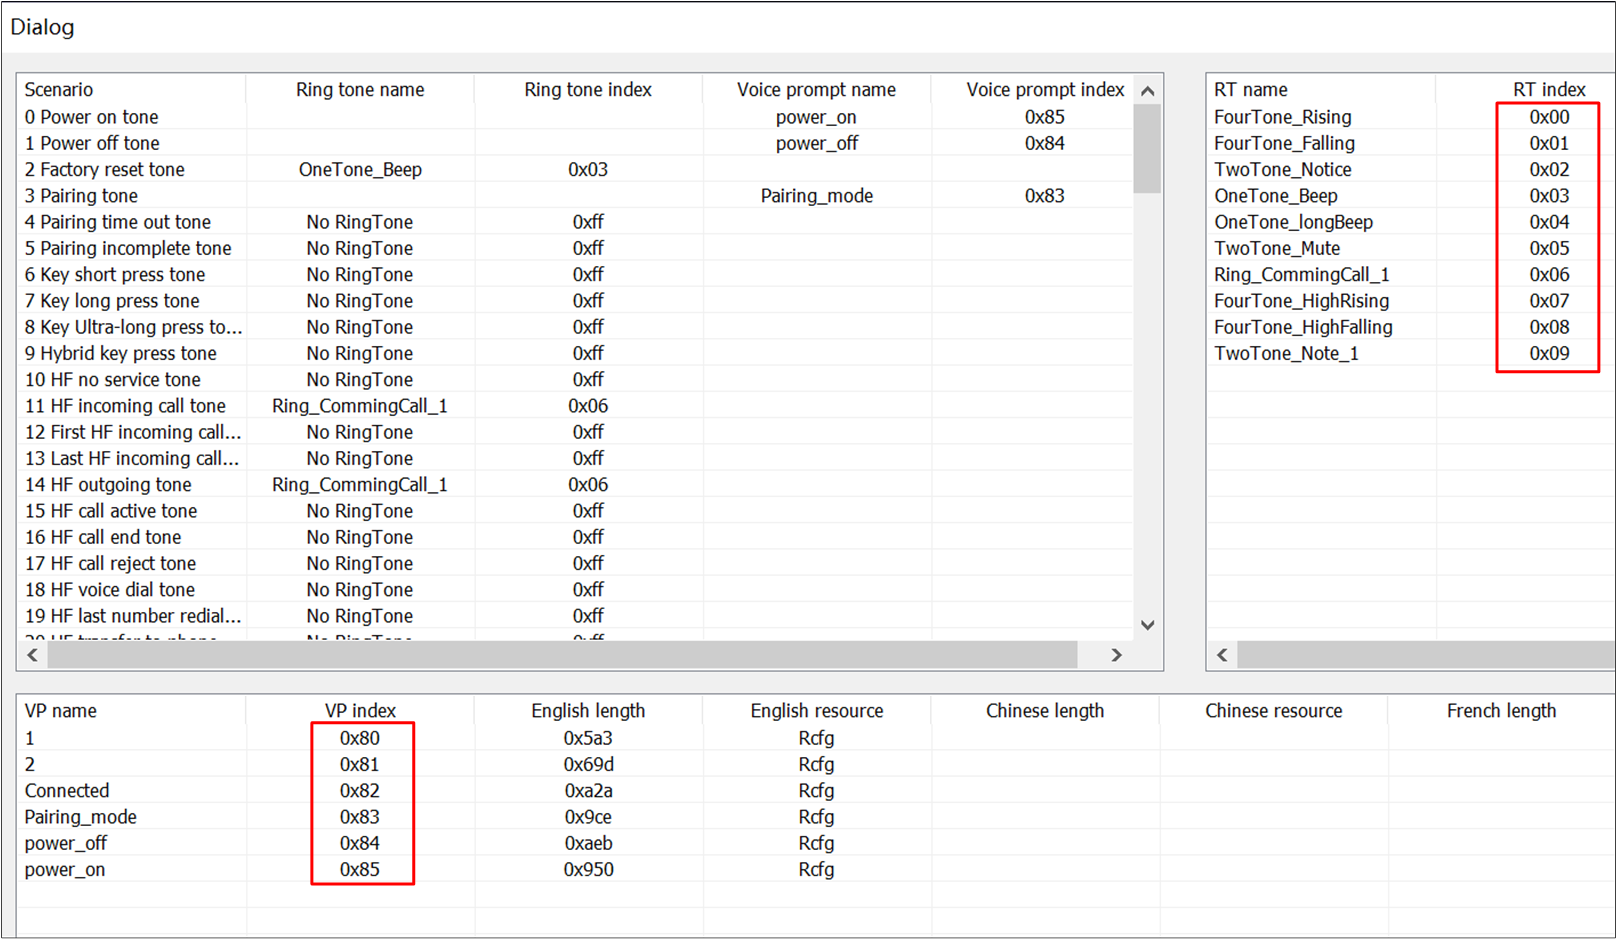
The specific information of the notification index and language for the audio demo can be described as follows.
VOICE_PROMPT_INDEXrepresents the minimum valid index value for VP in audio demo. If the index value is less than this constant, it indicates that the requested prompt is out of range for VP.TONE_INVALID_INDEXrepresents the maximum invalid index value for notification in audio demo. To summarize, if the index value is less thanVOICE_PROMPT_INDEX, it implies that the prompt is a Ringtone and should be played accordingly. However, if the index value is greater than or equal toVOICE_PROMPT_INDEXand less thanTONE_INVALID_INDEX, it implies that the prompt should be played as VP.VOICE_PROMPT_LANGUAGErepresents the default playback language in the audio demo. In this case, when the value ofVOICE_PROMPT_LANGUAGEis set to 0, it indicates that the default playback language is set to English.-
TONE_INDEXandVP_INDEXrepresent the default played Ringtone and voice prompt respectively, and the value of index can be seen in MCUConfig Tool.#define VOICE_PROMPT_INDEX 0x80 #define TONE_INVALID_INDEX 0xFF #define VOICE_PROMPT_LANGUAGE 0 #define TONE_INDEX 0x01 #define VP_INDEX 0x85
Ringtone Play
The reference API can be found in ringtone_play(). The process of Ringtone can be described below.
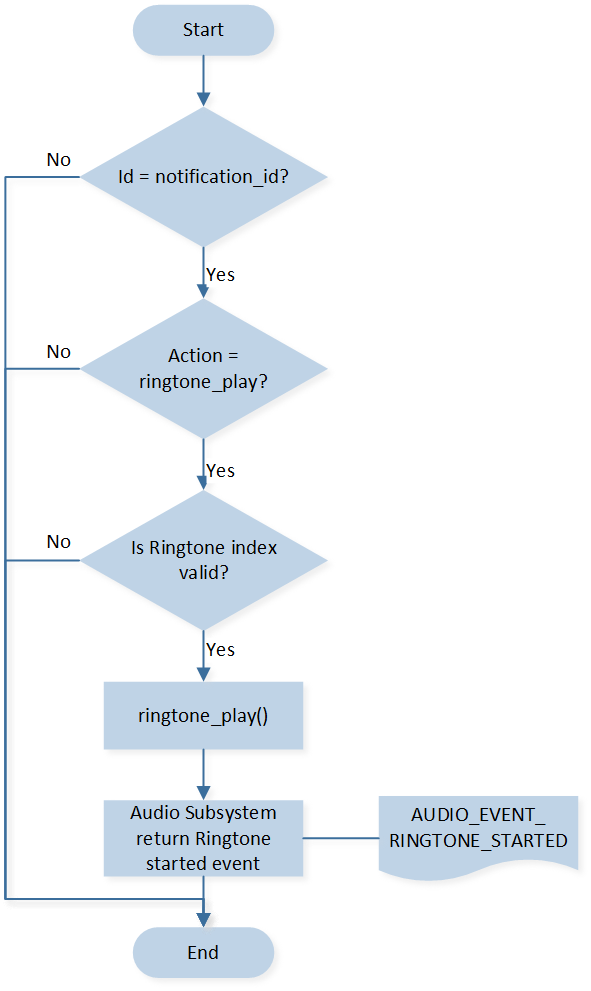
Notification Ringtone Flow
Notification Test
To ensure proper functionality, please follow these steps for testing the audio demo.
-
Check the index values of VP and Ringtone to ensure they are set as rational values. You can view the specific index value in the MCUConfig Tool.

Notification Configuration
Notification Index
No special configuration is required for enabling notification in audio route.
Download the audio demo application.
The users can input notification <vp|ringtone> play command to play default VP or Ringtone. If VP or Ringtone is played successfully, console will print VP played! or Ringtone played! respectively.
APT Commands
APT module is composed of APT enable, APT disable and APT test.
APT Enable
The reference API can be found in can be found in audio_passthrough_enable().
The specific flow of APT enable is shown as follows.

APT Start Flow
APT Disable
The reference API can be found in audio_passthrough_disable().
The specific flow of APT disable is shown as follows.
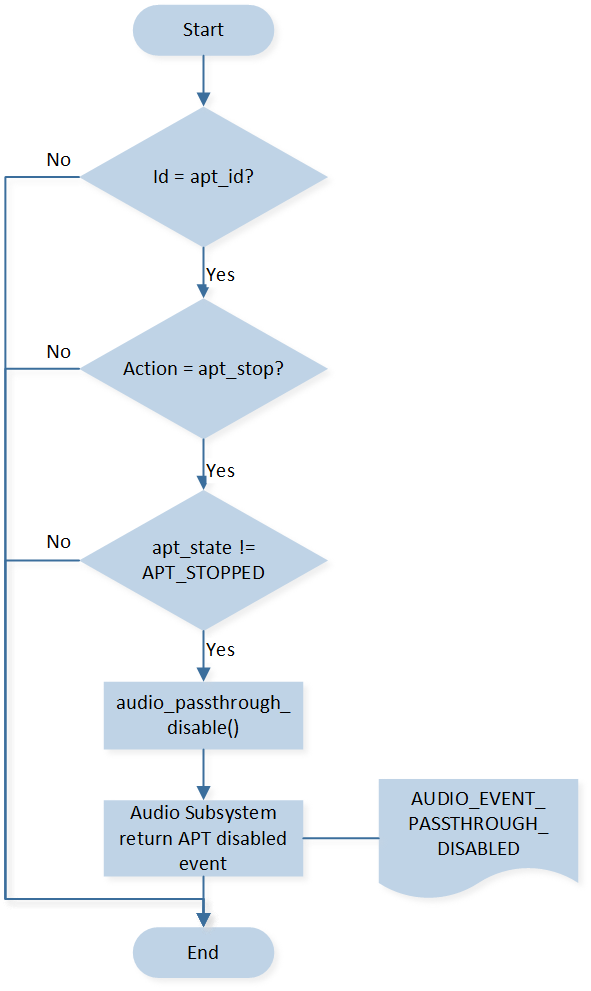
APT Stop Flow
APT Test
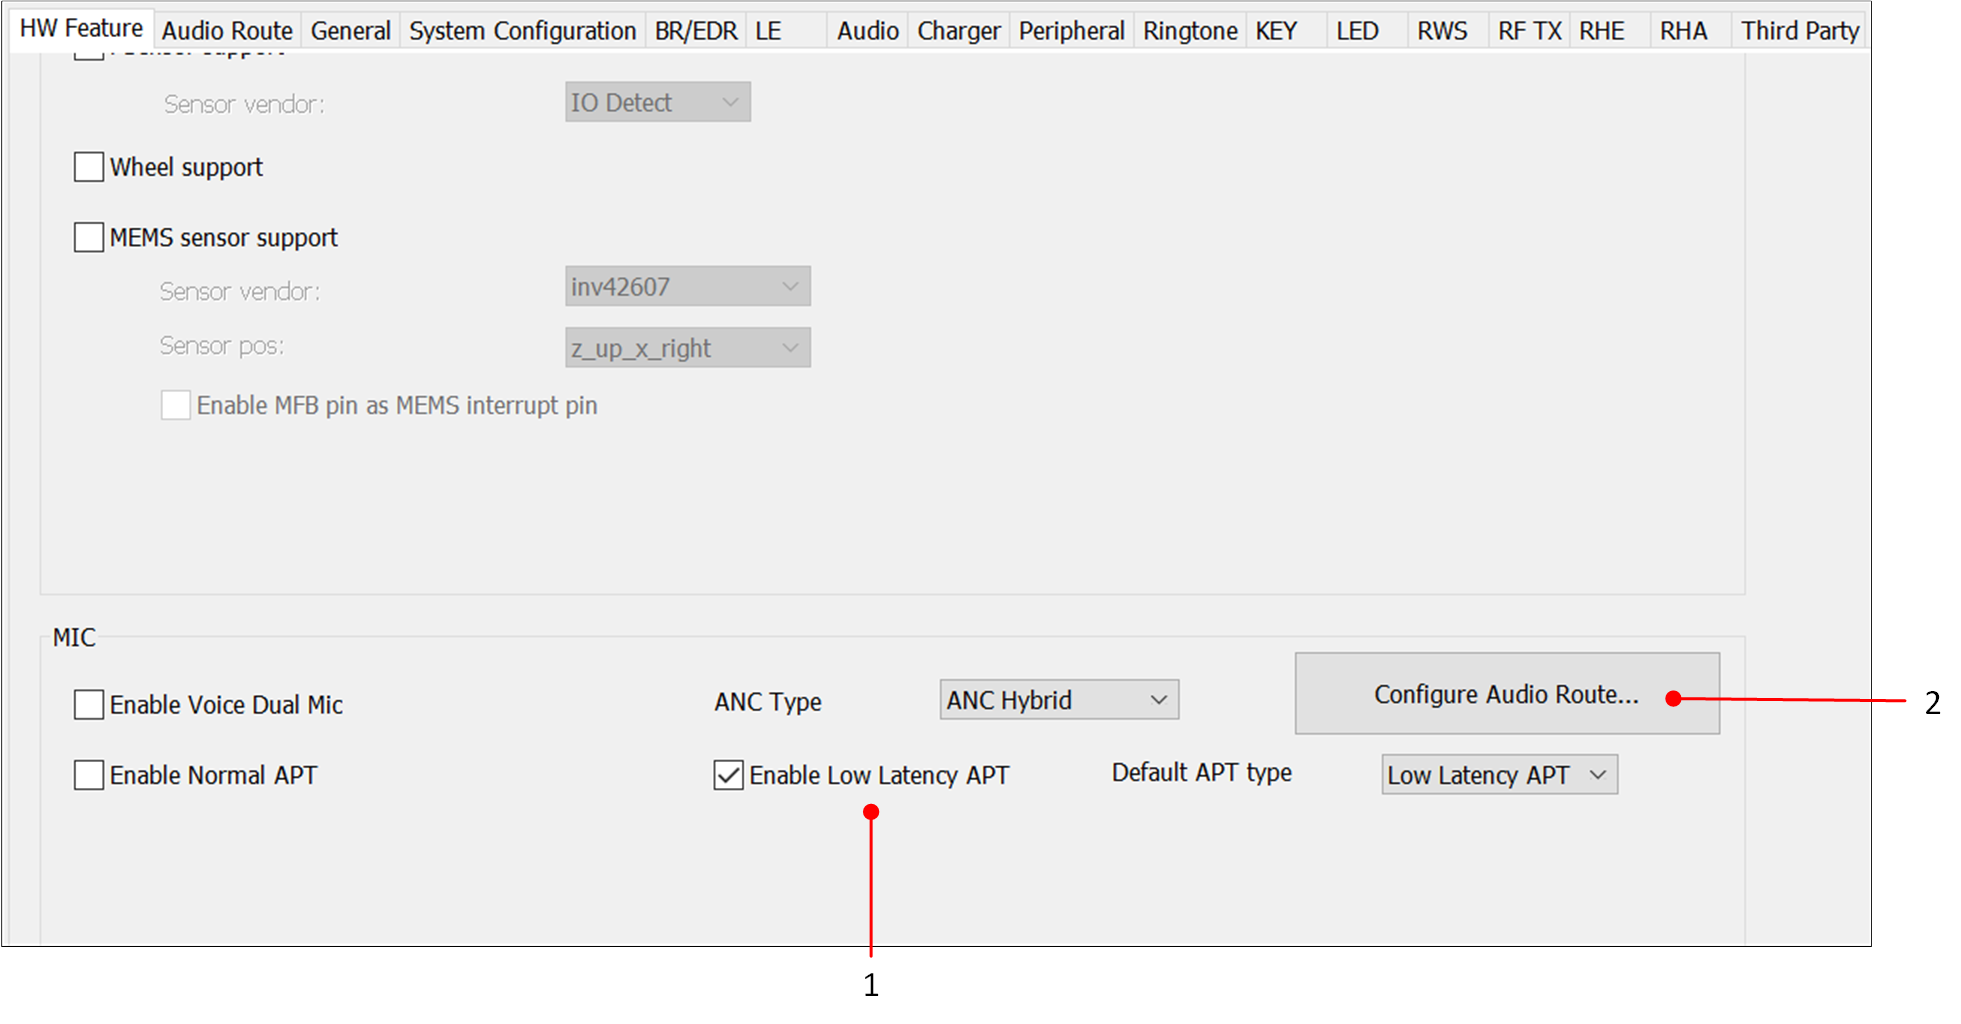
To enable the APT function and configure the audio route, please follow these steps.
-
Enable APT function on the audio feature interface.
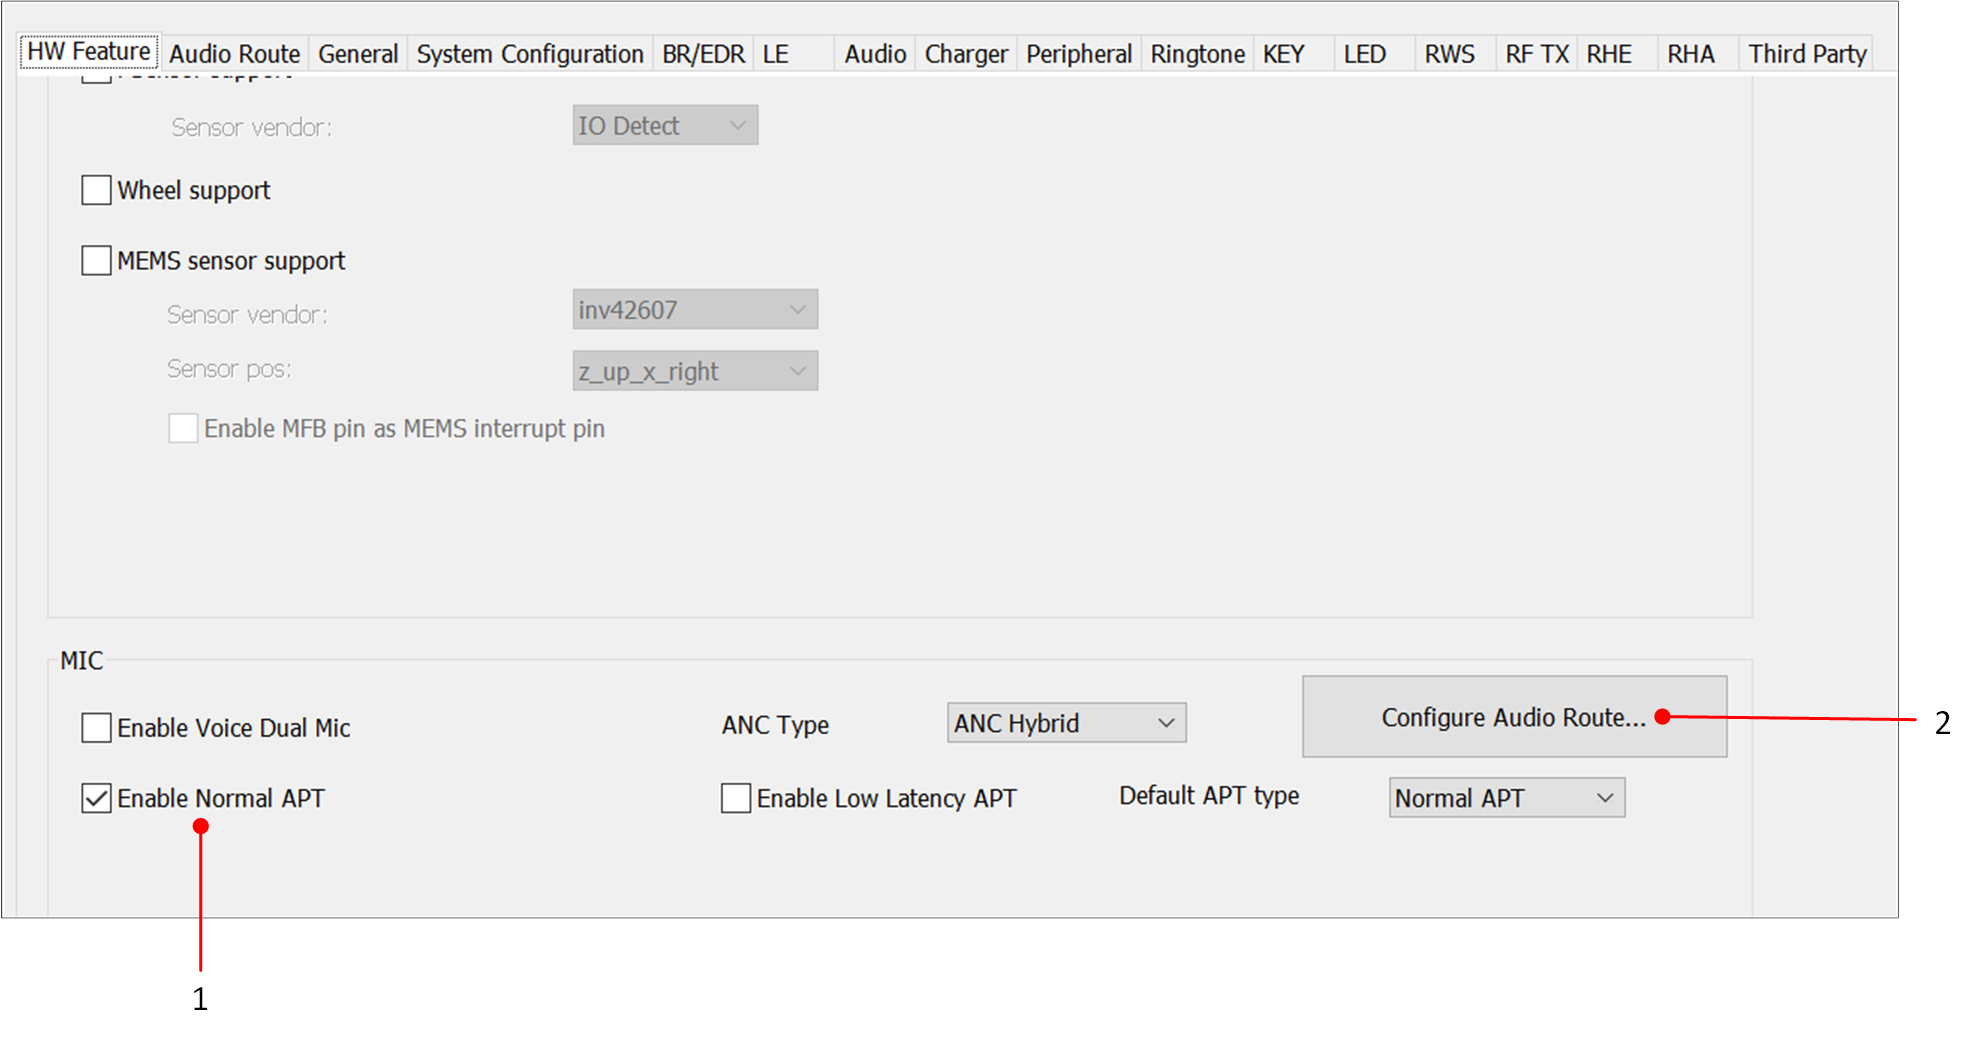
Enable APT in MCUConfig Tool
-
The audio route configuration for APT is demonstrated. You can implement the APT function by selecting the corresponding MIC. The specific meanings corresponding to different MIC can also be viewed in the MCUConfig Tool.
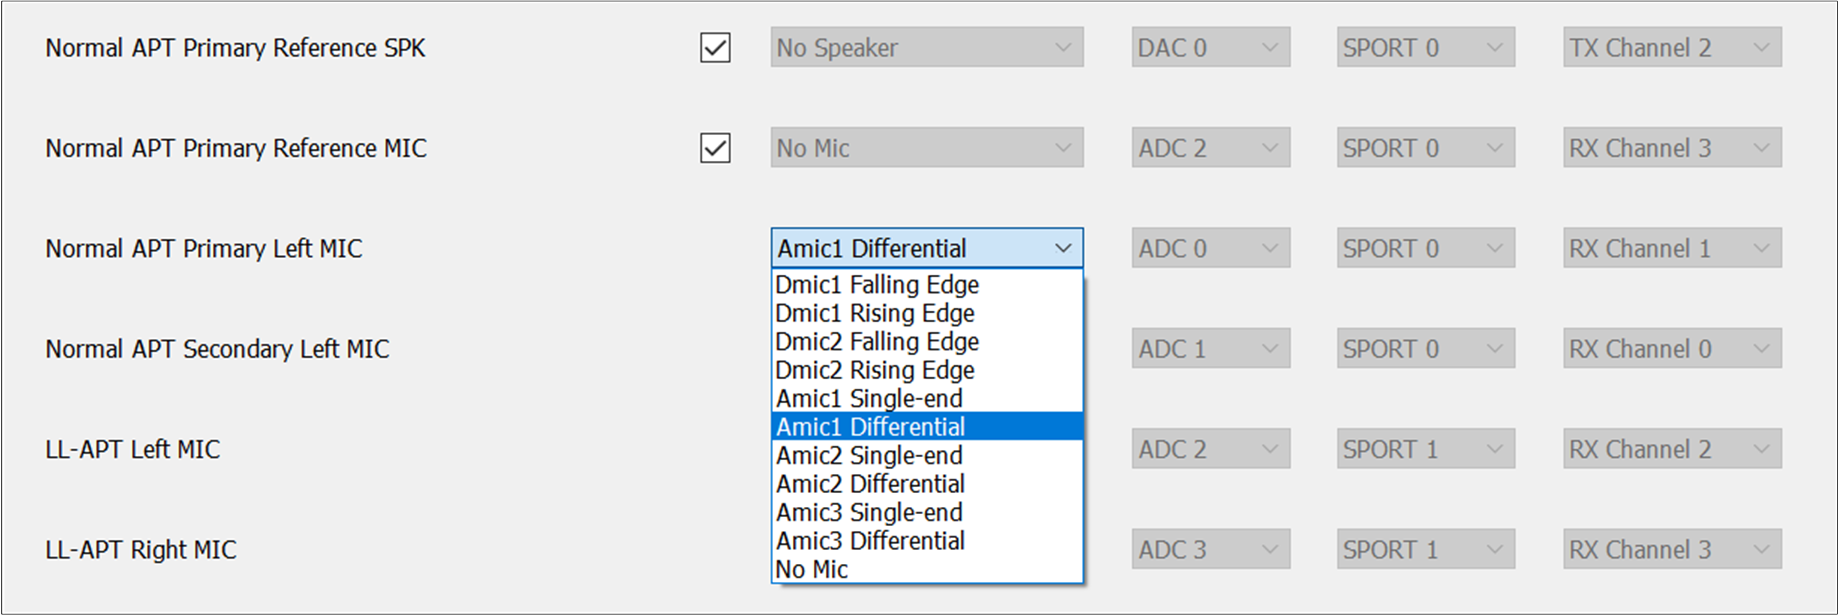
Audio Route Configuration of APT
-
The APT function needs to be enabled within the DSPConfig Tool.
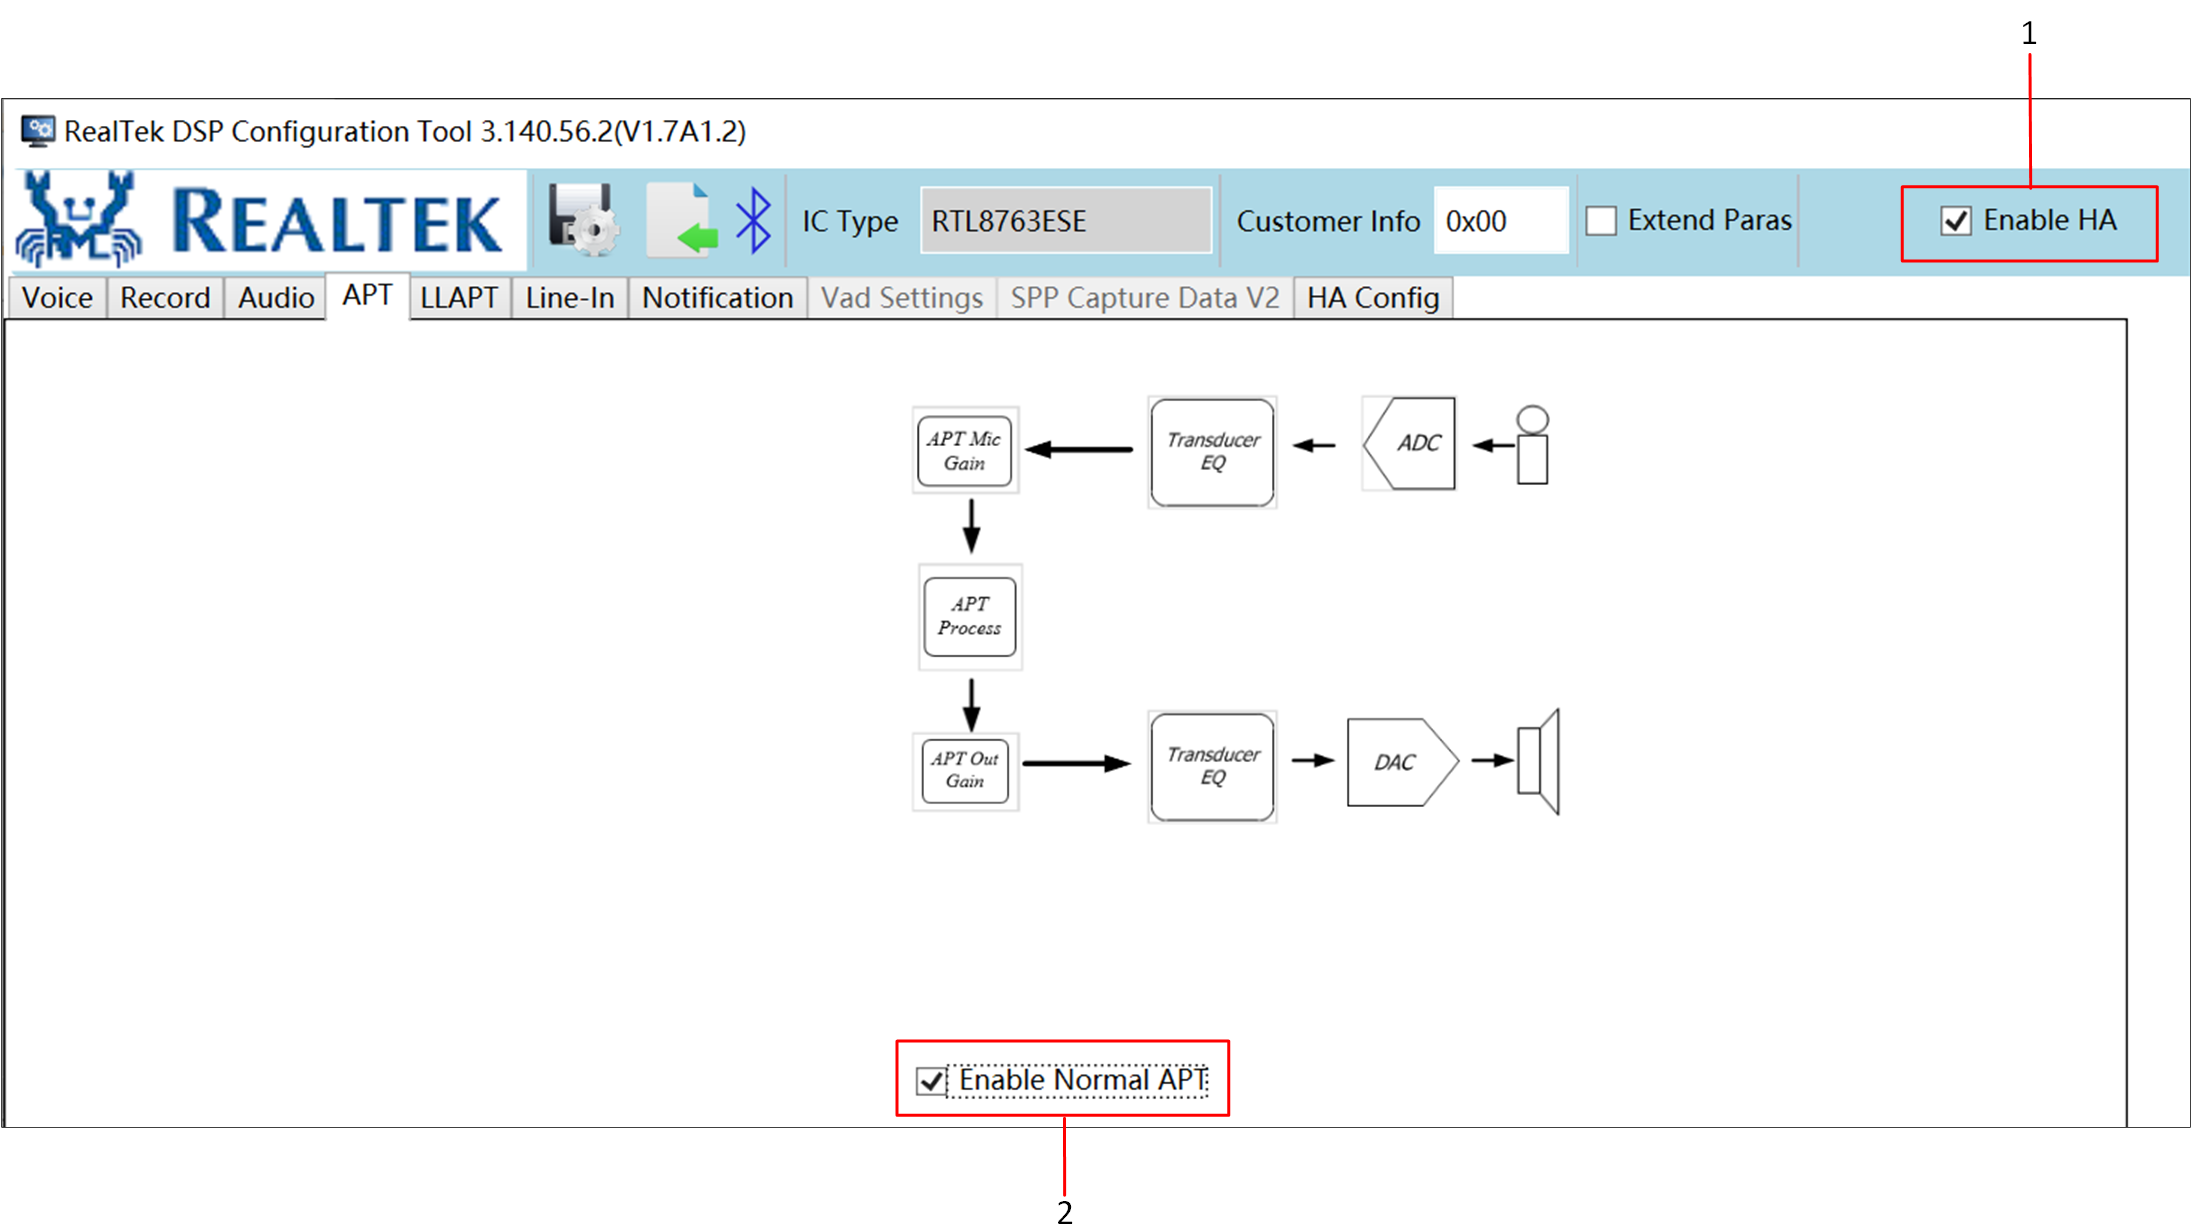
Enable APT in DSPConfig Tool
Download the audio demo application.
To enable APT function, you can input command apt enable and the console will print Passthrough enabled! informing user that APT is enabled.
The method of disable APT is similar, you can input command apt disable to disable APT function, then console will print Passthrough disabled! if APT is disabled successfully.
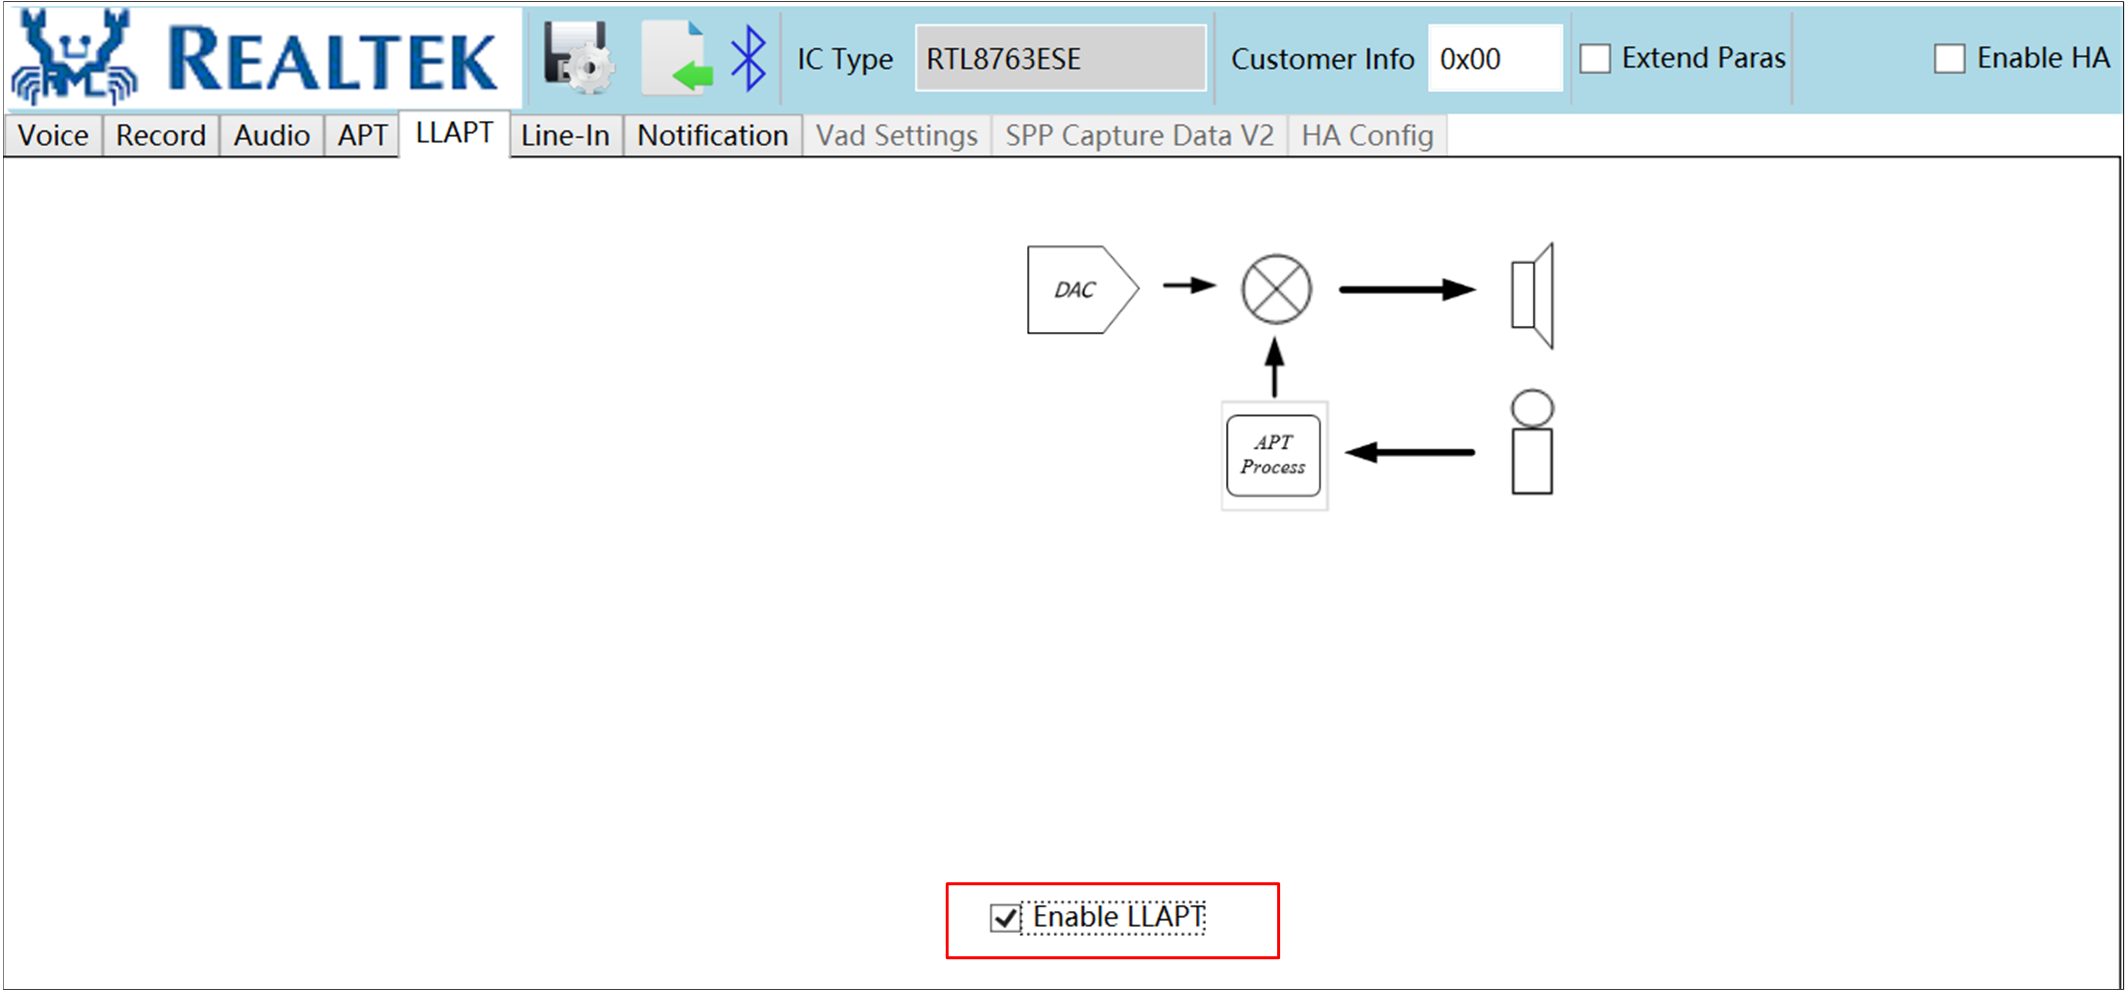
LLAPT Commands
LLAPT module is composed of LLAPT enable, LLAPT disable and LLAPT test.
LLAPT Enable
The reference API can be found in audio_passthrough_enable().
The flow of LLAPT enable is the same as enable APT except for the APT mode passed through
audio_passthrough_enable().
LLAPT Disable
The reference API can be found in audio_passthrough_disable().
Similarly, the flow of LLAPT disable is the same as APT disable.
LLAPT Test
Please follow these steps to enable the LLAPT function.
-
Enable LLAPT function on the audio feature interface.
Enable APT in MCUConfig Tool
-
The audio route configuration for LLAPT is demonstrated below. You can implement the LLAPT function by selecting the corresponding MIC.
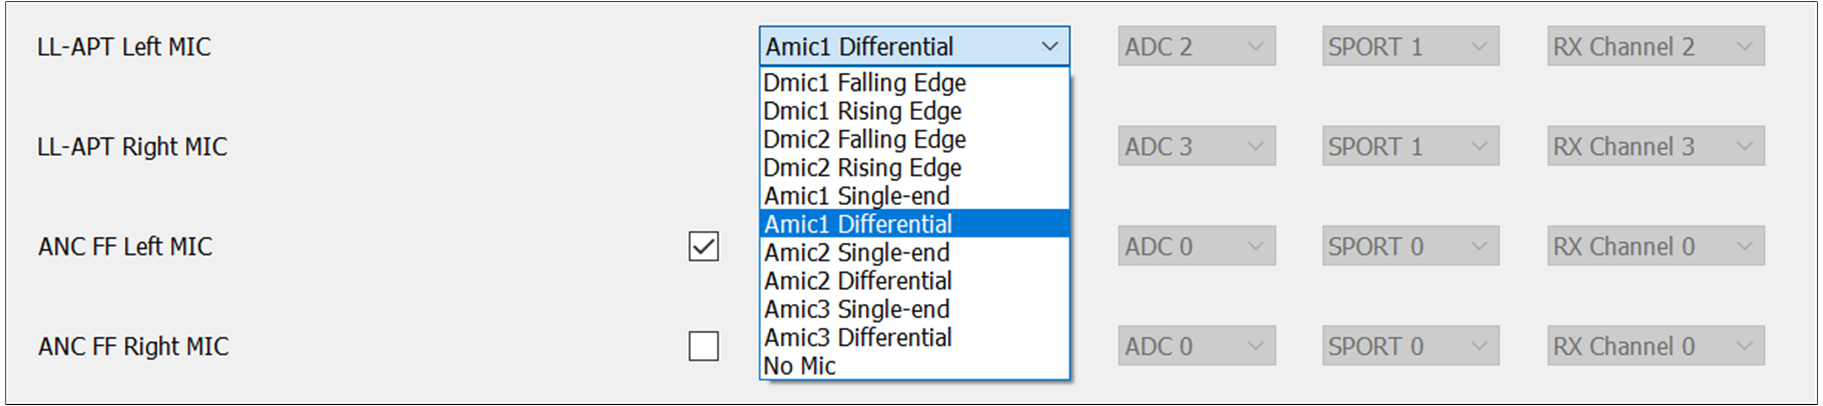
Audio Route Configuration of LLAPT
-
The LLAPT function in the DSPConfig Tool also needs to enable.
Enable APT in DSPConfig Tool
Download the audio demo application.
To enable LLAPT function, you can input command llapt enable and console will print Passthrough enabled! informing user that LLAPT is enabled.
The method of disable LLAPT is similar, you can input command llapt disable and console will print Passthrough disabled! if LLAPT is disabled successfully.
Audio Line Commands
Audio Line commands module is composed of Audio Line start, Audio Line stop and Audio Line test.
Audio Line Start
The reference API can be found in line_in_start(). The specific flow of Audio Line start
is shown below.
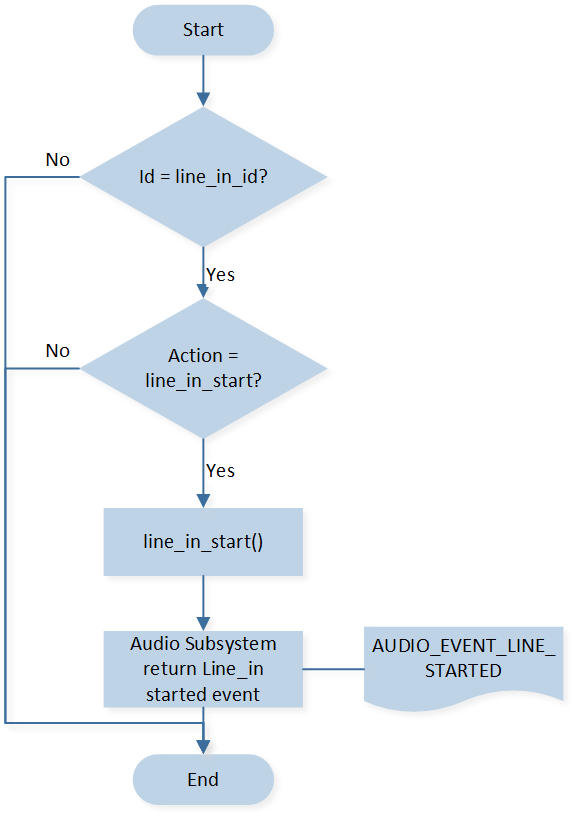
Audio Line Start Flow
Audio Line Stop
The reference API can be found in line_in_stop(). The specific flow of Audio Line stop
is shown as follows.
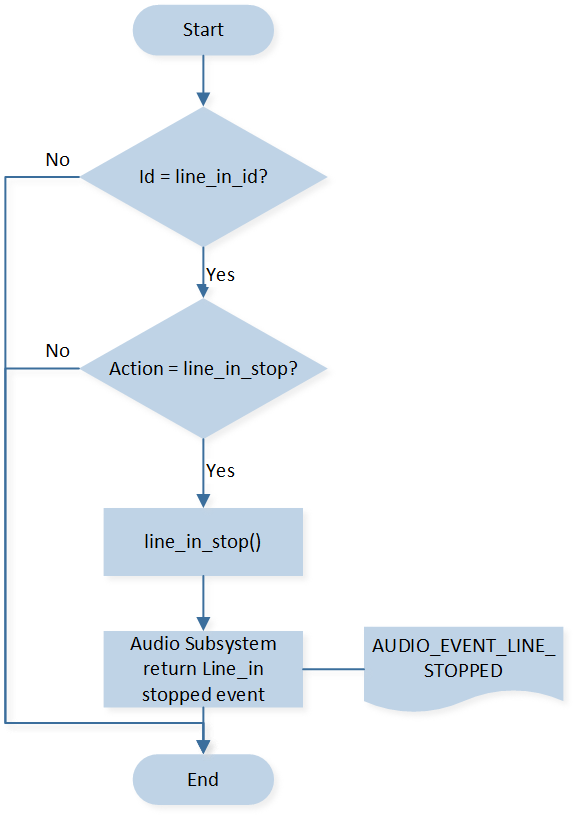
Audio Line Stop Flow
Audio Line Test
To configure and test the Audio Line function in the audio demo application, please follow these steps.
-
The audio route configuration for Audio Line needs to be set.
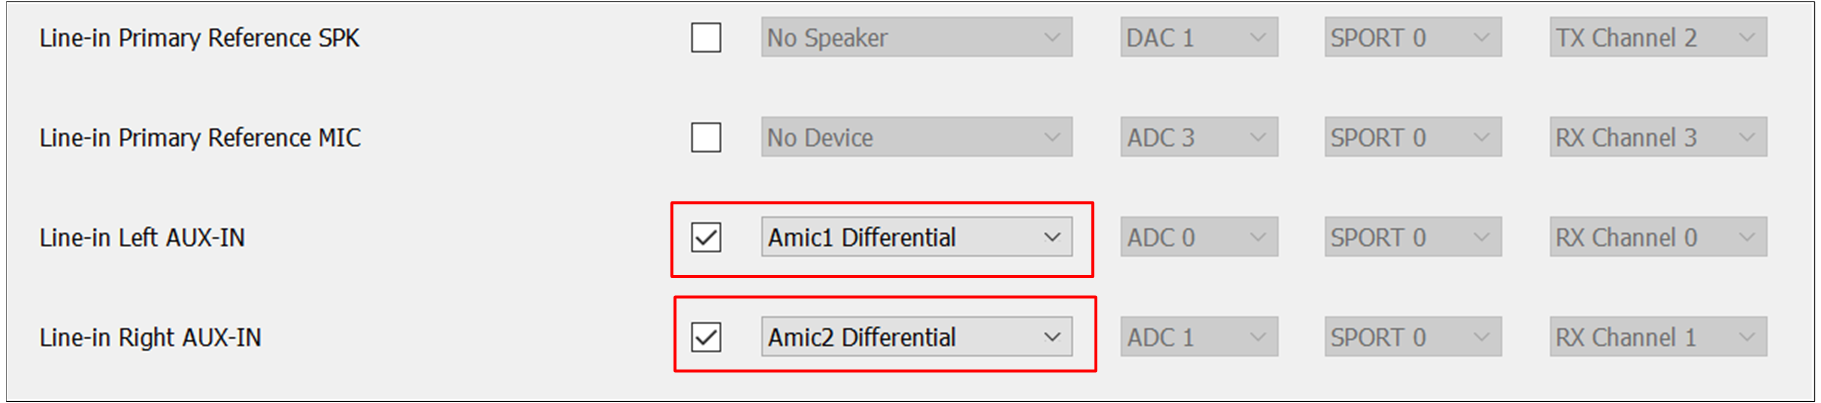
Audio Route Configuration of Line
Download the audio demo application.
You can input the command line_in start to start Audio Line function, and the console will print Line in started! informing user that Line is started.
The method of stop Audio Line is similar, you can input command line_in stop and the console will print Line in stopped! if Line is stopped successfully.
ANC Commands
ANC commands module is composed of ANC enable, ANC disable and ANC test.
ANC Enable
The reference API can be found in anc_enable().
The specific flow of ANC enable is shown as follows.
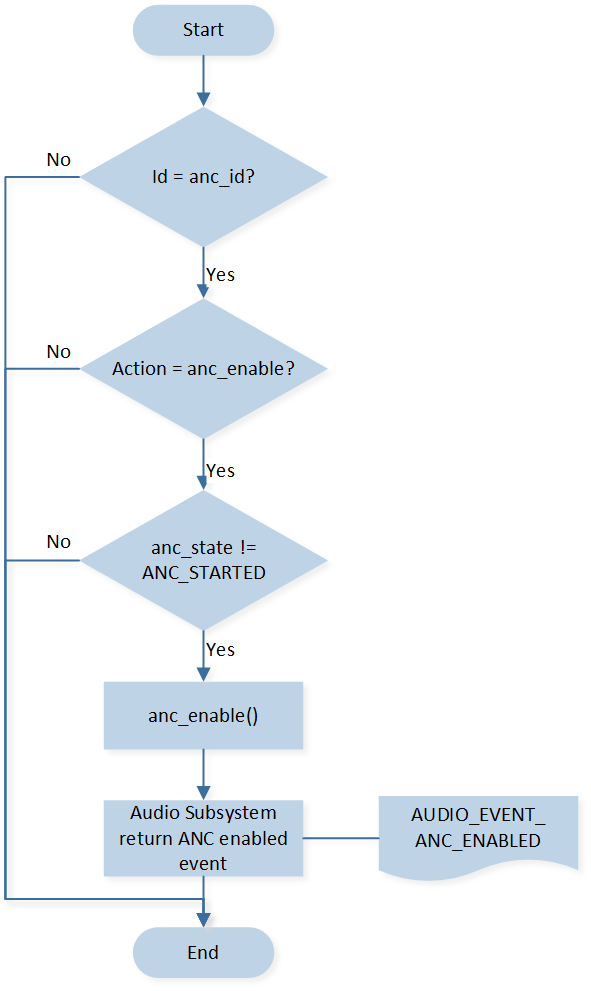
ANC Enable Flow
ANC Disable
The reference API can be found in can be found in anc_disable().
The specific flow of ANC disable flow is shown below.

ANC Disable Flow
ANC Test
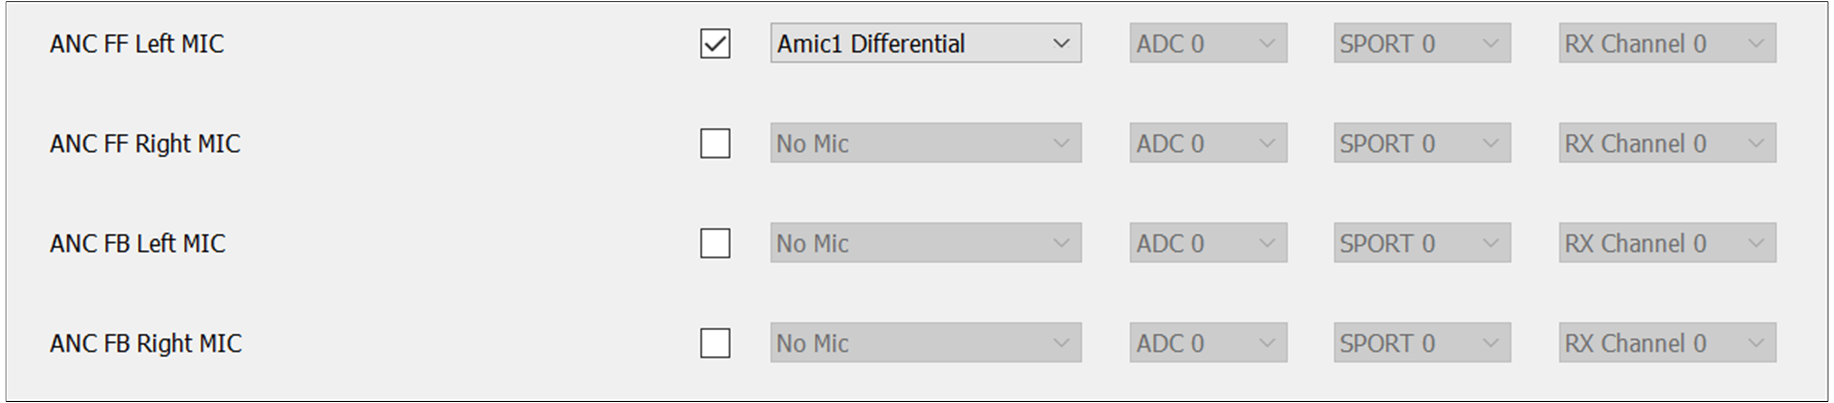
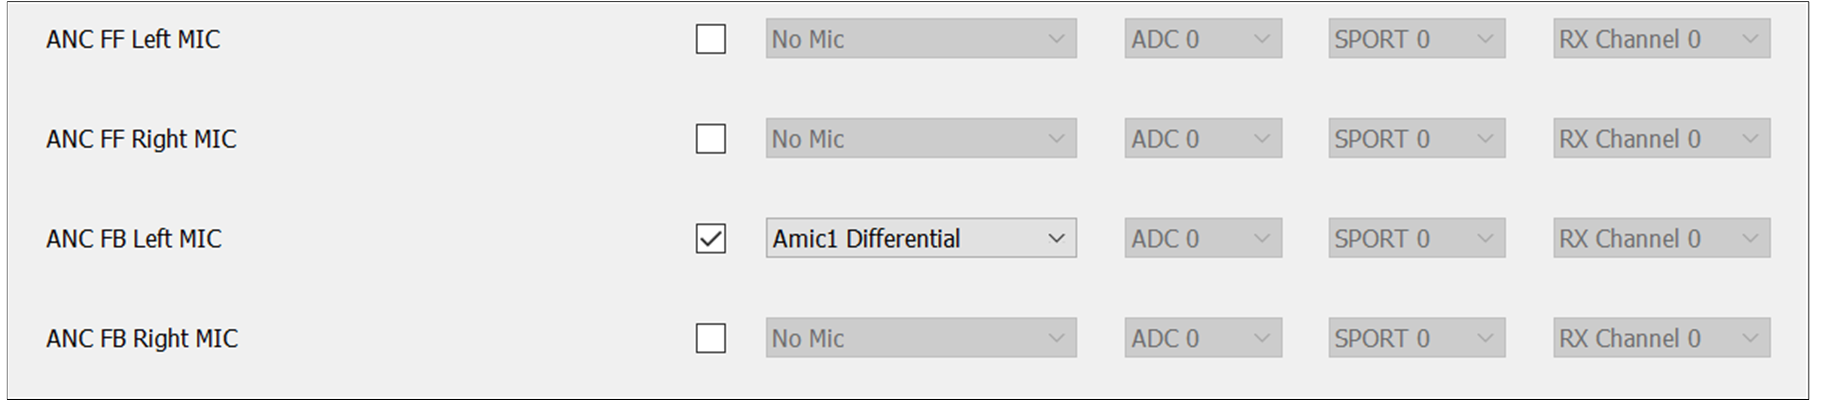
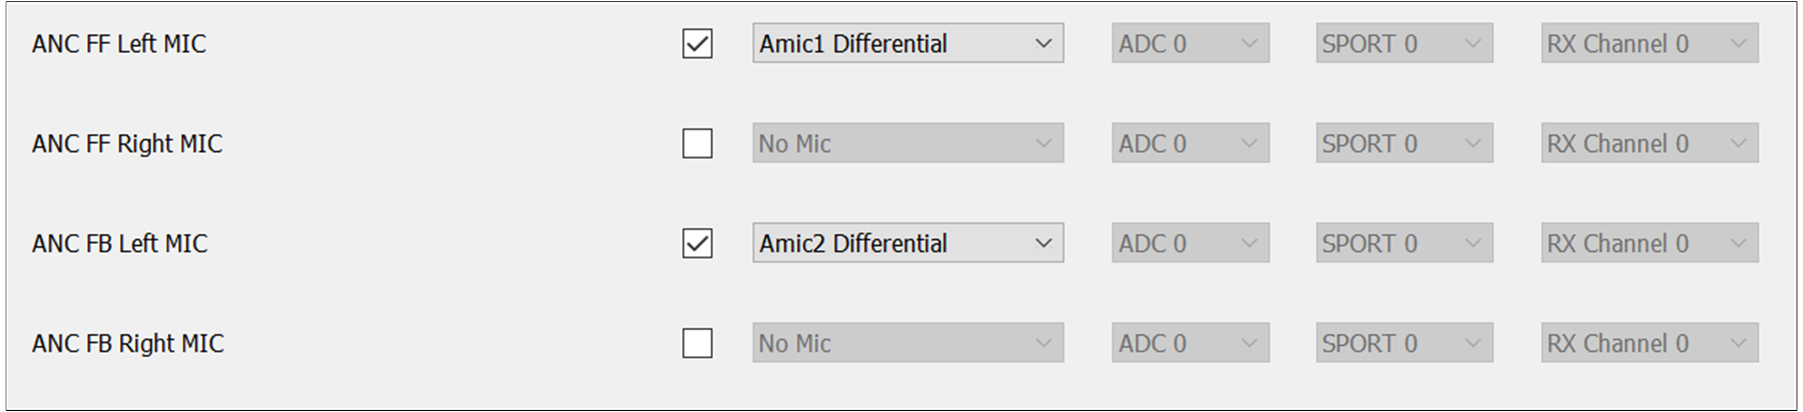
To configure and test the ANC function in the audio demo application, please follow these steps.
-
Choose corresponding ANC type, then configure ANC MIC on the audio route interface.
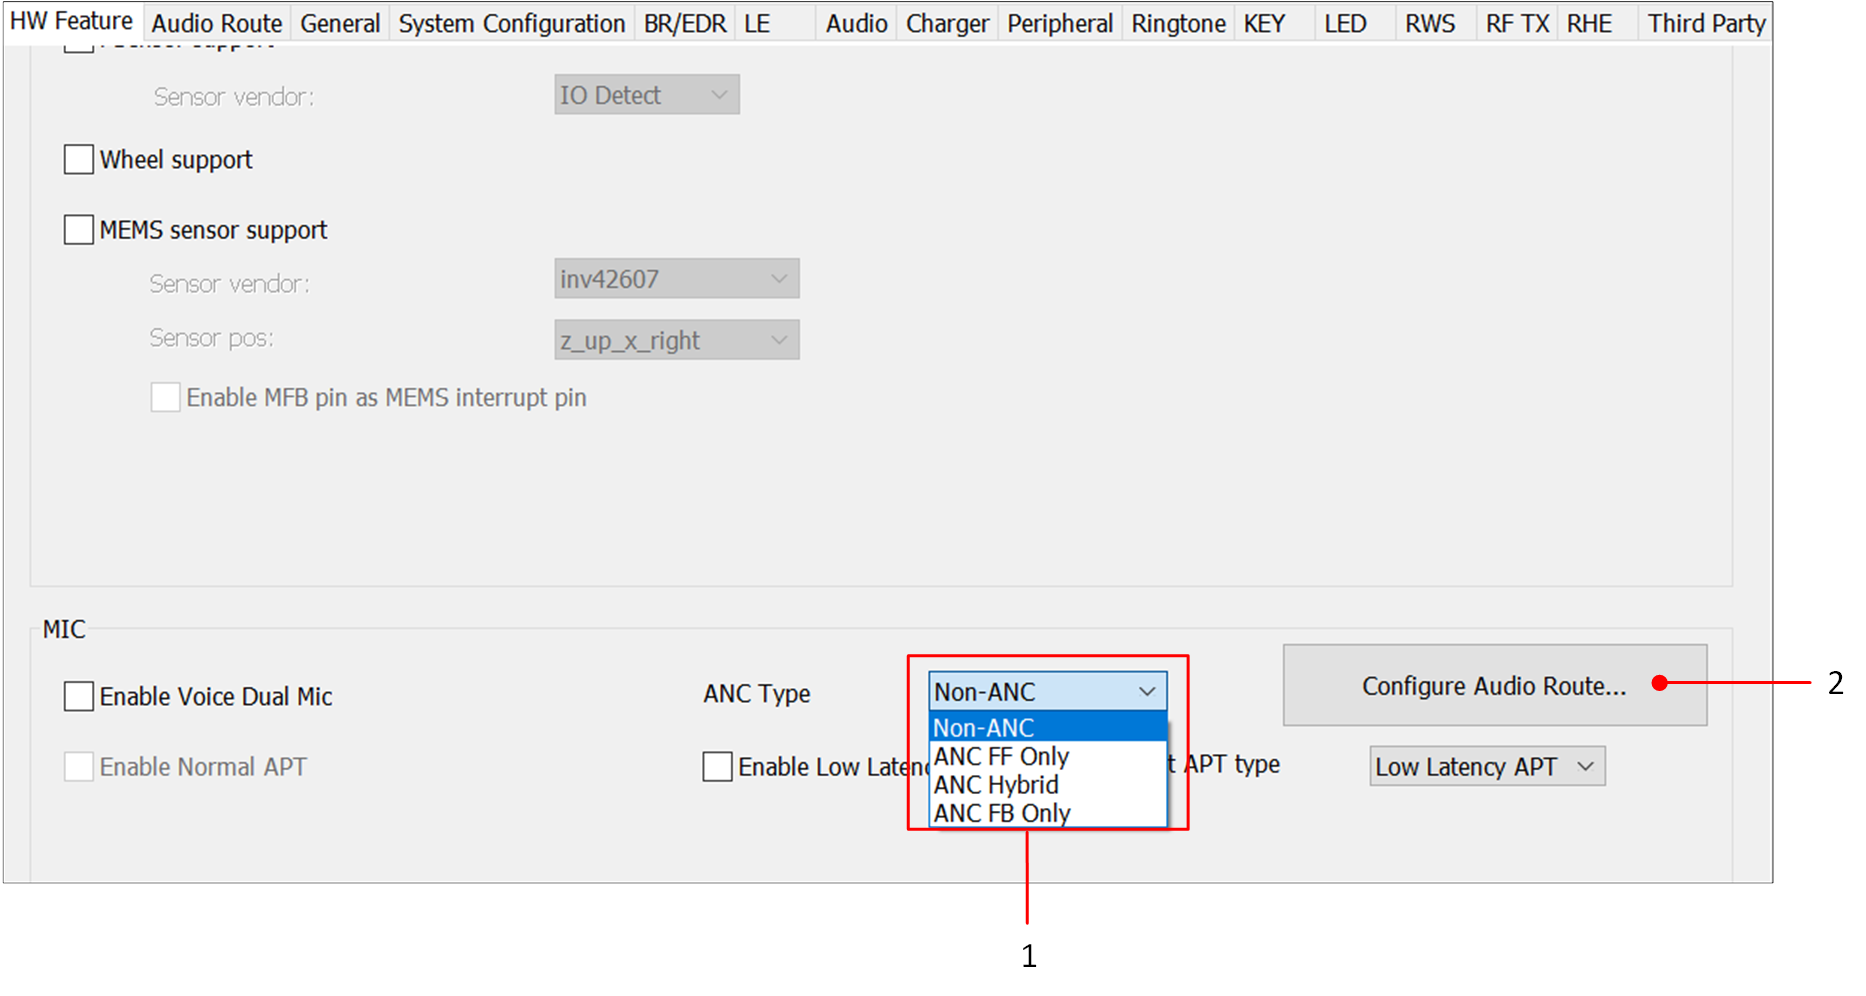
ANC Type Select
Download the audio demo application.
To enable ANC function, you can use command anc enable and the console will print ANC enabled! informing user that ANC is enabled.
The method of disable ANC is similar, you can input command anc disable and the console will print ANC disabled! if ANC is disabled successfully.
Audio Pipe Commands
Audio Pipe commands module is composed of the following parts:
Audio Pipe Create
Audio Pipe Start
Audio Pipe Stop
Audio Pipe Release
Audio Pipe Test
Audio Pipe Create
The reference API can be found in audio_pipe_create().
The specific Audio Pipe create flow is shown below.
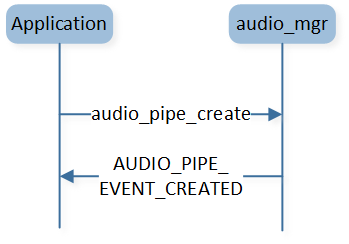
Audio Pipe Create
Input Pipe create command below to create an Audio Pipe node.
pipe create [src_type] [snk_type]
Corresponding codec type can refer to T_AUDIO_FORMAT_TYPE.
The console will show Audio Pipe Created! message if Pipe node is created successfully.
Audio Pipe Start
The reference API can be found in audio_pipe_start().
The specific audio start create flow is shown as follows.
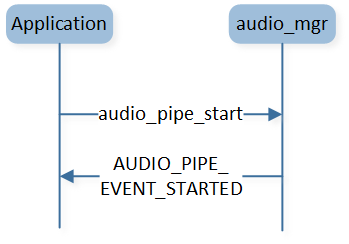
Audio Pipe Start
After successfully creating the Pipe, you can input command pipe start to start Pipe, the console will print Audio Pipe Started! message if Pipe node is started successfully.
Audio Pipe Stop
The reference API can be found in audio_pipe_stop().
The specific Audio Pipe stop flow is shown below.
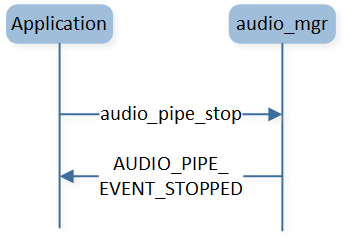
Audio Pipe Stop
To stop an Audio Pipe node, you can input command pipe stop and the console will print Audio Pipe Stopped! informing user that the Audio Pipe node is stopped.
Audio Pipe Release
The reference API can be found in audio_pipe_release().
The specific audio start release flow is shown as follows.
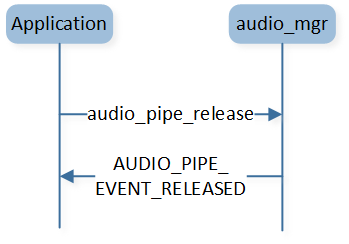
Audio Pipe Release
To release an Audio Pipe node, you can input command pipe release and the console will print Audio Pipe Released! informing user that the Audio Pipe node is released.
Audio Pipe Test
The Audio Pipe test in the audio demo application follows a flow diagram as follows. The whole test flow consists of four distinct steps, and some steps within dashed boxes are optional and may not be required for every test.
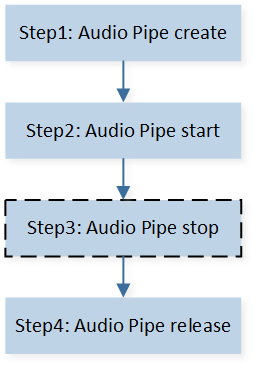
Audio Pipe Test
Audio Track Commands
Audio Track commands module is composed of the following parts:
Audio Track Create
Audio Track Start
Audio Track Stop
Audio Track Pause
Audio Track Restart
Audio Track Release
Audio Track Volume out Set
Audio Track Volume out Mute
Audio Track Volume out Unmute
Audio Track Test
Audio Track Create
The reference API can be found in audio_track_create().

Audio Track Create
If you want to create an Audio Track session, you can use command track create [stream_type] [format_type] [volume_out] [volume_in].
The specific parameters can be filled as follows:
stream_type, refer toT_AUDIO_STREAM_TYPE.format_type, refer toT_AUDIO_FORMAT_TYPE.volume_out, the stream volume out level.volume_in, the stream volume in level.
Creating an Audio Track session successfully, the console will print Audio Track Created!.
Audio Track Start
The reference API can be found in audio_track_start().

Audio Track Start
To start playing the Audio Track session, you can input command track start and the console will print Audio Track Started! message.
Audio Track Stop
The reference API can be found in audio_track_stop().
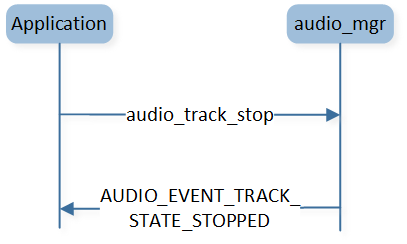
Audio Track Stop
To stop the Audio Track session, you can input command track stop then the console will print Audio Track Stopped! informing user that the Audio Track is stopped.
Audio Track Pause
The reference API can be found in audio_track_pause().

Audio Track Pause
To pause the Audio Track session, you can input command track pause then the console will print Audio Track Paused! informing user that the Audio Track is paused.
Audio Track Restart
The reference API can be found in audio_track_restart().
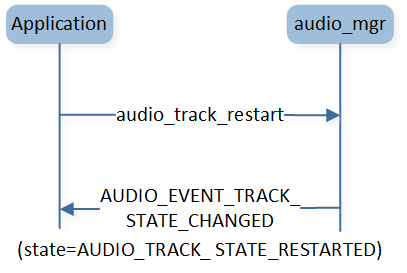
Audio Track Restart
You can choose following command track restart to restart the Audio Track session, and the console will print Audio Track Started!.
Audio Track Release
The reference API can be found in audio_track_release().

Audio Track Release
You can choose following command track release to release the Audio Track session, and the console will print Audio Track Released!.
Audio Track Volume out Set
The reference API can be found in audio_track_volume_out_set().
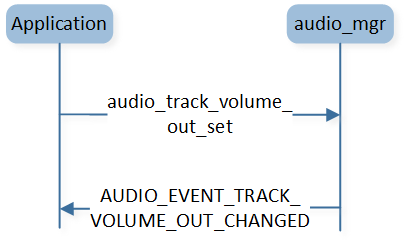
Audio Track Volume out Set
To set current volume out level, the users can input command track vol_out_set [volume_out], then the console will output current volume out level Audio Track Volume out Level:.
Audio Track Volume out Mute
The reference API can be found in audio_track_volume_out_mute().
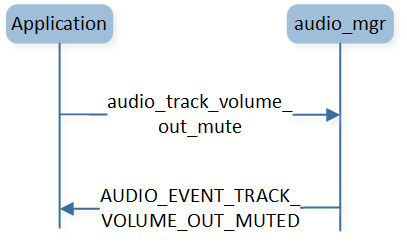
Audio Track Volume out Mute
You can use following command track vol_out_mute to mute the current volume out level, and the output message is Audio Track Volume out Muted!.
Audio Track Volume out Unmute
The reference API can be found in audio_track_volume_out_unmute().
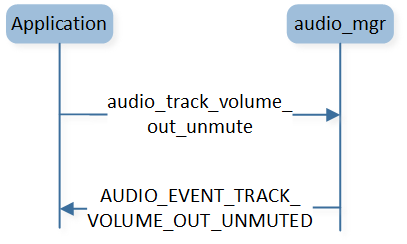
Audio Track Volume out Unmute
You can use following command track vol_out_unmute to unmute the current volume out level, and the console will output Audio Track Volume out Unmuted!.
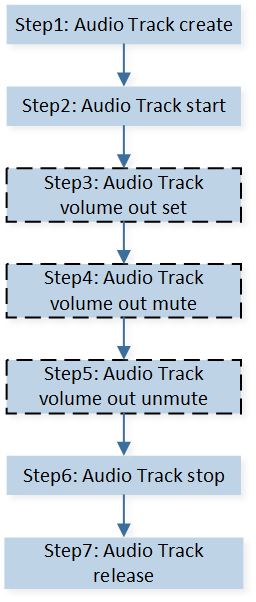
Audio Track Test
The Audio Track test in the audio demo application follows a flow diagram as follows. The test flow
consists of seven distinct steps. Some steps within dashed boxes should be performed specifically
for the stream_type AUDIO_STREAM_TYPE_PLAYBACK.
Audio Track Test
Code Overview
The audio demo application overview will be introduced according to the following parts.
The audio sample project overview will be introduced in the chapter Source Code Directory.
The audio sample project source code overview will be introduced in the chapter Source Code Overview.
Source Code Directory
Project directory:
sdk\board\evb\audio_demo.Source code directory:
sdk\src\sample\audio_demo.
Source files in the sample project are currently categorized into several groups as below.
└── Project: audio_demo
    ├── Include
    ├── Lib                                     includes all binary symbol files that user application is built on
    └── Cmsis                                   includes startup code
           ├── startup_rtl.c
           └── system_rtl.c
    └── APP                                     includes the audio demo application implementation
           ├── console_uart.c
           ├── app_dlps.c
           ├── app_audio_demo_console.c
           :
           ├── app_audio_demo_pipe.c
           └── app_audio_demo_track.c
    └── IO_hal                                  includes the configuration of IO pinmuxes
Source Code Overview
The audio demo application source code overview consists of two parts: Initialization and Audio Callback.
Initialization
The main() function is invoked when the application is powered on or the chip is reset, and it
executes the following initialization functions.
int main(void)
{
   board_init();
   driver_init();
   task_init();
   framework_init();
   app_audio_init();
   app_audio_line_init();
   app_audio_demo_cmd_register();
   os_sched_start();

   return 0;
}
Please refer to audio demo source code for initialization function declaration.
Audio initialization flow:
framework_init()- Contains Bluetooth Manager and Audio Subsystem initialization.app_audio_init()- Initialize audio.app_audio_line_init()- Initialize Audio Line.
Audio Callback
APP can register different callback functions to handle different events.
void app_audio_init(void)
{
   audio_mgr_cback_register(app_audio_policy_cback);
   app_timer_reg_cb(app_audio_policy_timeout_cb, &audio_policy_timer_id);
}
This code snippet demonstrates how to handle received events, such as the need to fill or drain data.
static void app_audio_policy_cback(T_AUDIO_EVENT event_type, void *event_buf, uint16_t buf_len)
{
T_AUDIO_EVENT_PARAM *param = event_buf;
T_AUDIO_STREAM_TYPE stream_type;
switch (event_type)
{
...
case AUDIO_EVENT_TRACK_STATE_CHANGED:
{
if (param->track_state_changed.state == AUDIO_TRACK_STATE_RELEASED)
{
char *temp_buff = "Audio Track Released!\r\n";
console_write((uint8_t *)temp_buff, strlen(temp_buff));
break;
}
if (audio_track_stream_type_get(param->track_state_changed.handle, &stream_type) == false)
{
break;
}
if (param->track_state_changed.state == AUDIO_TRACK_STATE_CREATED)
{
char *temp_buff = "Audio Track Created!\r\n";
console_write((uint8_t *)temp_buff, strlen(temp_buff));
}
else if (param->track_state_changed.state == AUDIO_TRACK_STATE_STARTED ||
param->track_state_changed.state == AUDIO_TRACK_STATE_RESTARTED)
{
char *temp_buff = "Audio Track Started!\r\n";
console_write((uint8_t *)temp_buff, strlen(temp_buff));
if (stream_type == AUDIO_STREAM_TYPE_PLAYBACK)
{
app_start_timer(&timer_idx_sbc_play,
"audio_demo_sbc_play",
audio_policy_timer_id,
APP_TIMER_AUDIO_DEMO_SBC_PLAY,
0,
true,
AUDIO_TRACK_SBC_PLAY_INTERVAL);
}
else if (stream_type == AUDIO_STREAM_TYPE_VOICE)
{
app_start_timer(&timer_idx_msbc_play,
"audio_demo_msbc_play",
audio_policy_timer_id,
APP_TIMER_AUDIO_DEMO_MSBC_PLAY,
0,
false,
AUDIO_TRACK_SBC_PLAY_INTERVAL);
}
else if (stream_type == AUDIO_STREAM_TYPE_RECORD)
{
}
}
else if (param->track_state_changed.state == AUDIO_TRACK_STATE_STOPPED)
{
char *temp_buff = "Audio Track Stopped!\r\n";
console_write((uint8_t *)temp_buff, strlen(temp_buff));
if (stream_type == AUDIO_STREAM_TYPE_PLAYBACK)
{
app_stop_timer(&timer_idx_sbc_play);
}
}
else if (param->track_state_changed.state == AUDIO_TRACK_STATE_PAUSED)
{
char *temp_buff = "Audio Track Paused!\r\n";
console_write((uint8_t *)temp_buff, strlen(temp_buff));
if (stream_type == AUDIO_STREAM_TYPE_PLAYBACK)
{
app_stop_timer(&timer_idx_sbc_play);
}
}
}
break;
case AUDIO_EVENT_TRACK_DATA_IND:
{
T_AUDIO_STREAM_STATUS status;
uint32_t timestamp;
uint16_t seq_num;
uint8_t frame_num;
uint16_t read_len;
uint8_t *buf;
buf = (uint8_t *)malloc(sizeof(uint8_t) + param->track_data_ind.len);
if (buf != NULL)
{
if (!audio_track_read(param->track_data_ind.handle,
×tamp,
&seq_num,
&status,
&frame_num,
buf,
param->track_data_ind.len,
&read_len))
{
APP_PRINT_TRACE0("AUDIO_EVENT_TRACK_DATA_IND: audio_track_read fail");
break;
}
free(buf);
}
if (audio_track_stream_type_get(param->track_data_ind.handle, &stream_type) == true)
{
read_count++;
if (stream_type == AUDIO_STREAM_TYPE_VOICE)
{
if (read_count == 100)
{
char *temp_buff = "Voice Data In!\r\n";
console_write((uint8_t *)temp_buff, strlen(temp_buff));
read_count = 0;
}
app_audio_track_write();
}
else if (stream_type == AUDIO_STREAM_TYPE_RECORD)
{
if (read_count == 100)
{
char *temp_buff = "Record Data In!\r\n";
console_write((uint8_t *)temp_buff, strlen(temp_buff));
read_count = 0;
}
}
}
}
break;
...
case AUDIO_EVENT_TRACK_BUFFER_LOW:
{
if (audio_track_stream_type_get(param->track_state_changed.handle, &stream_type) == true)
{
if (stream_type == AUDIO_STREAM_TYPE_PLAYBACK)
{
app_audio_track_write();
}
}
}
break;
case AUDIO_EVENT_TRACK_BUFFER_HIGH:
{
if (audio_track_stream_type_get(param->track_state_changed.handle, &stream_type) == true)
{
if (stream_type == AUDIO_STREAM_TYPE_PLAYBACK)
{
app_stop_timer(&timer_idx_sbc_play);
}
}
}
break;
default:
break;
}
}
See Also
Please refer to the relevant API Reference: