HoneyGUI Porting
HoneyGUI is a lightweight embedded GUI system optimized for Realtek series chips. This document will guide you through compiling the HoneyGUI library on different Realtek chip platforms, including both Armclang and Armcc compiler environments.
Important Notes
Ensure Keil MDK and CMake are properly installed
Make sure all required dependencies are installed before compilation
If compilation errors occur, verify the chip model specification
- Check compiler path settings:
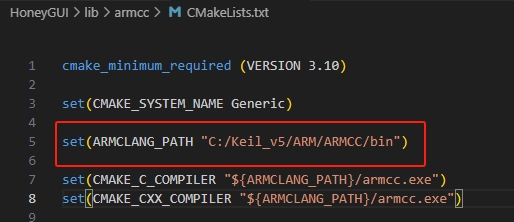
Armcc compiler default path: C:/Keil_v5/ARM/ARMCC/bin
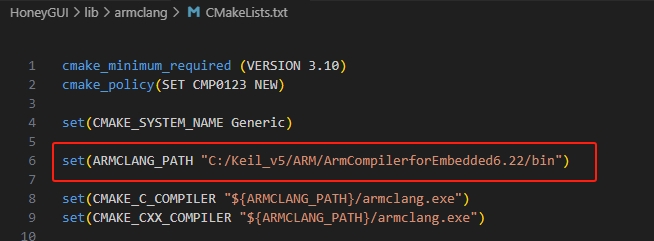
Armclang compiler default path: C:/Keil_v5/ARM/ArmCompilerforEmbedded6.22/bin
If installation paths are different, modify compiler paths in CMake configuration accordingly

Default Path for Armcc

Default Path for Armclang
Build Requirements
CMake 3.15 or above
Keil MDK 5 or above
Windows OS
Armcc Compilation
- Supported chips:
RTL8773E (default)
RTL8763E
RTL8762G
RTL8763D
Build steps:
Open cmd window in the armcc directory of the project path, generate build files using command cmake -G "MinGW Makefiles" -DSOC=RTL8763D -B "./temp":
E:\HoneyGUI\lib\armcc>cmake -G "MinGW Makefiles" -DSOC=RTL8763D -B "./temp"
soc = RTL8763D
-- The C compiler identification is ARMCC 5.6.960
-- The CXX compiler identification is ARMCC 5.6.960
-- Detecting C compiler ABI info
-- Detecting C compiler ABI info - done
...
-- Configuring done (2.7s)
-- Generating done (0.9s)
-- Build files have been written to: E:/HoneyGUI/lib/armcc/temp
Note
If chip model is not specified, RTL8773E will be used by default.
Enter temp directory to build project, using commands cd temp cmake --build .:
E:\HoneyGUI\lib\armcc>cd temp
E:\HoneyGUI\lib\armcc\temp>cmake --build .
[  1%] Building C object CMakeFiles/gui.dir/E_/HoneyGUI/realgui/3rd/cJSON/cJSON.o
[  2%] Building C object CMakeFiles/gui.dir/E_/HoneyGUI/realgui/3rd/nanovg/base/nanovg.o
...
[100%] Linking C static library gui.lib
[100%] Built target gui
Install resources, using command cmake --build . --target install:
E:\HoneyGUI\lib\armcc\temp>cmake --build . --target install
[100%] Built target gui
Install the project...
-- Install configuration: ""
-- Installing: E:/HoneyGUI/lib/armcc/install/lib/gui.lib
...
- Generated resource file locations:
Header files: E:/HoneyGUI/lib/armcc/install/include
Library file: E:/HoneyGUI/lib/armcc/install/lib/gui.lib
Armclang Compilation
- Supported chips:
RTL8762G (default)
RTL8762D
RTL8773E
RTL8773G
Build steps:
Open cmd window in the armclang directory of the project path, generate build files using command cmake -G "MinGW Makefiles" -DSOC=RTL8762G -B "./temp":
E:\HoneyGUI\lib\armclang>cmake -G "MinGW Makefiles" -DSOC=RTL8762G -B "./temp"
soc = RTL8762G
-- The C compiler identification is ARMClang
-- The CXX compiler identification is ARMClang
...
-- Configuring done
-- Generating done
-- Build files have been written to: E:/HoneyGUI/lib/armclang/temp
Note
If chip model is not specified, RTL8762G will be used by default.
Enter temp directory to build project, using commands cd temp cmake --build .:
E:\HoneyGUI\lib\armclang>cd temp
E:\HoneyGUI\lib\armclang\temp>cmake --build .
[  0%] Building C object CMakeFiles/gui.dir/...
...
[100%] Built target gui
Install resources, using command cmake --build . --target install:
E:\HoneyGUI\lib\armclang\temp>cmake --build . --target install
[100%] Built target gui
Install the project...
-- Installing: E:/HoneyGUI/lib/armclang/install/lib/gui.lib
...
- Generated resource file locations:
Header files: E:/HoneyGUI/lib/armclang/install/include
Library file: E:/HoneyGUI/lib/armclang/install/lib/gui.lib
Project Porting Example
This example demonstrates porting to the RTL8773GWP dashboard project.
-
Copy the compiled resource files to the project directory:
Copy header files (.h) to the project resource directory
Copy library file (gui.lib) to the project resource directory
-
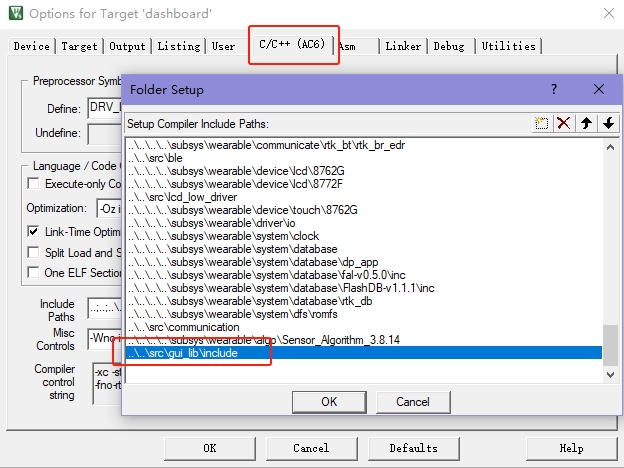
Project Configuration:
Add header file path in Keil MDK
Link gui.lib in project settings

Link Header Files to Project Directory

Link Library File to Project Directory