lwIP
lwIP is a small independent implementation of the TCP/IP protocol suite.
The focus of the lwIP TCP/IP implementation is to reduce the RAM usage while still having a full scale TCP. This making lwIP suitable for use in embedded systems with tens of kilobytes of free RAM and room for around 40 kilobytes of code ROM.
This document describes how to test and integrade lwIP as a library file. RTK has portted BNEP's netif. In the future, there maybe more netifs support for RTL87x3 series ICs.
Requirements
A typical application takes about 60 KB of RAM and 200KB of Flash. It is possible to cut down the RAM and Flash consumption if disabled some features for TCP/IP stack.
The sample supports the following development kits:
Hardware Platforms |
Board Name |
Build Target |
|---|---|---|
RTL87x3E EVB |
|
|
RTL87x3EP HDK |
RTL87x3EP EVB |
|
RTL87x3D HDK |
RTL87x3D EVB |
|
This sample project can be found under board\evb\lwip_lib in SDK folder structure.
Features
This project supports ARP, IPv4, ICMP, DHCP, UDP, TCP. RAW APIs and sockets APIs are available. User can porting other protocols and features by themselves.
Project Overview
This section introduces source code structure, user configurations and building for lwIP.
Source Code Structure
The source code of project located in sdk\src\sample\lwip_lib, it is almost all the same as original lwIP projects.
This section describes the project directory and project structure.
Top files directories are as follows:
Project directory:
\sdk\board\evb\lwip_lib.Project source code directory:
\sdk\src\sample\lwip_lib.
Source files in Keil project are currently categorized into several groups as below:
The
apiis corresponding tosrc\apiof lwIP project. It includes APIs for application layer.The
coreis corresponding tosrc\coreof lwIP project. It is core source code for TCP/IP.The
netifis corresponding tosrc\netifof lwIP project. It includes all default netif in lwIP.-
The
archis implemented by Realtek. It includes:bnepif.c: A Realtek implemented netif card for BNEP protocol. Realtek may add other netif card in the future.sys_arch.c: Realtek implemented OS layer.
The
appis transplanted APP source code from lwIP.
There is a diagram for directory structure:
└── Project: lwip_rtl87x3e
   ├── api
   ├── core
   ├── netif
   └── arch
      ├── bnepif.c
      └── sys_arch.c
   └── apps
      ├── http_client.c
      └── ping.c
Configurations
Default configurations are located in include\lwip\opt.h. It is recommanded to add custom configurations in src\arch\lwipopts.h to override the default ones in include\lwip\opt.h.
More information is introduced in https://lwip.nongnu.org/2_1_x/group__lwip__opts.html.
Building
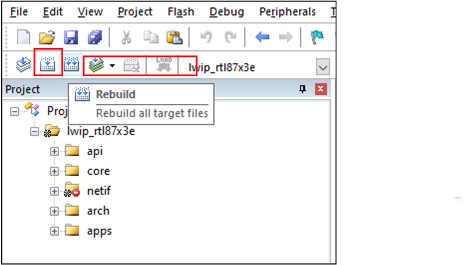
Take the project lwip_lib.uvprojx and target lwip_rtl87x3e as an example, to build and run the sample with the Keil development environment, follow the steps listed below:
Open
lwip_lib.uvprojx.Choose the build target
lwip_rtl87x3e.-
Build the target.
Building and Downloading
After a successful build, the library file
lwip.libwill be generated in the directorysdk\bin\rtl87x3e. This file is a library for other APP projects. For sockets API usage,lwip\sockets.handlwip.libshould be added as PAN application's BR/EDR PAN.
Integrade a New Netif
If user want to transplant a new netif for a specific MAC layer, there are brief steps:
Define a global variable of
netifstructure.-
Call
netif_addto add netif to lwIP, there are the explanation of parameters:netif: The pointer of new netif structure.ipaddr: The IP address for this netif. Normally, it will 0 because almost all application allocated dynamic IP address by DHCP.netmask: It is subnet mask, which normally is 0 with DHCP.gw: It is gateway, which normally is 0 with DHCP.init: It is the netif initialization function. This function mainly populatesname,hwaddr,mtu,flags,output,linkoutput.input: It uploads the packets to the whole TCP/IP of lwIP.
Call
netif_set_defaultto set this netif as default netif which forwards packets to outer network.Implement netif's down and up function and call them properly.
There is an example code as following in bnepif.c:
void bnepif_init(uint8_t local_addr[6], BNEPIF_INPUT output)
{
   memcpy(bnepif.local_addr, local_addr, 6);
   bnepif.output = output;
   ip4_addr_t fsl_netif0_ipaddr = {}, fsl_netif0_netmask = {}, fsl_netif0_gw = {};
   // when using DHCP Client, no address
   IP4_ADDR(&fsl_netif0_ipaddr, 0U, 0U, 0U, 0U);
   IP4_ADDR(&fsl_netif0_netmask, 0U, 0U, 0U, 0U);
   IP4_ADDR(&fsl_netif0_gw, 0U, 0U, 0U, 0U);

   // input function differs for sys vs nosys
   netif_input_fn input_function;
#if NO_SYS
   input_function = ethernet_input;
#else
   input_function = tcpip_input;
#endif

   LWIP_PLATFORM_DIAG(("bnepif_init: netif %p ", &bnepif.netif));

   netif_add(&bnepif.netif, &fsl_netif0_ipaddr, &fsl_netif0_netmask, &fsl_netif0_gw, NULL,
            bnep_netif_init, input_function);
   netif_set_default(&bnepif.netif);
}
Protocols Verification and Debugging
This section helps user to check the whole lwIP stack. It takes BNEP netif and BR/EDR PAN profile as example.
MAC & PHY
Please make sure that MAC address is set correctly, because some kinds of IP addresses are calculated on MAC address.
- Taking bnepif as an example:
outputofbnepif_initwhich serves MAC output.local_addrofbnepif_initwhich will be the MAC address.remote_addrofbnepif_netif_upwhich identifies the target Bluetooth device such as a phone as AP.
DHCP
DHCP is an APP layer protocol, but it operates before ARP. ARP protocol provides MAC and IP mappings thus it should have IP address first.
The example is depicted as follow. For the request from EVB (DHCP client), the Option 2 asked DHCP Server about subnet mask, router, broadcast address and dns server.
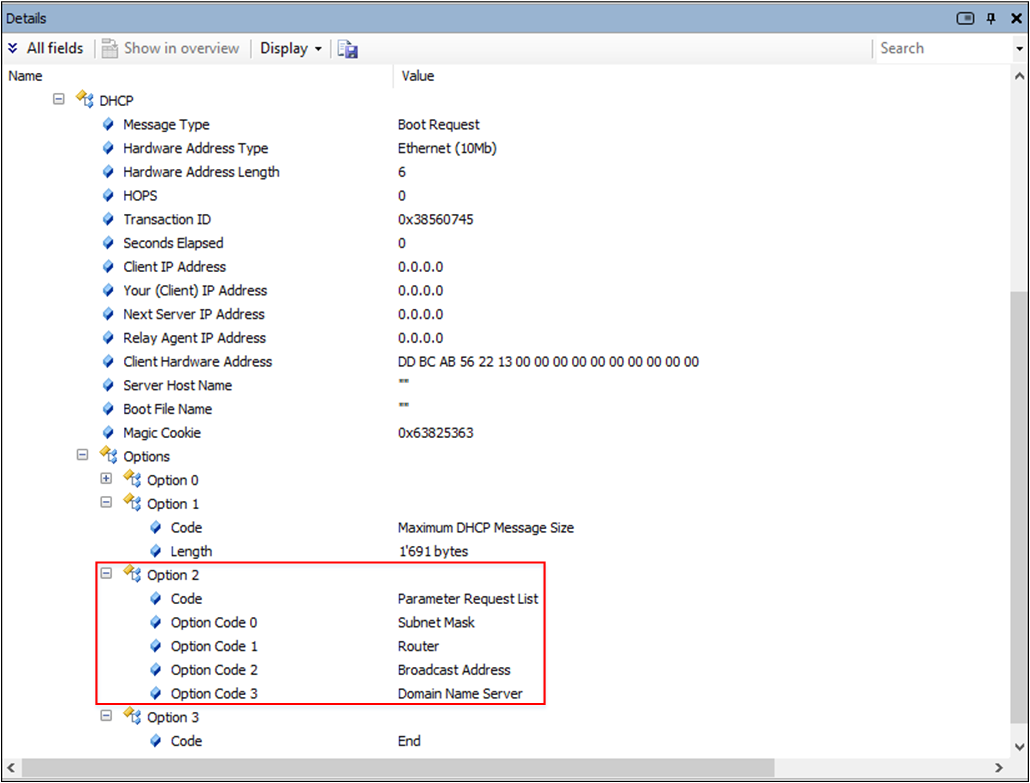
DHCP Request
The response gives router and dns server as 192.168.44.1. It is the IP address of the device that acts as an NAP in BR/EDR PAN.
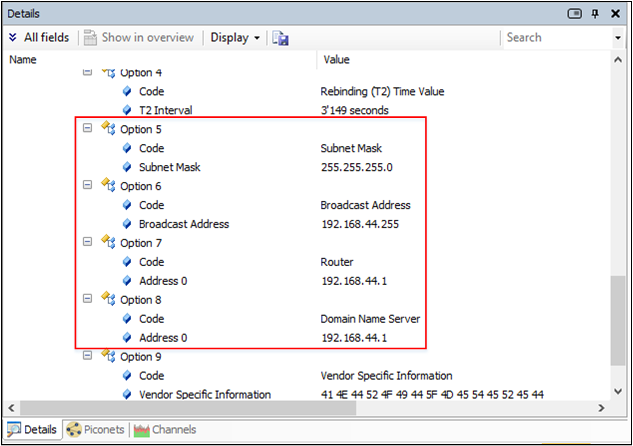
DHCP Response
ARP
ARP protocol provides mapping between MAC address and IP address. Please check that EVB request target host's MAC address.
The following pictures demonstrates an ARP transaction for 192.168.44.1 (gateway) to access host outside the local network. On this condition, router just acts as a router.
If accessing to a host on local network, router actually acts as a switch, EVB will directly ask for the host's MAC address.
C0 A8 2C 01 means the target IP address is 192.168.44.1.
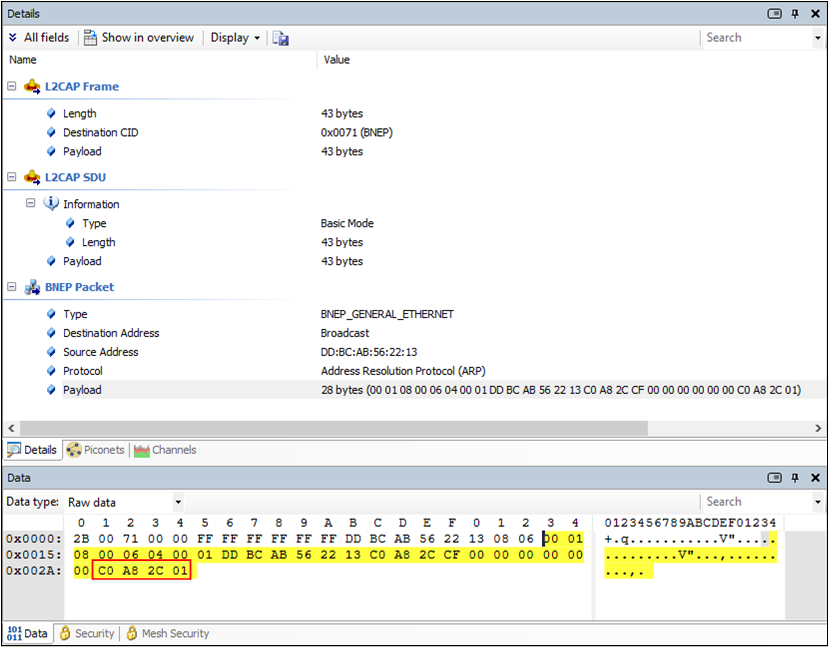
ARP Request
DD BC AB 56 22 13 is target MAC address.
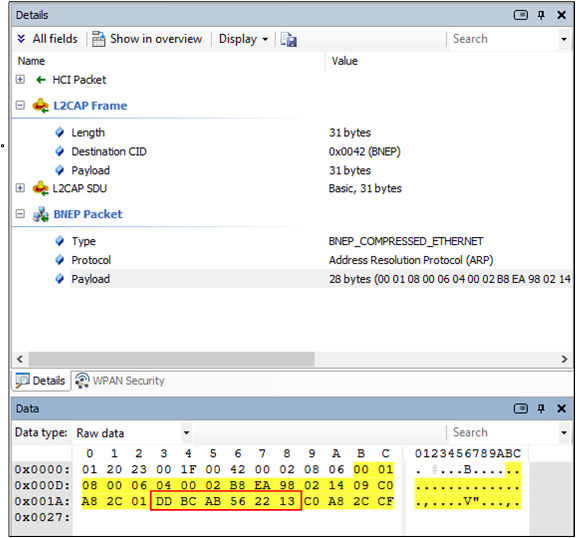
ARP Response
ICMP
ICMP is a network layer protocol, but it will be demonstrated in PING section.
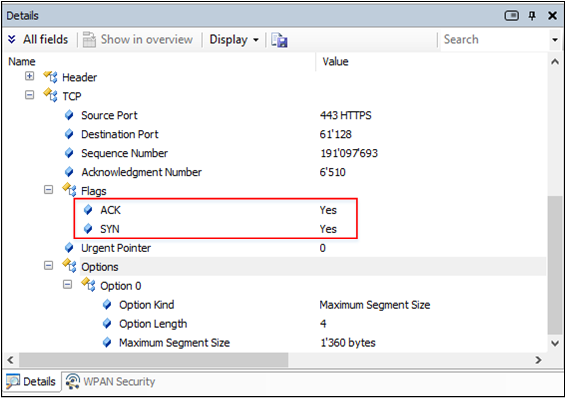
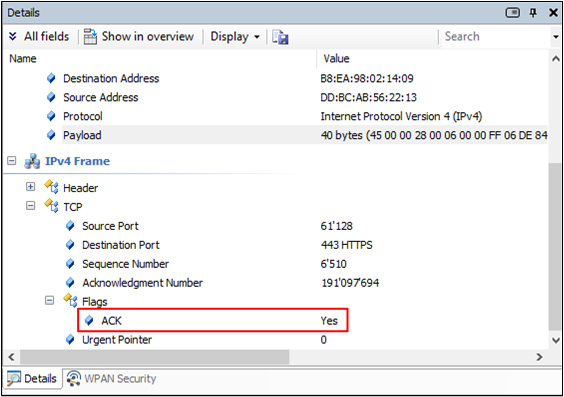
TCP
TCP is a three-step protocol:

PING
lwIP's ping source code is located in lwip\contrib\apps\ping and BR/EDR PAN project reuse it in it's own ping.c.
Ping.c in BR/EDR PAN demo simply calls ping_init and ping_send_now to start pinging. Note that in default condition, it was only able to ping IPv4 address. Unless user replace IP_ADDR_ANY with IP6_ADDR_ANY in raw_bind(ping_pcb, IP_ADDR_ANY);.
HTTP
The following cmd can start a HTTP server on port 8080 in python. Note that windows IIS service may occupy 80 port, so this server should bind to 8080. HTTP client should set the same port number.
D:\>python -m http.server 8080
Serving HTTP on :: port 8080 (http://[::]:8080/) ...
User should access this server by IP address directly because there is no DNS entry for this host. Request URL can be a related path of a file in current directory.
lwIP's HTTP client template is located in lwip\src\apps\http and BR/EDR PAN project reuse it in it's own http.c. The core functionality for http.c is to call httpc_get_file get data from a website with a IPv4 address, while user could replace httpc_get_file with httpc_get_file_dns with a domain name. If user want to modify HTTP request header, please go to HTTPC_REQ_11_XXX macros in http_client.c.
HTTPS
There is a python script to start a python HTTPS server with a self-signed certificate:
from http.server import HTTPServer, SimpleHTTPRequestHandler
import ssl

host = '192.168.44.17'
port = 443

cert_path = 'server.crt'
key_path = 'server.key'
context = ssl.SSLContext(ssl.PROTOCOL_TLS_SERVER)
context.load_cert_chain(certfile=cert_path, keyfile=key_path)

httpd = HTTPServer((host, port), SimpleHTTPRequestHandler)
httpd.socket = context.wrap_socket(httpd.socket, server_side=True)

httpd.serve_forever()
Cert_path and key_path is a certificate-key pair for HTTPS server when certificate verifying. The host should be the address of the network card. The port could be changed as will.
HTTPS client demo is in https_demo.c of bt_pan_demo project.
The main flow is depicted as follow:
Calling
mbedtls_ssl_init,mbedtls_ssl_config_initto clear SSL/TLS layer's data structure.Calling
mbedtls_ssl_config_defaultsto set default values for SSL/TLS data structure.Calling
mbedtls_entropy_init,mbedtls_ctr_drbg_init,mbedtls_ctr_drbg_seedandmbedtls_ssl_conf_rngto set random number for SSL/TLS.Calling
mbedtls_x509_crt_parse_der,mbedtls_ssl_conf_ca_chainto set root trust certificates for server verification; callingmbedtls_ssl_conf_authmodeto set the verification mode.mbedtls_ssl_setupto setup SSL/TLS session.mbedtls_ssl_set_hostnameto set the website wanted and it will be checked when the server verification.Connecting to website with sockets.
mbedtls_ssl_set_bioto set network layer APIs for SSL/TLS.mbedtls_ssl_handshaketo perform handshake procedures.mbedtls_ssl_writeto write HTTPS requests.mbedtls_ssl_close_notifycloses the SSL/TLS layer connection.
Note
Set
WEB_SERVERto the host name of server.Call
mbedtls_x509_crt_parse_derormbedtls_x509_crt_parseto load server's root certificates.
Heap Memory Leak Debugging
lwIP is a complicated project, so it is necessary to fimiliar with it's heap memory infrastructure.
lwIP has it own heap API mem_xxx, which is equipped with sanity and overflow check mechanism. Sanity will go through the heap-block list for each running of all malloc APIs and it is enabled by MEM_SANITY_CHECK. OVERFLOW_CHECK sets sentinel pattern (0xcdcdcdcd) at boundary of heap-block and check it for each running of all malloc APIs. It is enabled by MEM_OVERFLOW_CHECK.
When debugging with lwIP heap memory, user should find the point of assert (implemented as a hardfault is best). Then user should gather the clues as much as possible to solve memory leak.
An example is as follows:
00580001 is a block header while four cdcdcdcd together form a sentinel.

lwIP Overflow Check