LE Central Extended Scan
The LE Central extended scan sample demonstrates how to develop many different Central role based applications.
Supported features:
Extended scan for advertising packets on the primary advertising channel (LE 1M PHY or LE Coded PHY).
Scan for a duration or period scan.
Can initiate connection and become a Central role in the link on LE 1M PHY, LE 2M PHY or LE Coded PHY.
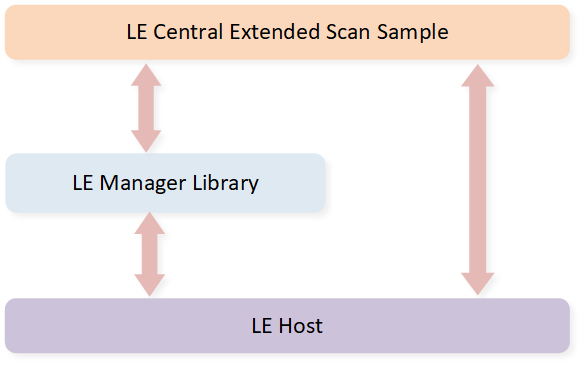
LE Central Extended Scan Project Architecture
The sample uses LE Host and LE manager module. The above figure shows the relationships between several modules in the sample.
More information about these modules can be found in the LE Host and LE Manager documentation.
Overview
Central device with LE Advertising Extensions can communicate with device using legacy advertising PDUs or extended advertising PDUs and set duration of scan.
If Central device uses LE Advertising Extensions, compatibility with peer device of different Bluetooth versions is shown as below:
Bluetooth 5 Feature |
Bluetooth 4.0 |
Bluetooth 4.1 |
Bluetooth 4.2 |
Bluetooth 5.0 (Not Use LE Advertising Extensions) |
Bluetooth 5.0 (Use LE Advertising Extensions) |
|---|---|---|---|---|---|
LE Advertising Extensions |
Y |
Y |
Y |
Y |
Y |
Requirements
The sample supports the following development kits:
Hardware Platforms |
Board Name |
Build Target |
|---|---|---|
RTL87x3E EVB |
|
|
RTL87x3D HDK |
RTL87x3D EVB |
|
Note
To purchase EVB, please visit https://www.realmcu.com/en/Home/Shop.
This sample project can be found under board\evb\ble_bt5_central in SDK folder structure.
Developers can choose the project according to the Board Name and choose the Build Target according to the flash map.
When built for an xxx_4M_xxx build target, the sample is configured to compile and run with a 4M flash map.
When built for an xxx_8M_xxx build target, the sample is configured to compile and run with an 8M flash map.
When built for an xxx_16M_xxx build target, the sample is configured to compile and run with a 16M flash map.
To quickly set up the development environment, please refer to the detailed instructions provided in Quick Start.
Wiring
Please refer to EVB Interfaces and Modules in Quick Start.
The sample requires support for user command interface. For specific wiring instructions, please refer to Data UART Connection in User Command Interface.
Configurations
Configurable Items
All contents that can be configured for the sample are in
src\sample\ble_bt5_central\app_bt5_central_flags.h ,
developers can configure according to actual needs.
/** @brief Configure coding scheme of LE Coded PHY: 0 - S = 2, 1 - S = 8 */
 #define LE_CODED_PHY_S8            0
 /** @brief Configure APP LE link number */
 #define APP_MAX_LINKS  1
 /** @brief Configure APP to recombine advertising data: 0 - Disable recombine advertising data feature, 1 - recombine advertising data */
 #define APP_RECOMBINE_ADV_DATA  0
Developers can use APP_RECOMBINE_ADV_DATA to configure the sample to recombine advertising data. The procedure of recombining advertising data is introduced in Recombine Advertising Data of Code Overview.
Generating System Configuration File
Developers shall configure the following items through MCUConfig Tool:
Configurable Item |
Value |
|---|---|
LE link number |
≥ |
LE master link number |
≥ |
For more information about MCUConfig Tool Configuration, please refer to MCUConfig Tool.
Building and Downloading
Take the project rtl87x3e_ble_bt5_central.uvprojx
and target ble_bt5_central_4M_bank0 as an example, to build and run the sample with Keil development environment, follow the steps listed below:
Open
rtl87x3e_ble_bt5_central.uvprojx.-
Choose the build target
ble_bt5_central_4M_bank0.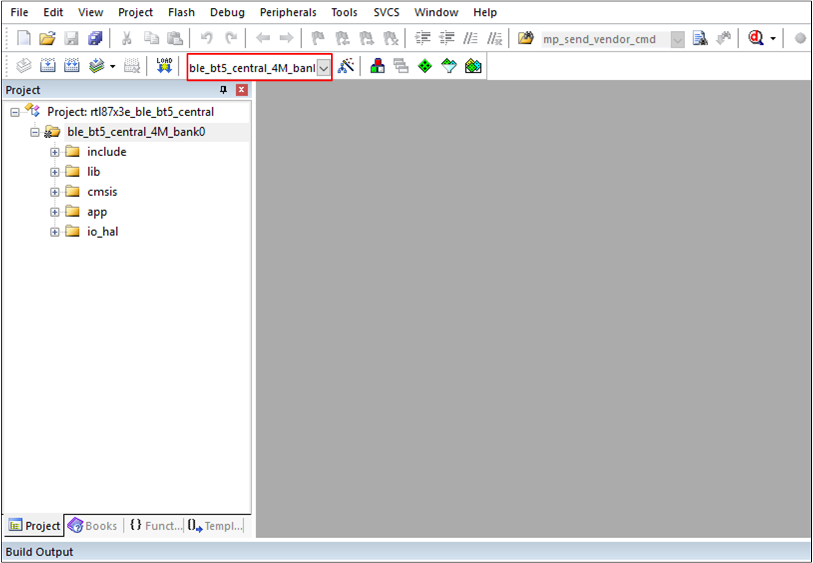
Choose LE Central Extended Scan Project Build Target
-
Build the target.
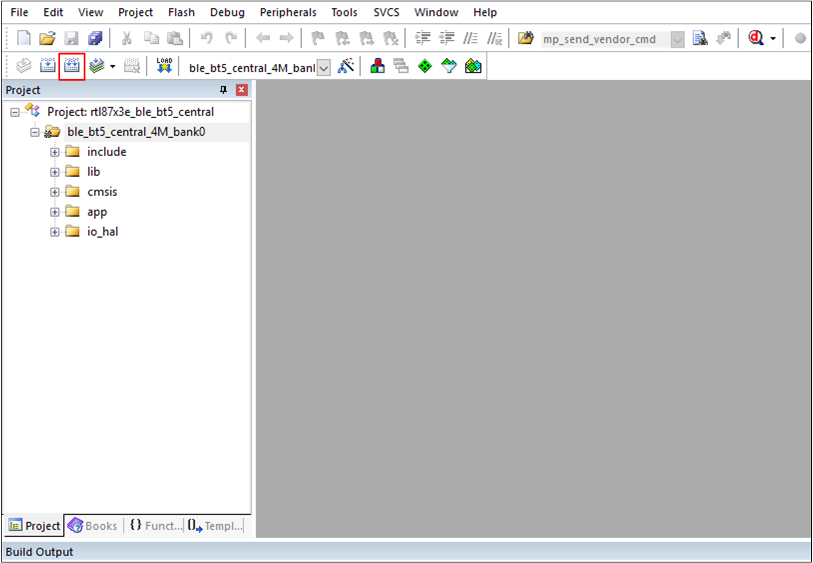
Build LE Central Extended Scan Project
After a successful build, the APP bin file
ble_bt5_central_bank0_MP-v0.0.0.0-xxx.binwill be generated in the directorybin\rtl87x3e\flash_4M_dualbank\bank0. Download APP bin into EVB.
Press reset button in EVB and it will start running.
Experimental Verification
After downloading the sample bin to the EVB, developers can test it by using another kit that is running the LE Peripheral Extended ADV sample.
Testing with Another Kit
Prepare two development boards named DUT and Tester respectively. Developers can capture SoC logs using Debug Analyzer.
Primary Advertising Channel is LE 1M PHY, Secondary Advertising Channel is LE 2M PHY
Preparation Phase
Use MCUConfig Tool set DUT address to [00:11:22:33:44:92], and then build the LE Central extended scan sample, and download images into DUT.
Firstly, set macro definition
ADVERTISING_PHYtoAPP_PRIMARY_1M_SECONDARY_2M. Use MCUConfig Tool set Tester address to [00:11:22:33:44:91], and then build the LE Peripheral extended advertising sample, and download images into Tester. For more information, please refer to Building and Downloading in LE Peripheral Extended ADV.
For details about how to change the Bluetooth Address, please refer to MCUConfig Tool.
Testing Phase
-
Press the reset button on Tester and Tester will start sending connectable undirected advertising events.
If the advertisement is successfully enabled, the following Debug Analyzer log will be printed. If developers don't see the following log, it means that the advertisement failed to start. Please check if the software and hardware environment is configured correctly.
[APP] !**app_peripheral_adv_callback: BLE_EXT_ADV_MGR_ADV_ENABLED
-
Press the reset button on DUT and developers can enter the user command in the Serial Port Assistant Tool on PC.
If the DUT successfully boots up and the Serial Port Assistant Tool configuration is successful, developers will see the following log. The Serial Port Assistant Tool will display the local address. If developers don't see the following log, please check if the software and hardware environment is configured correctly.
local bd addr: xx:xx:xx:xx:xx:xx
One link test flow is shown as below:
One Link Test Flow with 1M and 2M PHY Step
DUT User Command
Description
DUT Log
1
escan 2 5
DUT scan mode is set to 2, continue scanning until duration has expired. Scan PHYs is set to 5 (LE 1M PHY and LE Coded PHY). Application starts extended scanning for duration, and examines information on nearby LE device whose primary advertising channel is LE 1M PHY or LE Coded PHY.
Serial Port Assistant Tool shows:
GAP scan start
2
stopescan
DUT stops extended scanning.
Serial Port Assistant Tool shows:
GAP scan stop
3
showdev
Show scan device list.
Serial Port Assistant Tool shows:
dev list
RemoteBd[8] = [00:11:22:33:44:91]
4
condev 8 x001
Scan connectable advertising events on LE 1M PHY, and initiate connection. Secondary advertising channel is LE 2M PHY, and then TX PHY type and RX PHY type are LE 2M PHY.
Serial Port Assistant Tool shows:
Connected success conn_id 0, tx_phy 2, rx_phy 2
5
showcon
Show connection information.
Serial Port Assistant Tool shows:
conn_id 0 state 0x00000002 role 1
RemoteBd = [00:11:22:33:44:91] type = 0
active link num 1,  idle link num 0
6
disc 0
Disconnect with Tester.
Serial Port Assistant Tool shows:
Disconnect conn_id 0, dis_cause 0x00000116
7
condev 8 x001
Reconnect with Tester.
Serial Port Assistant Tool shows:
Connected success conn_id 0, tx_phy 2, rx_phy 2
In the above Step 2, when the macro definition
APP_RECOMBINE_ADV_DATAis set to 1, the first advertising report from Tester is shown as below. The advertising report indicates that Tester sends connectable undirected advertising with extended advertising PDUs, and the primary advertising PHY is LE 1M PHY, the secondary advertising PHY is LE 2M PHY. Since there is more data to come, the DUT starts recombination and waits for more data.[APP] !**app_scan_cb: BLE_SCAN_REPORT event_type 0x1, bd_addr 00::11::22::33::44::00, addr_type 0, rssi -45, data status 0x1 [APP] !**app_handle_ext_adv_report: Old ext_adv_data->flag is 0, data status is 0x1 [APP] !**app_handle_ext_adv_report:First Data from bd_addr 00::11::22::33::44::00, data length is 229, and waiting more data [APP] !**app_handle_ext_adv_report: New ext_adv_data->flag is 1
The last advertising report from Tester is shown below. The advertising report indicates that the data is complete. DUT completes the recombination, and the length of advertising data received from Tester is 245 bytes.
[APP] !**app_scan_cb: BLE_SCAN_REPORT event_type 0x1, bd_addr 00::11::22::33::44::00, addr_type 0, rssi -45, data status 0x0

[APP] !**app_handle_ext_adv_report: Old ext_adv_data->flag is 1, data status is 0x0

[APP] !**app_handle_ext_adv_report: Data from bd_addr 00::11::22::33::44::00 is complete, event type is 0x1, total data length is 245

[APP] !**app_handle_ext_adv_report: First five datas are 0x2, 0x1, 0x5, 0x13, 0x9

[APP] !**app_handle_ext_adv_report: Last five datas are 0xd5, 0xd6, 0xd7, 0xd8, 0xd9

[APP] !**app_handle_ext_adv_report: New ext_adv_data->flag is 0
Primary Advertising Channel is LE Coded PHY, Secondary Advertising Channel is LE Coded PHY
Preparation Phase
Use MCUConfig Tool to set DUT address to [00:11:22:33:44:92], and then build the LE Central extended scan sample, and download images into DUT.
Firstly, set macro definition
ADVERTISING_PHYtoAPP_PRIMARY_CODED_SECONDARY_CODED. Use MCUConfig Tool to set Tester address to [00:11:22:33:44:91], and then build the LE Peripheral extended advertising sample, and download images into Tester. For more information, please refer to Building and Downloading in LE Peripheral Extended ADV.
For details about how to change the Bluetooth Address, please refer to MCUConfig Tool.
Testing Phase
-
Press the reset button on Tester and Tester will start sending connectable undirected advertising events.
If the advertisement is successfully enabled, the following Debug Analyzer log will be printed. If developers don't see the following log, it means that the advertisement failed to start. Please check if the software and hardware environment is configured correctly.
[APP] !**app_peripheral_adv_callback: BLE_EXT_ADV_MGR_ADV_ENABLED
-
Press the reset button on DUT and developers can enter the user command in the Serial Port Assistant Tool in PC.
If the DUT successfully boots up and the Serial Port Assistant Tool configuration is successful, developers will see the following log. The Serial Port Assistant Tool will display the local address. If developers don't see the following log, please check if the software and hardware environment is configured correctly.
local bd addr: xx:xx:xx:xx:xx:xx
One link test flow is shown below:
One Link Test Flow with Coded PHY Step
DUT User Command
Description
DUT Log
1
escan 0 5
DUT scan mode is set to 0, continue scanning until scanning is disabled. Scan PHYs is set to 5 (LE 1M PHY and class LE Coded PHY). Start extended scanning and viewing information on LE device nearby whose primary advertising channel is LE 1M PHY or LE Coded PHY.
Serial Port Assistant Tool shows:
GAP scan start
2
stopescan
DUT stops extended scanning.
Serial Port Assistant Tool shows:
GAP scan stop
3
showdev
Show scan device list.
Serial Port Assistant Tool shows:
dev list
RemoteBd[3] = [47:78:39:48:32:1a]
RemoteBd[4] = [00:11:22:33:44:91]
4
condev 4 x100
Scan connectable advertising events on LE Coded PHY, and initiate connection. Secondary advertising channel is LE Coded PHY, and then TX PHY type and RX PHY type are LE Coded PHY.
Serial Port Assistant Tool shows:
Connected success conn_id 0, tx_phy 3, rx_phy 3
5
showcon
Show connection information.
Serial Port Assistant Tool shows:
ShowCon conn_id 0 state 0x00000002 role 1
RemoteBd = [00:11:22:33:44:91] type = 0
active link num 1, idle link num 0
6
dis 0
Disconnect with Tester.
Serial Port Assistant Tool shows:
Disconnect conn_id 0, dis_cause 0x00000116
7
condev 4 x100
Reconnect with Tester.
Serial Port Assistant Tool shows:
Connected success conn_id 0, tx_phy 3, rx_phy 3
In Step 2, when the macro definition
APP_RECOMBINE_ADV_DATAis set to 1, the first advertising report from Tester is shown as below. The advertising report indicates that Tester sends connectable undirected advertising with extended advertising PDUs, and the primary advertising PHY is LE Coded PHY, the secondary advertising PHY is LE Coded PHY. Since there is more data to come, DUT starts the recombination and waits for more data.[APP] !**app_scan_cb: BLE_SCAN_REPORT event_type 0x1, bd_addr 00::11::22::33::44::00, addr_type 0, rssi -41, data status 0x1 [APP] !**app_handle_ext_adv_report: Old ext_adv_data->flag is 0, data status is 0x1 [APP] !**app_handle_ext_adv_report:First Data from bd_addr 00::11::22::33::44::00, data length is 229, and waiting more data [APP] !**app_handle_ext_adv_report: New ext_adv_data->flag is 1
The last advertising report from Tester is shown as below. The advertising report indicates that the data is complete. The DUT completes the recombination, the length of advertising data received from Tester is 245 bytes:
[APP] !**app_scan_cb: BLE_SCAN_REPORT event_type 0x1, bd_addr 00::11::22::33::44::00, addr_type 0, rssi -41, data status 0x0

[APP] !**app_handle_ext_adv_report: Old ext_adv_data->flag is 1, data status is 0x0
Code Overview
This chapter will be introduced according to the following several parts:
The directories of the project and source code files will be introduced in chapter Source Code Directory.
The main function will be introduced in chapter Initialization.
The configurable GAP parameters of this sample will be introduced in chapter GAP Parameter Initialization.
The GAP message handler of this sample will be introduced in chapter GAP Message Handler.
The GAP callback handler of this sample will be introduced in chapter GAP Callback Handler.
The procedure of start scanning will be introduced in chapter Start Scanning.
The procedure of recombining advertising data will be introduced in chapter Recombine Advertising Data.
Source Code Directory
Project directory:
board\evb\ble_bt5_central.Source code directory:
src\sample\ble_bt5_central.
Source files in the sample project are currently categorized into several groups as below:
└── ble_bt5_central_4M_bank0
    ├── include                  ROM UUID header files. Developers do not need to modify it.
    ├── lib                      Includes all binary symbol files that user application is built on.
        ├── gap_utils.lib
        ├── ROM.lib
        ├── upperstack_4M.lib
        ├── hal_utils.lib
        ├── ble_mgr.lib
        └── sysm.lib
    ├── cmsis                    The cmsis source code. Developers do not need to modify it.
    ├── app                      The sample source code.
        ├── data_uart.c
        ├── user_cmd_parse.c
        ├── app_bt5_central_main.c         Main entry
        ├── app_bt5_central_gap.c          LE GAP initialize and message handler
        ├── app_bt5_central_link_mgr.c     LE link utility
        ├── app_bt5_central_user_cmd.c     User Command
        ├── app_bt5_central_scan.c         Scan manager
        └── app_bt5_central_task.c         APP task
    └── io_hal
Initialization
main() function is invoked when the EVB is powered on and the chip boots up,
and it performs the following initialization functions:
int main(void)
{
   board_init();
   le_gap_init(APP_MAX_LINKS);
   gap_lib_init();
   app_gap_init();
   pwr_mgr_init();
   task_init();
   os_sched_start();

   return 0;
 }
le_gap_init()function is used to initialize GAP and configure link number.app_gap_init()function is used to initialize the GAP Parameters.
GAP Parameter Initialization
The app_gap_init() function is used to initialize the GAP parameters.
Developers can easily customize the sample by modifying the following parameter values.
void app_gap_init(void)
{
   /* Device name and device appearance */
   uint8_t  device_name[GAP_DEVICE_NAME_LEN] = "BLE_CENTRAL";
   uint16_t appearance = GAP_GATT_APPEARANCE_UNKNOWN;
   le_set_gap_param(GAP_PARAM_DEVICE_NAME, GAP_DEVICE_NAME_LEN, device_name);
   le_set_gap_param(GAP_PARAM_APPEARANCE, sizeof(appearance), &appearance);

   ......

   /* Allocate memory for recombining advertising data */
#if APP_RECOMBINE_ADV_DATA
   ext_adv_data = os_mem_zalloc(RAM_TYPE_DATA_ON, sizeof(T_EXT_ADV_DATA));
   ext_adv_data->flag = false;
#endif

   le_set_gap_param(GAP_PARAM_DEFAULT_DATA_LEN_MAX_TX_OCTETS, sizeof(max_data_len_tx_oct),
                   &max_data_len_tx_oct);
   le_set_gap_param(GAP_PARAM_DEFAULT_DATA_LEN_MAX_TX_TIME, sizeof(max_data_len_tx_time),
                   &max_data_len_tx_time);

   /* Setup the GAP Bond Manager */
   gap_set_param(GAP_PARAM_BOND_PAIRING_MODE, sizeof(auth_pair_mode), &auth_pair_mode);
   gap_set_param(GAP_PARAM_BOND_AUTHEN_REQUIREMENTS_FLAGS, sizeof(auth_flags), &auth_flags);
   gap_set_param(GAP_PARAM_BOND_IO_CAPABILITIES, sizeof(auth_io_cap), &auth_io_cap);
   gap_set_param(GAP_PARAM_BOND_OOB_ENABLED, sizeof(auth_oob), &auth_oob);
   le_bond_set_param(GAP_PARAM_BOND_FIXED_PASSKEY, sizeof(auth_fix_passkey), &auth_fix_passkey);
   le_bond_set_param(GAP_PARAM_BOND_FIXED_PASSKEY_ENABLE, sizeof(auth_use_fix_passkey),
                     &auth_use_fix_passkey);
   le_bond_set_param(GAP_PARAM_BOND_SEC_REQ_REQUIREMENT, sizeof(auth_sec_req_flags),
                     &auth_sec_req_flags);

   /* Use LE Advertising Extensions */
   uint8_t use_extended = true;
   le_set_gap_param(GAP_PARAM_USE_EXTENDED_ADV, sizeof(use_extended), &use_extended);

   /* Register GAP message callback */
   le_register_app_cb(app_gap_callback);

   /* LE manager module initialization */
   app_gap_ble_mgr_init();
}
-
Configure device name with the parameter
GAP_PARAM_DEVICE_NAME.Configure appearance with the parameter
GAP_PARAM_APPEARANCE.Configure APP to use LE Advertising Extensions with the parameter
GAP_PARAM_USE_EXTENDED_ADV.
-
gap_set_param()andle_bond_set_param()Initialize GAP pairing parameters.
-
Register the GAP message callback function
app_gap_callback(), and all GAP callback messages will be handled in this callback. -
app_gap_ble_mgr_init()Initialize the LE manager library. More information on LE manager library initialization can be found in the chapter LE Manager Initialization of LE Manager.
void app_gap_ble_mgr_init(void) { BLE_MGR_PARAMS param = {0}; param.ble_scan.enable = true; ble_mgr_init(¶m); }
More information on LE GAP initialization and startup flow can be found in the chapter GAP Parameters Initialization of LE Host.
GAP Message Handler
app_handle_gap_msg() function is invoked whenever a GAP message is received from the Bluetooth Host.
More information on GAP messages can be found in the chapter Bluetooth LE GAP Message of LE Host.
When the sample handles GAP message, the ble_mgr_handle_gap_msg() shall be called to handle the GAP message.
void app_handle_gap_msg(T_IO_MSG *p_gap_msg)
{
    T_LE_GAP_MSG gap_msg;
    uint8_t conn_id;
    memcpy(&gap_msg, &p_gap_msg->u.param, sizeof(p_gap_msg->u.param));
    ble_mgr_handle_gap_msg(p_gap_msg->subtype, &gap_msg);
    APP_PRINT_TRACE1("app_handle_gap_msg: subtype %d", p_gap_msg->subtype);
    switch (p_gap_msg->subtype)
    {
    case GAP_MSG_LE_CONN_STATE_CHANGE:
        {
            app_handle_conn_state_evt(gap_msg.msg_data.gap_conn_state_change.conn_id,
                                      (T_GAP_CONN_STATE)gap_msg.msg_data.gap_conn_state_change.new_state,
                                      gap_msg.msg_data.gap_conn_state_change.disc_cause);
        }
        break;

    ......

    default:
        break;
    }
}
GAP Callback Handler
app_gap_callback() function is used to handle GAP callback messages.
More information on GAP callback can be found in the chapter Bluetooth LE GAP Callback of LE Host.
When the sample handles GAP callback, the ble_mgr_handle_gap_cb() shall be called to handle the callback message.
T_APP_RESULT app_gap_callback(uint8_t cb_type, void *p_cb_data)
{
   T_APP_RESULT result = APP_RESULT_SUCCESS;
   T_LE_CB_DATA *p_data = (T_LE_CB_DATA *)p_cb_data;
   ble_mgr_handle_gap_cb(cb_type, p_cb_data);

   ......
}
Start Scanning
ble_scan_start() function is used to start scanning.
If the device starts extended scanning and receives advertising data or scan response data, the LE manager library will use BLE_SCAN_REPORT message to inform sample. Sample code is listed as below:
void app_scan_start(uint16_t scan_interval, uint16_t scan_window, uint8_t scan_phy)
{
BLE_SCAN_PARAM param;
BLE_SCAN_FILTER scan_filter;
APP_PRINT_TRACE2("app_scan_start: scan_interval 0x%x, scan_window 0x%x",
scan_interval, scan_window);
memset(¶m, 0, sizeof(param));
memset(&scan_filter, 0, sizeof(scan_filter));
param.scan_param_1m.scan_type = GAP_SCAN_MODE_ACTIVE;
param.scan_param_1m.scan_interval = scan_interval;
param.scan_param_1m.scan_window = scan_window;
#if LE_CODED_PHY_SUPPORT
param.scan_param_coded.scan_type = GAP_SCAN_MODE_ACTIVE;
param.scan_param_coded.scan_interval = scan_interval;
param.scan_param_coded.scan_window = scan_window;
#endif
param.ext_filter_duplicate = GAP_SCAN_FILTER_DUPLICATE_DISABLE;
param.ext_filter_policy = GAP_SCAN_FILTER_ANY;
param.own_addr_type = GAP_LOCAL_ADDR_LE_PUBLIC;
param.phys = scan_phy;
scan_filter.filter_flags = BLE_SCAN_FILTER_NONE;
ble_scan_start(&app_scan_hdl, app_scan_cb, ¶m, &scan_filter);
}
static void app_scan_cb(BLE_SCAN_EVT evt, BLE_SCAN_EVT_DATA *data)
{
uint8_t scan_state = ble_scan_get_cur_state();
switch (evt)
{
case BLE_SCAN_REPORT:
APP_PRINT_INFO6("app_scan_cb: BLE_SCAN_REPORT event_type 0x%x, bd_addr %s, addr_type %d, rssi %d, data_len %d, data_status 0x%x",
data->report->event_type,
TRACE_BDADDR(data->report->bd_addr),
data->report->addr_type,
data->report->rssi,
data->report->data_len,
data->report->data_status);
if (data->report->rssi > (0 - 60))
{
APP_PRINT_INFO2("app_scan_cb: add device into device list rssi %d, bd_addr %b",
data->report->rssi, TRACE_BDADDR(data->report->bd_addr));
link_mgr_add_device(data->report->bd_addr, data->report->addr_type);
}
#if APP_RECOMBINE_ADV_DATA
if (!(data->report->event_type & GAP_EXT_ADV_REPORT_BIT_USE_LEGACY_ADV))
{
/* If the advertisement uses extended advertising PDUs, recombine advertising data. */
app_handle_ext_adv_report(data->report->event_type,
data->report->data_status, data->report->bd_addr,
data->report->data_len, data->report->p_data);
}
#endif
break;
default:
break;
}
}
Recombine Advertising Data
Recombination of advertising data implements a recombination for one advertising data or scan response data, and recombined advertising data is deleted before next recombination. The process of recombination can be used as a framework for recombining multi-advertising data at a time.
Memory for recombining advertising data is allocated in GAP Initialization:
void app_le_gap_init(void)
{
   ......
   /* Allocate memory for recombining advertising data */
#if APP_RECOMBINE_ADV_DATA
   ext_adv_data = os_mem_zalloc(RAM_TYPE_DATA_ON, sizeof(T_EXT_ADV_DATA));
   ext_adv_data->flag = false;
#endif
   ......
}
//Message data structure is T_EXT_ADV_DATA.
typedef struct
{
   uint8_t      bd_addr[GAP_BD_ADDR_LEN];           /**< remote BD */
   bool         flag;                               /**< flag of recombining advertising data, true: recombining, false: waiting extended advertising PDUs */
   uint16_t     event_type;                         /**< advertising event type */
   uint16_t     data_len;                           /**< length of recombined advertising data */
   uint8_t      p_data[APP_MAX_EXT_ADV_TOTAL_LEN];  /**< recombined advertising data */
} T_EXT_ADV_DATA;
LE Peripheral extended ADV sample handles BLE_SCAN_REPORT message which indicates the receipt of the advertising data or scan response data in app_scan_cb().
If the extended advertising report indicates using extended advertising PDU, the sample calls app_handle_ext_adv_report() function to recombine advertising data.
The following sections describe the recombination of advertising data.
GAP_EXT_ADV_EVT_DATA_STATUS_COMPLETE
GAP_EXT_ADV_EVT_DATA_STATUS_COMPLETE indicates that the data is complete. The process of advertising report with data status GAP_EXT_ADV_EVT_DATA_STATUS_COMPLETE is shown below:
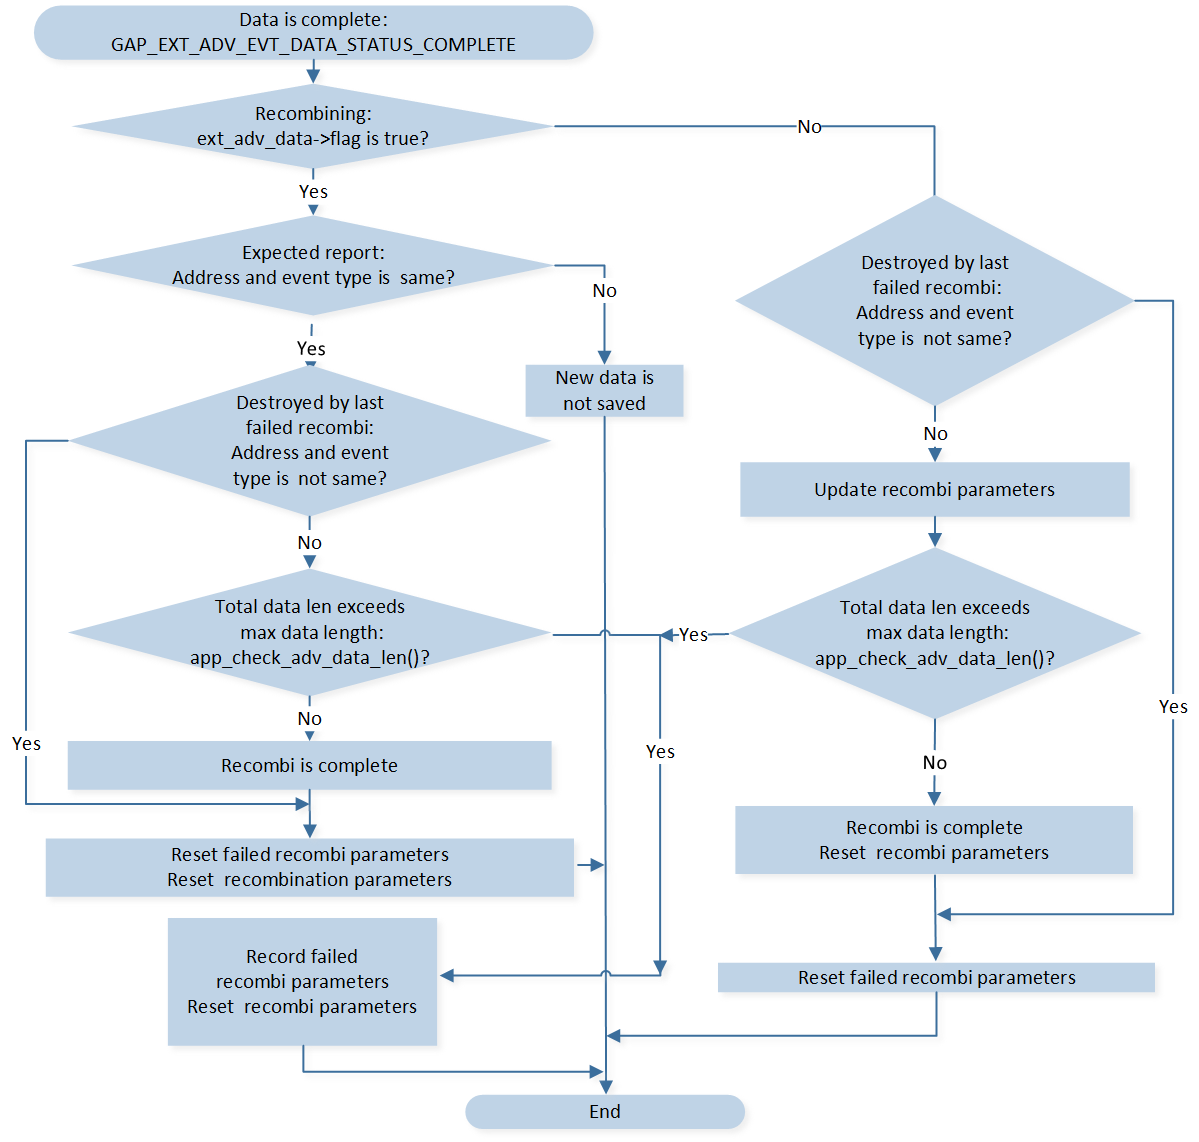
Recombination Flow (GAP_EXT_ADV_EVT_DATA_STATUS_COMPLETE)
GAP_EXT_ADV_EVT_DATA_STATUS_MORE
GAP_EXT_ADV_EVT_DATA_STATUS_MORE indicates that the data is incomplete, and more data will be received. The process of advertising report with data status GAP_EXT_ADV_EVT_DATA_STATUS_MORE is shown below:
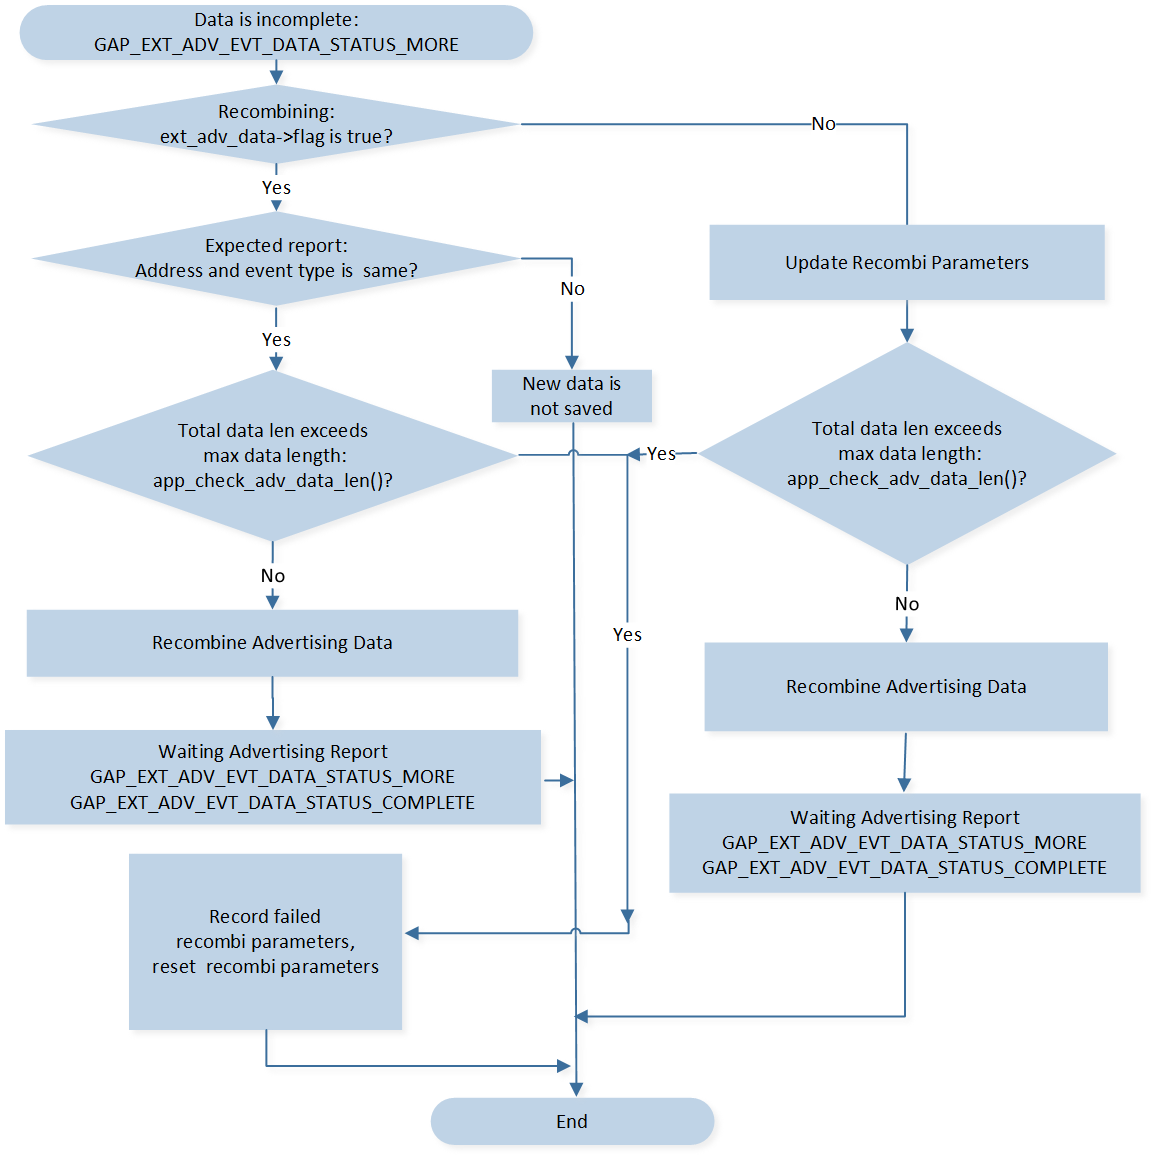
Recombination Flow (GAP_EXT_ADV_EVT_DATA_STATUS_MORE)
After processing the advertising report with GAP_EXT_ADV_EVT_DATA_STATUS_MORE, the sample waits for advertising report to complete the recombination.
The last advertising report with GAP_EXT_ADV_EVT_DATA_STATUS_COMPLETE indicates that the recombination process is completed.
GAP_EXT_ADV_EVT_DATA_STATUS_TRUNCATED
GAP_EXT_ADV_EVT_DATA_STATUS_TRUNCATED indicates that the data is incomplete, data is truncated, and no more data is to come.
If an advertising report with truncated data is the expected report, the sample will terminate the current recombination by resetting recombination parameters and will wait for an advertising report to start the next recombination.
See Also
Please refer to the relevant API Reference: